

A watermark is a recognizable mark, symbol, or pattern that is intentionally added to a document, image, or video. Its purpose is to indicate ownership or authenticity and deter unauthorized use or duplication. Watermarks are often translucent and placed on top of the content, allowing the underlying material to be visible but with the added mark. In simple terms, Sometimes, you might see the words Remove Watermark online. This means someone wants to get rid of the special mark or remove the watermark added by the creator. But remember, it’s important to respect the creator’s work and not remove the watermark without their permission. They do this so no one uses their pictures without asking or giving them credit. It’s like asking permission. The special marks on the pictures remind everyone who made them and make it harder for people to use them without permission. Wondering How to Remove Watermarks from Photo? (With Tips)? We’ll explore some helpful tips in the following discussion
How to Remove Watermark from Photos: Step-by-Step Guide
Watermarks can occasionally detract from the visual appeal and professionalism of a photograph. Luckily, there are several effective methods for removing watermarks from photos with the assistance of Adobe Photoshop. In this extensive guide, we will take a deep dive into various techniques to erase watermarks and rejuvenate your images’ original quality.
Some of the tools we’ll explore include the
- Crop tool,
- Content-Aware Fill Tool, and the
- Clone Stamp and Healing Brush.
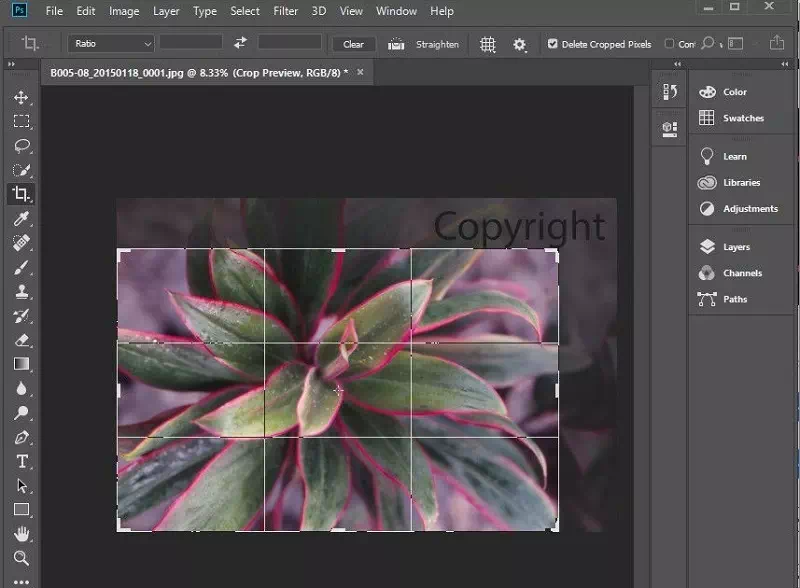
Method 1: Crop Tool
The Crop tool is a quick and easy solution to remove watermark, especially when the watermark is discreetly placed. However, it may not be suitable for complex watermarks located in central areas of the image, as it can result in loss of essential data and image quality.
Step 1:
First, open Photo in Adobe Photoshop. You can do this by dragging and dropping the images onto the Photoshop interface or selecting File > Open from the top left corner.
Step 2:
To crop an image, click on the Crop tool from the toolbar. To remove the watermark, simply drag the handles on the corners of the crop frame to remove the unwanted area. Alternatively, you can draw your structure by clicking anywhere on the photo. Review the cropped image and save it as a new file.
Method 2: Using Content-Aware Fill
Adobe Photoshop has the Content-Aware Fill feature for a highly efficient and accurate approach. If you’re wondering How to Remove Watermark from Photo? (With Tips), consider this method for handling more intricate watermarks without compromising the overall image quality.
Follow these steps to remove watermark Photoshop using Content-Aware Fill:
Step 1:
Open your image in Adobe Photoshop and choose the area around the watermark using tools like the Pen, Quick Selection, or Magic Wand.
Step 2:
Make this selected area a bit bigger by adding some background pixels. Go to Select > Modify > Expand and increase the selection size by a few pixels.
Step 3:
Now, we’ll use the Content-Aware Fill tool to remove the watermark. Go to Edit > Fill, select Content-Aware, and click OK.
Step 4:
Deselect everything by pressing Ctrl+D on your keyboard. Even though the watermark area might be filled with the background color, you may still see a faint outline.
Step 5:
To remove any remaining traces, use the Clone Stamp Tool. Choose it from the toolbar (shortcut: “S”), sample nearby pixels by holding Alt, and paint over the outline until it’s gone.
Method 3: Clone Stamp and Healing Brush
In Adobe Photoshop, you have powerful tools like Clone Stamp and Healing Brush to get rid of watermarks, but they’re a bit advanced. If you’re looking for guidance on How to Remove Watermark from Photo? (With Tips), consider exploring these advanced tools with caution, and we’ll provide some useful tips to help you navigate the process effectively.
Step 1:
First, open your photo in Photoshop. Then, find and select the Clone Stamp tool from the toolbar. Adjust the brush size and hardness as needed for your work.
Step 2:
Move the cursor to where the watermark is.
Press and hold the Alt key to copy pixels from a nearby area.
Click to use those copied pixels to cover the watermark.
Step 3:
After copying, let go of the Alt key and start painting over the watermark using the Clone Stamp tool.
Step 4:
You can make your image look even better with the Healing Brush tool. Right-click on the image to choose the brush size and hardness that suits your task.
Step 5:
To copy pixels from near the watermark, hold down the Alt key while you work. Start by clicking gently to heal and completely remove the watermark.
Removing Watermarks using Photo Director:

Photo Director is a powerful and user-friendly photo editing software developed by Cyber Link. It offers a wide range of features and tools for editing and enhancing digital photographs. In an easy way, we can remove watermarks on photos by using this software.
- Download PhotoDirector – The Best Free Watermark Remover.
- Import an Image.
- Tap “Tools” and Choose “Removal” to Remove Watermarks.
- Manually Adjust the Removal Area.
- Save the New photo and share it with Others.
Top 10 Tips to Remove Watermarks from Photos:
Think, you wanted to use a picture but didn’t like the watermark on it. Well, in this guide, we’re going to share the top 10 tips to help you ‘How to Remove Watermark from Photo? (With Tips)’ Whether it’s for personal projects or sharing with others. But remember, we’ll also talk about doing this the right way, following the rules, and being fair to the people who made those pictures. Let’s begin!
Suggested Article –what is watermark
Editing Software:

Professional editing software, such as Adobe Photoshop, GIMP, or Lightroom, provides comprehensive sets of tools for advanced image manipulation. These programs offer features like layer management, precise selection tools, and various filters, making them powerful options for removing watermarks.
Clone Stamp Tool:

The clone stamp tool is a staple in image editing software. It works by selecting a source area (usually a part of the image without the watermark) and then “stamping” or copying that area over the watermark. This tool allows for precise control over what replaces the watermark.
Healing Brush Tool:

The healing brush tool is a more sophisticated option than the clone stamp. It not only duplicates pixels from a source area but also intelligently blends them with the surrounding pixels to create a seamless transition. This results in a more natural and less noticeable removal of the watermark.
Content-Aware Fill:

Content-aware fill, found in software like Photoshop, is an advanced tool that analyzes the image’s content and replaces the watermark with nearby pixels that match the surroundings. It’s particularly effective for removing watermarks from images with complex backgrounds.
Cropping:
Cropping is like cutting out a part of a picture you don’t want. Imagine you have a photo of your favorite pet, but there’s a watermark at the bottom. It is like using scissors to cut off that part with the watermark. But be careful! You need to make sure the picture still looks good and makes sense after you cut it. Cropping works best when the watermark is near the edges of the picture.
Blurring Techniques:

Blurring can be applied to the watermark area using various blur filters available in editing software. The degree of blur can be adjusted to control how much the watermark is obscured. Gaussian blur is commonly used for this purpose, as it softens edges while maintaining the overall image quality.
Adding Filters or Effects:

Creative filters or effects can be applied to the entire image to divert attention from the watermark. These effects, like texture overlays, artistic filters, or gradient fills, can enhance the overall aesthetics of the image while minimizing the visibility of the watermark.
Opacity Adjustment:

When dealing with semi-transparent watermarks, reducing their opacity can make them less distracting while retaining some of the watermark’s original appearance. This method can be useful when you want to acknowledge the source but find the watermark too prominent.
Contact the Copyright Holder:

If you intend to use an image with a watermark for legitimate purposes, it’s ethical to contact the copyright holder. Request permission or inquire about purchasing a licensed, watermark-free version of the image. This ensures that you use the image legally and respect the creator’s rights.
Create Your Own Content:
The most straightforward way to avoid watermark issues is to create your own original content. By producing your images you can sidestep watermark concerns entirely. This way, you can be more creative without any restrictions.
Suggested Article- watermark alternatives
Conclusion
So, there you have it – ten helpful tips for removing watermarks from your photos. We’ve covered everything from using special tools to being creative with filters. But before you start, always remember two really important things.
First, play fair! It’s super important to respect the people who made those photos. Just like we wouldn’t want someone taking our stuff, we should ask before using theirs. Second, follow the rules. Removing watermarks can sometimes break the law, so let’s be on the safe side. If you’re not sure, it’s a good idea to talk to the person who owns the picture or find a legal way to use it.
So, go ahead, and use these tips, but always be respectful and do things the right way. That way, you can enjoy your pictures without any worries. Remember, it’s essential to ask for permission and give credit to the creators, even if you see the words “Remove Watermark.” Always seek approval and honor the effort and creativity of the original creators.


