Seamless patterns are like helpful sidekicks in this visual world, making things look cool. They are designs that repeat in a way that makes everything look tidy and stylish, whether on clothes, screens, or other things. Let’s talk about vector graphics, they are like digital wizards for making patterns. These graphics use math to create shapes, giving designers much power to make things just right. This unique quality finds its pinnacle in the image to vector conversion process. With vector graphics, seamless patterns can change sizes without getting blurry, and designers can easily change colors and shapes. It’s like having a magic tool that lets designers tell amazing stories through beautiful and flexible designs. Now, find out what seamless patterns are and why using vector graphics is like having a superpower for creating them.
How to Create Vector Seamless Patterns
Today, we’re going to explore step by step the magic behind creating those cool repeating or seamless patterns using a fantastic tool called vector graphics. let’s jump in together and have a great time being creative!
Step 1: Creating a New Document
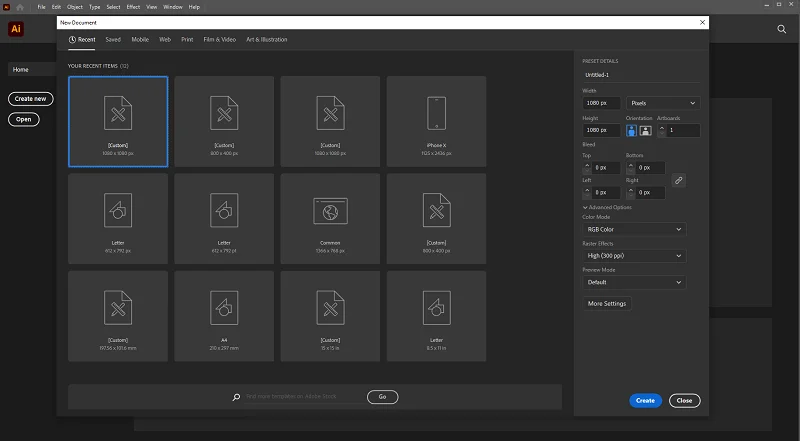
To start making your cool pattern, first, open the drawing program you like, such as Adobe Illustrator or Inkscape. Look for the “File” or “Document” option at the top, and click on “New” to begin a fresh project. A box will pop up, asking about your new picture. Here, choose how big your picture should be (make it square, like 1000 pixels by 1000 pixels, for a good pattern). Also, decide on the resolution about how clear your picture will be. Pick higher resolution for printing and lower for online stuff. Click “OK,” and now you have a new space to create your awesome seamless pattern.
Step 2: Designing the Pattern
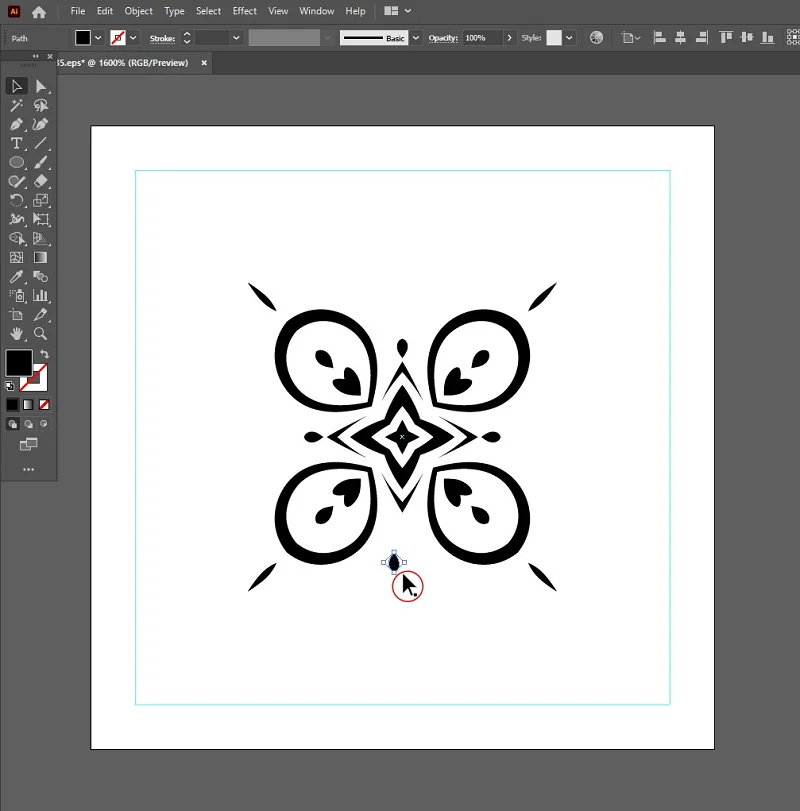
Now, let’s make your pattern cool! Use the tools to draw shapes like circles or squares. You can even add words if you like. Make sure the edges of your shapes fit perfectly, like a puzzle with no gaps. Check that when your pattern repeats, it flows smoothly.
To keep things tidy, group similar shapes together. If you’re creating a flower, group all the parts. This makes it easier to organize and change your pattern. Play with colors and shapes until your pattern looks just how you want it.
Step 3: Duplicating and Overlapping
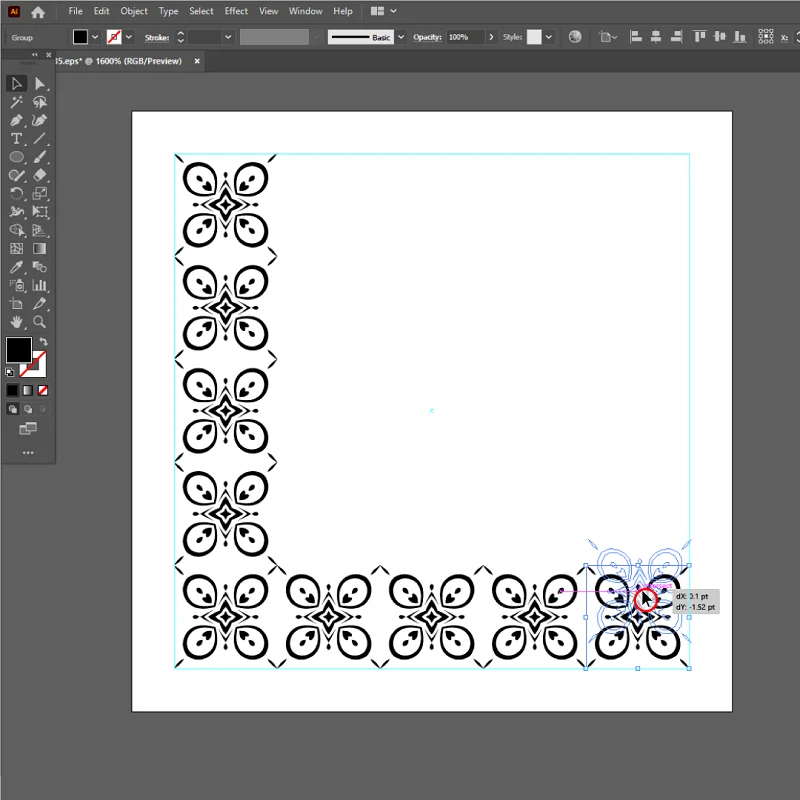
At this moment, let’s make your pattern even cooler by copying and overlapping. It’s like adding a special touch to your design. First, select all the shapes you made and copy them using the “Copy” or “Duplicate” tool. Put this copy next to the original shapes on your canvas. Have fun playing with it—try turning it, making it bigger or smaller, or even flipping it.
Make sure the copied shapes fit perfectly with the original ones, just like puzzle pieces. Keep doing this with more copies, making a flow that goes smoothly across your whole canvas. This makes your pattern look interesting and connected. By copying and overlapping, you’re giving your pattern a cool and dynamic look. So, enjoy trying out different things to make your seamless pattern stand out.
Step 4: Creating a Seamless Tile
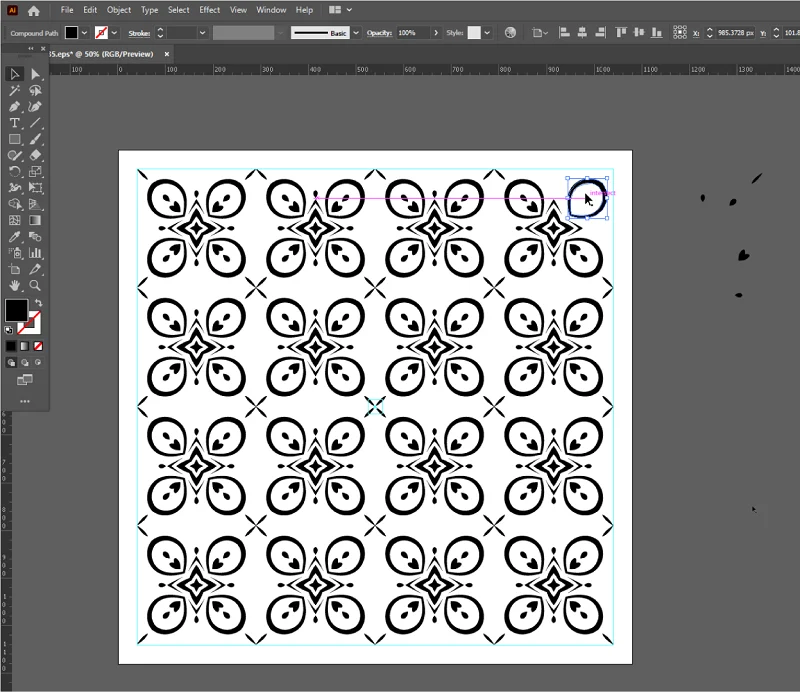
Now, let’s make your design into a pattern that goes on and on, like magic! It’s easy, click on the first group of shapes you made. Then, hold down a key (like Shift) and click on the copied group. Both groups are chosen now. Look at the top where it says “File” or “Edit.” Find “Object” and click there.
In the “Object” part, find something called “Pattern” or something like it. Click on “Pattern” and then choose “Make.” And there you go__ your design is now a pattern that can repeat forever. It is like a super cool tile that never ends. You did it! Try changing some things to see how your pattern looks, and enjoy this last step in making your pattern awesome.
Step 5: Adjusting Pattern Options
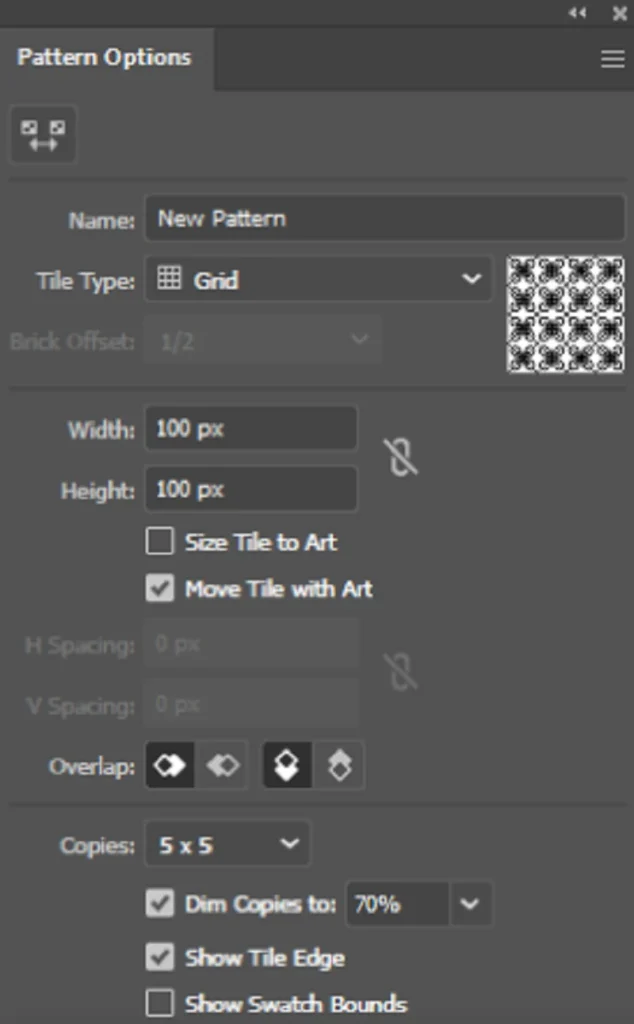
At this moment you can add a personal touch by adjusting a few settings. It’s simple, here’s how: Firstly, look for the “Tile Type” options – it’s like choosing how your pattern pieces come together. You can go for a simple grid, a staggered look with “Brick by Row,” or another cool style with “Brick by Column.”
Next, play around with the width and height settings. This helps you decide how much space your pattern covers on the canvas. Don’t forget to check the box that says “Size Tile to Art” or something similar. This ensures your pattern fits perfectly with your design. Once everything looks just right, click “Done” or a similar button to save your fantastic pattern. Now, not only have you created a seamless pattern, but you’ve also given it your unique touch by tweaking these cool options.
Step 6: Applying the Seamless Pattern
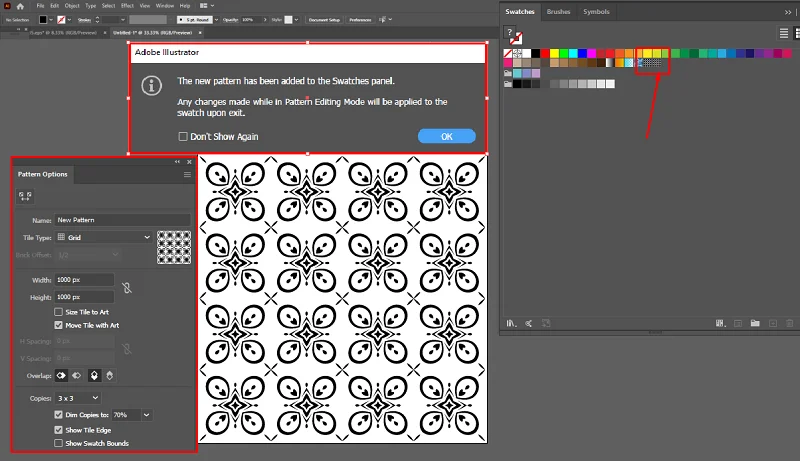
Currently, your pattern is looking fantastic, let’s make things even more exciting by using it. First, find the Swatches Panel in your software—it’s usually in the menu or toolbar. Look for your pattern swatch, and click on it to select it.
Now, draw a shape on your canvas using the shape tool. It can be any shape you like – a square, a circle, or something more creative.
With your shape chosen, click on your pattern swatch in the Swatches Panel once again. And just like magic, your shape is filled with your incredible seamless pattern! You’ve successfully applied your pattern to a shape. Experiment with different shapes and colors to see how versatile and fun your pattern can be.
Step 7: Editing and Refining
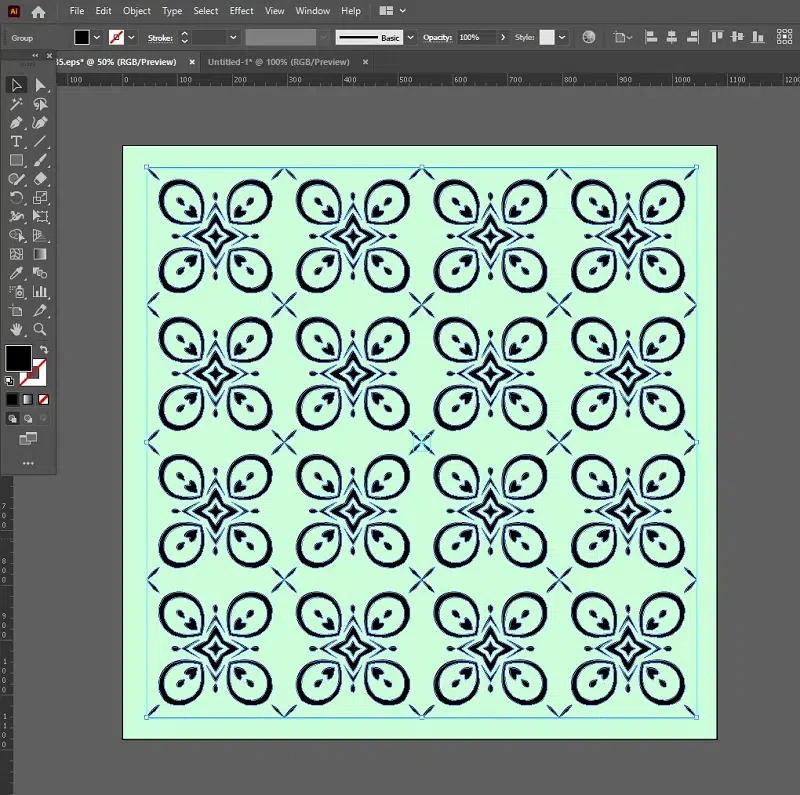
In the present your pattern is in shape, what if you want to make it even better? No worries! Here’s how you can tweak and refine your pattern: Go back to the Swatches Panel and double-click on your pattern swatch. This opens up a whole world of editing possibilities. Inside the Pattern Options Panel, you’ll find settings like Tile Type, Width, Height, and more—similar to when you first created the pattern.
Now, play around with these options to make adjustments. You can change the size, arrangement, or other features until your pattern looks exactly the way you want it to. Feel free to experiment and fine-tune until it’s just right. This step gives you the freedom to make your pattern truly unique and perfect for your creative vision.
Step 8: Save and Export
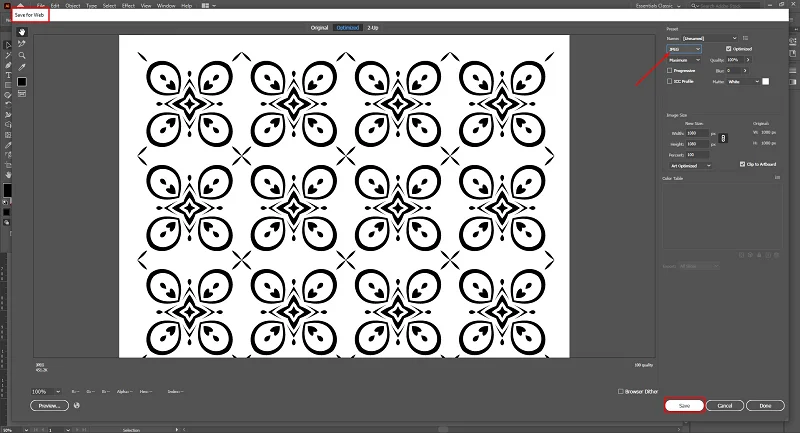
You’ve created a fantastic pattern, and now it’s time to save and share your masterpiece. Firstly, save your design file. Click on “File” in the menu and choose “Save” or “Save As.” This way, you keep your pattern safe, and you can always come back to edit it.
If you want to use your pattern in other projects or share it online, you need to export it. Look for “Export” or “Export As” in the menu. Pick a format like JPEG, PNG, or SVG, depending on how you plan to use it. This makes an image file of your pattern that you can use in different places. By saving and exporting, you’ve completed the final steps. Now you can proudly show off and use your awesome pattern wherever you like.
Tips for Creating Patterns
Certainly! Here are some helpful tips to make your seamless pattern-making experience even better:
Start Easy, Add More Later: Begin with simple shapes, and as you get better, you can make your patterns more interesting.
Keep Things the Same: Make sure your shapes are similar in size, and they’re not too far apart. This makes your pattern look nice.
Choose Colors That Go Together: Pick colors that look good together. This makes your pattern look even cooler.
Check if it Repeats Well: See if your pattern repeats nicely. This means it goes on and on without looking weird.
Make Some Things Big and Some Small: Try different sizes for your shapes. Some big, some small. It makes your pattern more fun.
Get Ideas from Everywhere: Look at things around you for ideas. Ask friends what they think of your pattern. It makes your patterns better and more interesting.
Conclusion
In conclusion, let’s reflect on the incredible journey of creating seamless patterns. Each pattern is a testament to your creativity, and the process is a canvas for endless exploration. Remember, there’s no limit to what you can create – patterns are your playground.
As you continue on this artistic adventure, don’t hesitate to push boundaries and experiment with new ideas. Every tweak and adjustment adds to the uniqueness of your patterns. Create patterns that reflect your artistic essence and share them with friends to get feedback. Patterns are not just visuals; they tell stories and evoke emotions. So, enjoy the process of creating and let your imagination lead you to even more exciting seamless patterns. Your creative journey has just begun, and the possibilities are endless. Enjoy every step of the way.

