
Vector art, a versatile and widely embraced digital art form, empowers you to bring your artistic visions to life with precision and flexibility. By harnessing mathematical equations and geometric shapes, you can create stunning graphics, illustrations, and logos that are scalable and of the highest quality. In this guide, we’ll walk you through the essential steps, unique techniques, and invaluable resources to propel your vector art proficiency to new heights.
You’ll delve into the core concepts of vector graphics, acquaint yourself with industry-standard software, and embark on practical projects to gain hands-on experience. Additionally, we’ll delve into the importance of composition and design principles, and provide tips on seeking feedback and continuously improving your vector art skills.
What is Vector Art?
Vector art refers to a digital art form created using mathematical equations and geometric shapes. Unlike raster or pixel-based images, vector art is composed of lines, curves, and shapes that are defined by their mathematical properties rather than individual pixels. This mathematical representation allows vector graphics to be infinitely scalable without any loss of quality. It is broadly utilized in different imaginative fields, like visual communication, logo creation, illustrations, and typography.
Popular Vector Art Software and Tools

There are several popular vector art software and tools available. Each software has its own unique features and capabilities. Here are some widely used ones:
Adobe Illustrator

Adobe Illustrator is one of the most popular vector graphics editors on the market. Its extent tools allow you to modify existing shapes or create new ones from scratch using Bezier curves. This software helps designers to easily move between different programs without losing any quality in their designs.
CorelDRAW

CorelDRAW is another popular vector graphics software which helps the users to increase their workflow. It offers various features like – color management, object style, Photo-Paint, After Shot, etc.
You may also read– Authentic Comparison between Adobe Illustrator and CorelDRAW.
Inkscape

Inkscape helps to draw appropriate lines and curves that can be edited easily in real time. It is a text edition tool which helps to add typography to the design and also works as font, style and colors editor.
Affinity Designer

Affinity Designer is a professional vector graphics software available for Mac, Windows, and iPad. It offers a range of advanced features for creating sharp and detailed vector artwork, making it popular among designers and illustrators.
Sketch

Sketch is a simple but powerful tool, used for Designing logos or web pages. It is used for macOS. You can convert your designs in various formats like JPEG, SVG and PDF.
GIMP

GIMP is another vector graphics editor. It is a free and open-source tool. And, it enables you to create high-quality graphics such as image editing, painting tools, animation support, etc. Besides, GIMP offers the ability to rearrange the layout.
You may also read– Photoshop Vs GIMP.
Krita

Krita is famous for open-source digital painting. This software offers various powerful tools including shapes, gradients, and customizable brushes, which helps to create stunning vector art.
Familiarize with Software Interface
Familiarizing with the software interface refers to understanding the various elements and tools available in it. Let’s know how the interface of this software works:
Menu Bar

The menu bar is located at the top of the software and contains various menus such as File, Edit, Object, Type, and Window. These menus provide access to different commands and options.
Toolbox

The toolbox is situated on the left or right side of the interface, containing icons representing different tools. These tools help to create and manipulate vector objects. Some common tools of this software are the Selection tool, Pen tool, Shape tools, and Text tool.
Control Panel

The control panel is usually located at the top of the software, below the menu bar. You can get the options and settings related to the currently selected tool or object. The control panel allows you to adjust stroke and fill colors, stroke weight, font settings, and more.
Document Workspace

The main area of the interface is the document workspace, where you create and edit your vector artwork. It displays the active document and provides tools for drawing, editing, and arranging objects.
Layers Panel

The layers panel, typically located on the right side of the interface, allows you to organize and manage different elements of your artwork. You can create layers, group objects, adjust stacking order, and control the visibility and locking of layers.
Pen Tool and Bezier Curves
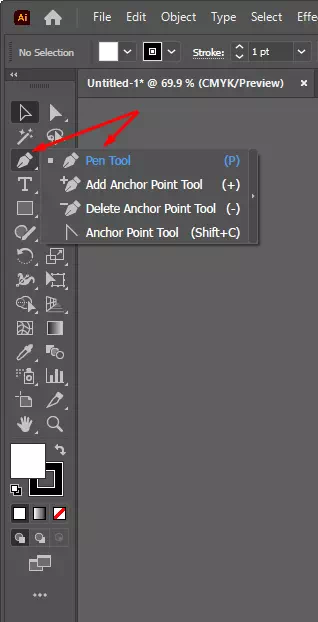
The Pen tool is a fundamental tool in vector art software. It allows you to create precise and smooth paths using Bezier curves. Mastering the Pen tool enables you to create complex shapes and paths.
Artboards

Artboards are like separate canvases within a single document. You can have multiple artboards in a single Illustrator file, each representing a different composition or design. They can be resized, rearranged, and exported individually
Explore Basic Tools and Functions
Through exploring basic tools and functions you will be able to understand their purpose and how they can be used to create and edit vector artwork. Let’s explore some basic tools and functions of this Software:
Selection Tools

There are different types of selection tools that allow you to select and manipulate objects on the canvas. you can select entire objects or groups of objects by the Selection Tool. Another selection tool is Direct Selection Tool which helps to select individual anchor points. Besides, Magic Wand Tool which enables you to select objects with similar attributes, and Lasso Tool which helps to make freehand selections are the popular selection tools
Pen Tool

The Pen Tool is a fundamental tool for creating precise and custom shapes. It allows you to draw paths by placing anchor points and adjusting their direction handles.
Shape Tools

Shape Tools enable you to create geometrical shapes, such as rectangles, circles, ellipses, polygons, and stars. They also offer the right of adjusting size, proportions, and corner radii.
Text Tools

Text Tools help you to add text to your artwork. You can choose any font style for your work. It also helps you to adjust the sizes, colors, and alignments of the text.
Fill and Stroke Attributes

Fill and stroke attributes determine the appearance of your shapes and lines. The Fill attribute refers to the interior color or pattern of an object, while the Stroke attribute defines the color, thickness, and style of its outline
Layers and Groups

Layers and Groups help to control the stacking order of objects, apply effects selectively, and manage the visibility and editing of specific elements.
Transformation Tools

Transformation Tools enable you to scale, rotate, skew, and distort objects.
Gradient Tool
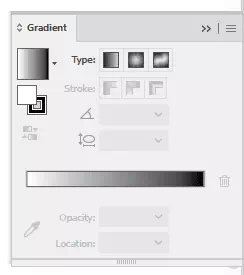
Gradient Tools allow you to apply smooth color transitions to objects. You can create linear or radial gradients and adjust their direction, color stops, and opacity.
Path Editing Tools

Through Path Editing Tools you can move anchor points, adjust their direction handles, convert corner points to curves, and vice versa.
Undo and History

These features allow you to revert changes, step backward or forward through your editing process.
Be Familiar with Colors, Gradients, and Fills

Working with colors, gradients, and fills is essential for creating visually appealing and dynamic vector artwork. Here are some tips for effectively using these elements:
Color Selection
- Understand Color Theory: Familiarize yourself with color theory principles. Gather knowledge about hue, saturation, value, complementary colors, and color harmonies. This knowledge will help you create balanced and harmonious color schemes.
- Consider Context: Think about the overall mood, message, and purpose of your artwork when selecting colors. Different color combinations represent different emotions and meanings.
Solid Fills
- Apply Solid Colors: Select the shape you want to fill, then choose a color from the software’s color picker. Use the Fill tool to apply the color to the selected object.
- Adjust Opacity: Varying the opacity of a solid fill can create transparency effects. It will add depth to your artwork.
Gradients
- Create Linear Gradients: The Gradient tool helps to create a linear gradient. Adjust the starting and ending points to control the direction and transition of the gradient.
- Experiment with Radial Gradients: Radial gradients radiate from a central point outward. Use the Gradient tool to create radial gradients. This tool is used to adjust the center, focal point, and color stops to achieve desired effects.
- Combine Multiple Gradients: Overlaying multiple gradients can create complex and dynamic color transitions. Explore layering gradients and adjusting their opacity to achieve unique visual effects.
Learn Vector Art from Tutorials and Online Resources

Learning from tutorials and online resources is an excellent way to enhance your vector art skills. Some tips are given below for effectively utilizing tutorials and online resources:
Choose Reliable Sources
Look for reputable websites, platforms, and channels that offer vector art tutorials. Some popular platforms include YouTube, Skillshare, Udemy, and Adobe’s official tutorials. Ensure that the resources are from trusted instructors or organizations.
Determine Skill Level
Consider your current skill level when selecting tutorials. Beginners should start with tutorials specifically designed for beginners. It will help to grasp the foundational concepts and techniques. Intermediate and advanced artists can choose more complex tutorials.
Follow Step-by-Step Instructions
Tutorials usually provide step-by-step instructions. These instructions are helpful for understanding the workflow and techniques. Take your time and make sure you understand each step before moving on.
Experiment and Customize
Use the tutorial as a guide but allow your creativity to shine. Add personal touches and variations to your design.
Stay Curious and Open-Minded
Learning from tutorials is an ongoing process. Stay curious, keep an open mind, and continue exploring new tutorials. There is always something new to learn and discover in the world of vector art.
Practice Essential Exercises and Projects

Practicing essential exercises and projects is a great way to develop your vector art skills and gain hands-on experience. Here are some essential exercises and projects to consider:
- Shape Exploration: Start by practicing drawing basic shapes such as squares, circles, triangles, and polygons. Experiment with different sizes, angles, and arrangements. Focus on creating clean, precise shapes with smooth curves and sharp corners.
- Icon Design: Icons are an integral part of many design projects. Choose a theme or concept and create a set of icons representing different objects or ideas. Pay attention to clarity, simplicity, and consistency in your icon designs.
- Logo Design: Logos are a challenging yet rewarding project. Practice creating various logos for fictional companies or personal branding. Consider the use of shapes, typography, and color to convey the desired message and brand identity.
- Character Design: Develop your character design skills by creating unique vector illustrations of characters. Explore different styles, expressions, poses, and outfits. Pay attention to proportions, balance, and personality in your character designs.
- Pattern Creation: Experiment with creating seamless patterns using vector shapes and objects. Explore different themes and styles. Focus on the flow, repetition, and balance of elements within the pattern.
- Product Packaging: Design packaging for a fictional product or redesign existing packaging. Consider the shape, layout, branding, and visual hierarchy to create an appealing and functional package design.
- Poster Design: Create eye-catching posters for events, movies, or social causes. Experiment with composition, color, typography, and visual elements to effectively communicate the message and grab attention.
- Personal Project: Choose a subject or theme that interests you and create a vector art project based on it. It could be a digital illustration, a themed artwork series, or a conceptual piece.
Prepare your Artwork for Different Platforms and Formats

Preparing your vector artwork for different platforms and formats is essential to ensure compatibility, quality, and optimal display. This article provides you with some instructions that help you to prepare your artwork for various platforms and formats:
- Save a master file: Keep a master file of your vector artwork in the original format. Saving a master file helps you to edit your design later.
- Export to raster formats: If you need to share or display your artwork on platforms that require raster formats, such as websites or social media, export your vector art to raster formats like PNG, JPEG, or GIF. Appropriate raster formats help you to balance file size and image quality.
- Optimize for web: When preparing vector art for the web, consider optimizing the file size for faster loading times. Minimize unnecessary details. Reduce the number of anchor points and flatten transparency if possible.
- Export for print: If you plan to print your vector artwork, ensure that it is in the appropriate color mode (CMYK or Pantone). It helps to produce accurate color reproduction. Set the resolution to the printer’s recommended specifications (usually 300 DPI) to maintain sharpness and detail.
- Convert text to outlines: To ensure that your text appears correctly across different platforms and devices, convert text to outlines.
- Test and preview: Before finalizing and sharing your artwork, preview it on various platforms and devices to ensure it displays correctly. Test it on different web browsers, screens, and resolutions to identify any potential issues.
- Keep backups: Maintain backups of your prepared artwork files to avoid potential data loss. Use reliable storage solutions to keep your files secure and accessible.
Build an Online Portfolio and Promoting your Artwork

Building an online portfolio is a smart way to showcase your hard work and attract potential clients or opportunities. Here are some crucial steps to assist you create a portfolio and promote your work effectively:
- Define your goals: Determine the purpose of your portfolio. Are you looking to attract clients, apply for jobs, or simply showcase your work? Understanding your goals will help you tailor your portfolio accordingly.
- Choose a platform: Select a platform to host your online portfolio. Options include dedicated portfolio websites like Behance, Dribbble, or Adobe Portfolio.
- Curate your best work: Display a selection of your best and most representative pieces in your portfolio. Quality over quantity is key.
- Organize and categorize: Organize your portfolio into clear categories or projects. This makes it easier for visitors to navigate and find specific work. Consider adding brief descriptions or captions to provide context for each piece.
- Optimize visuals: Ensure your portfolio displays high-quality images of your work. Use professional photography. Optimize file sizes for the web to balance quality and loading speed.
- Utilize social media: Promote your portfolio and artwork on social media platforms like Instagram, Twitter, or Facebook to increase visibility and attract followers.
- Stay active and update regularly: Regularly update your portfolio with new artwork, projects, or achievements. Keep your online presence active by sharing works in progress. This shows potential clients that you are active and committed to your craft.
Engage with the Vector Art Community

Engaging with the vector art community is a great way to connect with fellow artists, gain inspiration, receive feedback, and expand your network. Let’s see the ways how to engage effectively with the vector art community:
Join online communities: Look for vector art communities or social media groups that focus on vector art. Platforms like Behance, Dribbble, Reddit, or specific Facebook groups dedicated to vector art can provide opportunities to connect with like-minded artists.
Share your work: Regularly share your vector art in these communities. Be active in your posting. Provide background information, ask for feedback, or share your creative process.
Attend workshops or webinars: Look for workshops, webinars, or online classes focused on vector art. Participate in these events. It allows you to learn new techniques, gain insights from industry professionals, and connect with fellow attendees.
Collaborate with other artists: Seek opportunities for collaboration with other vector artists. This could involve creating joint projects, exchanging artwork, or working on shared themes. Collaboration expands your creative horizons. It also introduces your work to new audiences.
Learn Vector Art from Professional Vector Artists & Mentors

Learning from professional vector artists and mentors can greatly enhance your growth as a vector artist. Some advice are given below on how to learn from and engage with professionals in the field:
- Follow their work: Identify professional vector artists. Try to follow their portfolios, blogs, social media accounts, and websites. Pay attention to their techniques, styles, and creative processes.
- Study their tutorials and resources: Many professional vector artists share tutorials, tips, and resources on their websites, blogs, or YouTube channels. Take advantage of these materials to learn their techniques.
- Attend workshops and masterclasses: Attend workshops or masterclasses conducted by professional vector artists. These sessions provide the opportunity to learn directly from them.
- Seek mentorship: Ask the professionals if they offer mentorship opportunities. A mentor can provide guidance, critique your work, offer industry insights, and help you grow as an artist.
You may also read– Graphic Designer vs. Vector Artist.
Common Challenges and How to Overcome

While working and learning vector art, you may encounter various challenges. Let’s see some way to overcome them:
Uneven curves or jagged lines: If your curves appear uneven or your lines are jagged, it could be due to low anchor point density. Add more anchor points along the curve and adjust their handles to create smoother lines.
Difficulty in creating complex shapes: Complex shapes can be challenging to create with the pen tool alone. In that case use additional tools like the Shape Builder tool or Pathfinder tools to create complex shapes.
Distorted or skewed shapes: When scaling or resizing vector shapes, ensure that you maintain the aspect ratio to avoid distortion. Hold the Shift key while dragging the corner handles to constrain proportions. Use the Transform panel to input specific dimensions for accurate scaling.
Inconsistent stroke weights: If your strokes appear inconsistent, make sure you’re using the same stroke weight throughout your artwork. Using the Align Stroke to Center option also can help to maintain stroke weights consistently inside and outside shapes.
File size issues: Vector files are generally smaller in size compared to raster images, but complex or detailed vector artwork can still result in large file sizes. To reduce file size, simplify paths, remove unnecessary anchor points, and consider using gradient meshes sparingly.
Difficulty in achieving specific colors: If you’re struggling to achieve the exact color you want, use color pickers or eyedroppers to sample colors from reference images or other artwork.
Limited understanding of advanced features: Vector software often includes advanced features and tools. To overcome the challenge of limited knowledge, explore online tutorials and videos on it.
Optimize your Workflow for Efficiency

Optimizing your workflow means make the best use of your talent to gain more efficiency and productivity in vector art. Some tips are given bellow to increase your workflow:
Plan and organize
Before starting your vector art project, spend some time planning and sketching out your ideas. This will help you have a clear vision and save time during the actual creation process.
Organize your project files, reference materials, and resources in a logical manner to easily locate them when needed.
Customize your workspace
Tailor your vector software’s workspace to suit your preferences and needs. Arrange panels, tools, and menus in a great way. Create custom keyboard shortcuts for frequently used commands to speed up your workflow.
Learn and use shortcuts
Familiarize yourself with keyboard shortcuts. Knowing and using shortcuts can significantly speed up your workflow and reduce repetitive mouse movements. Take the time to memorize the shortcuts.
Work with layers and groups
Utilize layers to organize your artwork into logical groups. This allows you to work on individual elements independently.
Use the align and distribute tools
Take advantage of alignment and distribution tools to position and space objects accurately. Align objects along edges or centers, distribute them evenly, and use smart guides or grids to ensure precise placement.
Take breaks and maintain focus
Take a short break in your work to rest your eyes. It helps you to clear your mind. To maintain productivity, you have to stay focused on the task.
To Conclude
As a beginner everyone faces some difficulties. So, don’t be discouraged by initial struggles. Don’t compare yourself with more experienced artists. Just focus on improving your skills one step at a time. You’ll gradually develop the skills and techniques necessary to create stunning vector artworks. Consistency and perseverance are key to progress.


