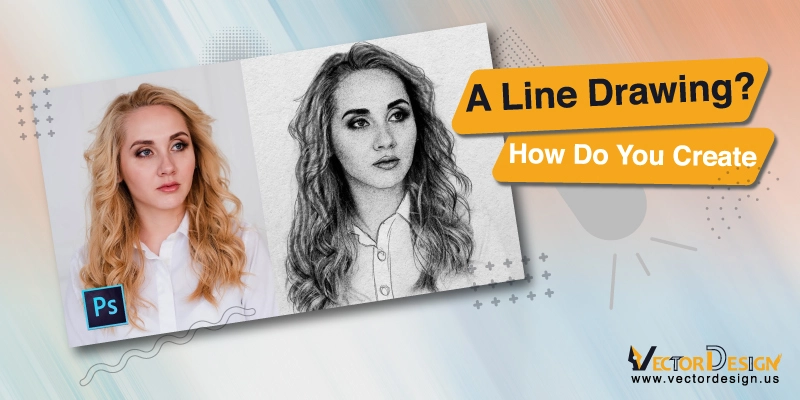
We need to create a line drawing on an image for many different reasons. But this is pretty much a difficult task that you can’t do just with any online tool. There are many different high-end tools that let you create a line drawing. Among them, Photoshop is the most trusted one.
So, if you plan to learn to create a line drawing, you should concentrate here until the end. We have divided the entire process into 10 simple steps. Make sure to follow them sequentially and properly.
How to Create a Line Drawing in Photoshop?

Creating a line drawing is not easy, and you should have basic Photoshop knowledge before trying it. Make sure to follow the below steps to do the task successfully.
Step 1: Open the Image in Photoshop CC

To draw a line using Photoshop CC, you have first to open the image in the software. You can click on File and then Open. Then choose the photo you want to edit and click on Open again.
Step 2: Customizing Color Contrast

Once the photo is ready to edit, you have to adjust the contrast. For that, you have to first click on the layer panel and check if the layer that contains the photo is selected. If it is not, then select the layer and click on Okay.
Now, click on the option, Image. You will find it on the top of the screen. Now, find the option Adjustment, which will be in the second row on the panel. Once you click on it, another panel will appear where the third option will be Curves. Now, click on the option again.
A Curve Dialogue box will then appear. Now, you have to change the curve line on the box’s graph. You have to draw the line downward, and then the darker part of the image will be darker. But the lighter part won’t change. When you are done customizing the color contrast, you have to click on Ok. The color is now ready, and you have to set the layer in the next step.
Step 3: Layer Setup
To set up the layer, you have to click on the layer panel again. You’ll find a layer containing two more copies of the images here. Now, duplicate the layer to make an identical layer. For that, you have to click on the Select option in the layer panel menu and click on Duplicate Layer.

Step 4: Converting Photo on the Adjustment Layer
Now, you have to use the adjustment layer to convert the images into grayscale files. On the upper side of the layer panel, you will find another option name Duplicate Layer. A panel will appear once you click on it, and then you have to find and click on Adjustment Layer Icon.

A drop-down menu will appear once you click on the Layer Icon. Now find Hue or Saturation and click on it. Now, an adjustment layer has been created. Now, go to the properties panel that you’ll find on the right side of the image. You can also find this panel on the Window option.
However, in the Properties panel, there will be slides. They are the Hue, Saturation, and Lightness. First, you have to drag the Saturation slider to the left side. Make sure to drag it to the last part of the side. Now the Saturation level will be -100, turning your image into grayscale.
Step 5: Converting the Photo into Line Drawing
In this step, you have to draw the outline in the image. For that, you have to use a couple of layer effects. On the layer panel, you will find an eye button. Click on it, and it will make the previously made duplicate layers invisible. Now, you have to click on the Visible Layer button, and you’ll find it on the bottom part of the panel.

Then, you have to click on the dropdown menu and select Color Dodge. Now, press CTRL+I on your keyboard, letting you invert the image. Again you have to go back to the image and click on File, Adjustment, and Invert, respectively.
Again go back to the filter and choose Blur. Then find Gaussian Blur and click on it. Then, another dialogue box will appear. Now, like the 3rd step, you have to customize the slider until you get an outline.
Step 6: Background Setting
At this point, you have to set the background from the toolbar. For that, you have to double-click on the background color and then set it to white background. Here, you’ll find a color picker in the dialogue box, and you have to click on the large color box to choose the color.

Step 7: Setting Foreground Color
After setting the background color, you have to customize the foreground color. And this time, it’s not white but gray. You will find the Foreground Color option in the toolbar, and you have to double-click on it. You have to click on the large color box in the dialogue box and choose gray to set the foreground color.

Step 8: Adding Pencil Shading
Now, you have to add a pencil sketch effect to the image. For that, you have to click on the layer right above the layer you have worked on before. Again, click on the eye button, and it will make your image in black and white color.

Now, you have to click on Filter and then Filter Gallery. At that point, you will get another layer of panels where you will have multiple copies for the background of the image. Make sure to choose the Background Copy 2.
Next to that, you have to click on the filter again and choose a sketch. Make sure to select Charcoal to get the pencil-like color. Here, you can customize the thickness of the pencil and the color balance too. Once it is okay, you have to click on OK. Now, go to the drop-down menu and adjust the Layer Blend mode to multiply.
Step 9: Adding Cross-Hatching Effects
You are near to completing the task, and now, you have to add the cross-hatching effect on the image. For that, you have to go to the layer panel and click on the eye button. It makes all the layers visible. Then click on Filter, Filter Gallery, and Background Copy 3. Here, make sure to go sequentially.
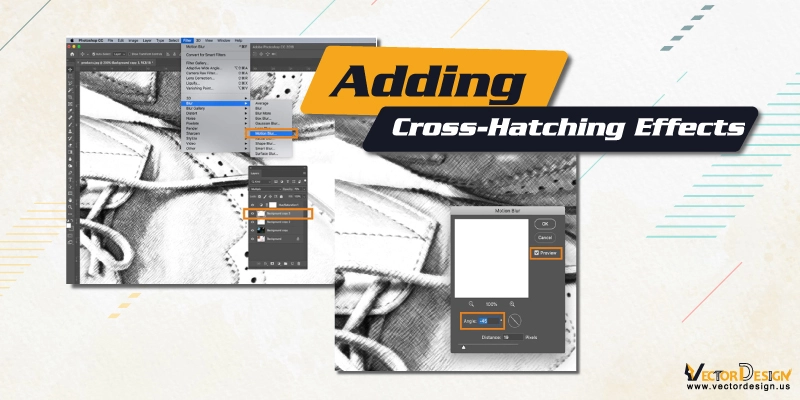
Again, click on Filter, Sketch, and Torn Edges, respectively. Now, you have to edit the torn edges slide to get the right level. Then click on the New and New Layer Icon. Now, the torn edges will appear two times. Then you have to click on the graphic pen and use it to change the Stroke Diagonal to the Left one. Next, click on Ok.
Then, you have to change two more options. First, change the Layer Blend mode to multiply and select Blur Motion for a better line. Make sure to set the motion blur to a 45-degree angle. Next, you have to check the preview for endurance and click on OK.
Step 10: Finish the Line
Your line drawing is nearly ready. Before you save the image, you have to complete two more tasks. First, you have to adjust the opacity of the layer by reducing the pencil sketch intensity. And next, you have to clean up if there are any artifacts.

Once you are done, just save the image and choose the right file for that. So, this is how you can create a line drawing in Photoshop.
Final Thought
If you are a new Photoshop CC user, this is not a suitable task for you to begin with. Obviously, creating a line drawing is difficult, and the process is time-consuming. Still, it is possible to do it at home by following the mentioned steps sequentially.
Let us know how you completed the task and how the outcome was. You can let us know if you have any more confusion. Thank you for your time.


