
For different reasons, we have to remove the background of the images. To Remove the Background, photoshop is the most versatile tool. Using Photoshop, we can handle the process in various ways. Among them, the automatic background remover and the manual background remover are the most popular ones.
Basically, both these background removal systems are equally popular and easy. So, people often get confused about which one to try. That’s why today, we are planning to discuss these two types of the background removal process and find out which one is the best.
Automatic Background Remover Tutorial
Among the best ways to use Photoshop for photo background removal, the automatic process is the most popular one. Before you remove the background, you have to select the area around the product or people inside the photo. That’s the part where the two types of background removal processes differ.
However, in the automatic background removal function, photoshop itself selects the area of the background. That’s why it is called automatic background removal. This process basically uses a special algorithm for the automatic area selection. The best part of this process is, that it lets you remove unwanted background from the images with just one click.
You must be thinking about trying the process, right? If yes, the following steps will help you remove the background with the automatic process. But be careful of selecting the process. Automatic background removal is basically the perfect solution for all types of images.
However, first, let me introduce you to the two different processes. And then, we will inform you about which one to try and the reasons you should try that. So, let’s first learn about the simple stems of the automatic background removal process.
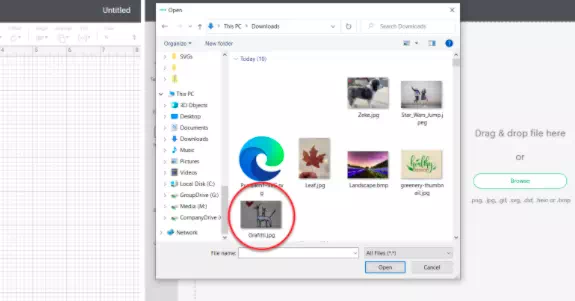
Step 1: Select the Photo
In the very first step, you have to select Upload so that you can upload the image to remove the background. Next to that, select the particular image from your computer. You should choose an image with png, jpg, gif, or BMP format.
Step 2: Select Image Type
Once you upload the image, you have to select the type of image. Generally, an image can be either simple, moderately complex, or Complex. Check out the image. If it’s an image of a simple product like an apple, it will be simple.
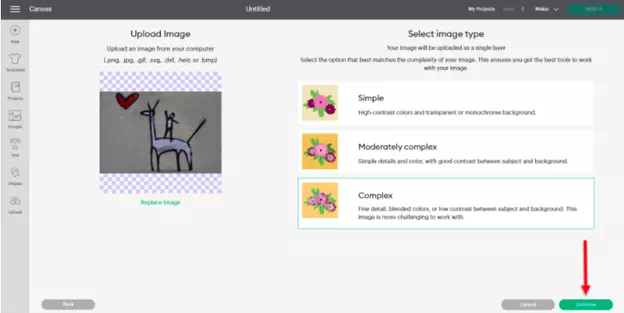
Choose moderately complex if the background area is like a bicycle. And of course, choose the Complex one if it’s an image of a woman with hair or a flower garden. So, check the image, give it a think, and choose the right image type.
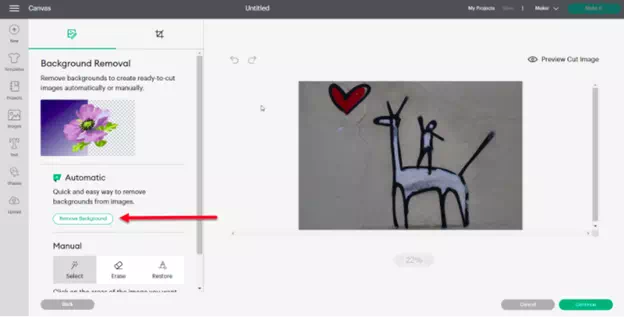
Step 3: Use the Tool
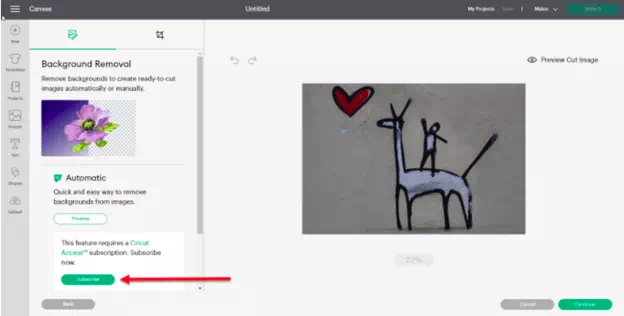
Now, the image is ready to remove the background. At this point, you have to find out the Background Removal Area in the left side panel. Here, find out the button, Automatic, and select Remove Background.
Step 4: Recheck the Selection
Photoshop is already making a selection of the image product. So, you have to give a recheck on the selection. For that, you can use the Preview Cut Image. You will get it right over the image. Click on it to check the cut preview and make sure that it has proper accuracy.
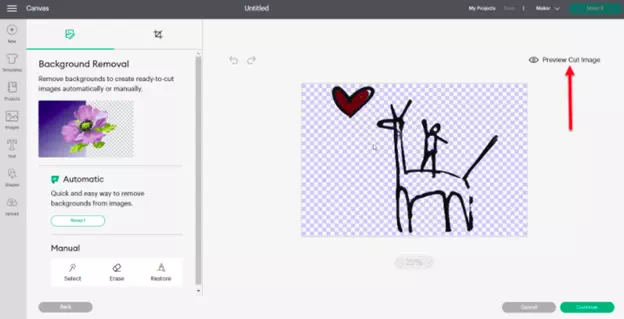
Step 5: Further Edit
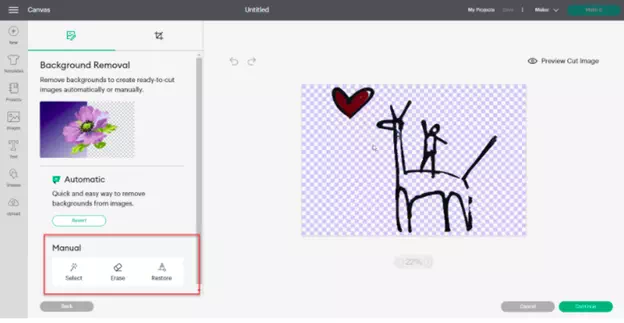
This step is required only if you are not satisfied with the automatic background selection. If you need to do any further edits, you have to use the Manual tools. You can use this tool to simply Select or Erase areas of the image you want to remove. You can also Restore parts of the image to get the previous outlook.
Step 6: Save the Photo
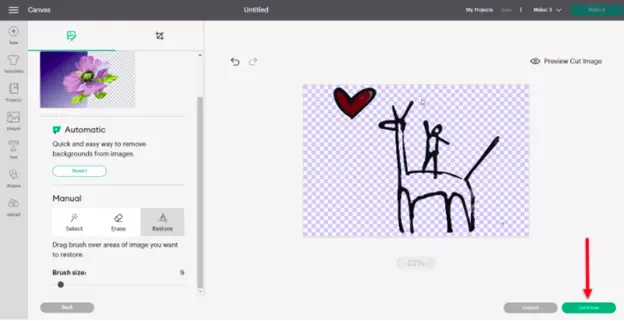
Now, you must be satisfied with the cut preview. At this point, you have to make the background vanish. For that, select Continue and give it a few seconds. The image must be edited, and you won’t find the background here.
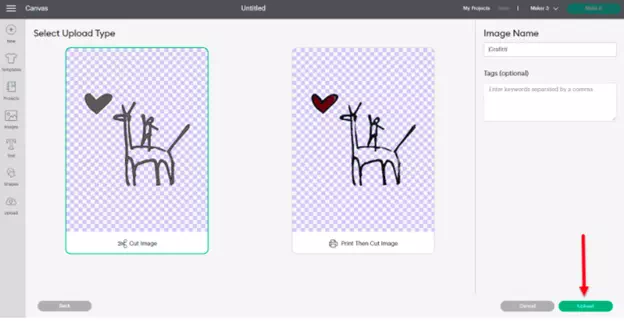
However, make sure to save the image as a Cut image or just as a Print. While saving it, you have to name and tag the image. After that, you can simply select Upload to add it to your library.
That’s how the automatic background removal process works. It seems easy, right? But still, many editors don’t take the side of this process. Don’t know why? Well, we will make things clear to use. But first, let us introduce you to another background removal process.
Manual Background Remover Tutorial
The next option is to remove the background manually. Previously, you have learned a way where Photoshop itself creates the selection automatically. So, you don’t have so much to do. However, when it is about the manual process, you have to make the selection by yourself. That’s why we call it the manual process.
However, using the pen tool is the most popular way to create the selection while removing the background of a photo. This process depends on your expertise in using the pen tool. Indeed, it will help you to be a master of pen tools as well.
Are you not properly familiar with the use of the pen tool in Photoshop to remove the image background? If not, maybe you need a straight tutorial for that. Check out the below steps to learn to use the pen tool to remove the background of an image.
Step 1: Drawing the Path Around the Product in the Photo
You must know how to upload an image on Photoshop, right? The first step of the previous process told you how to do that. So, we are not repeating that here again. However, upload it and open the image in photoshop.
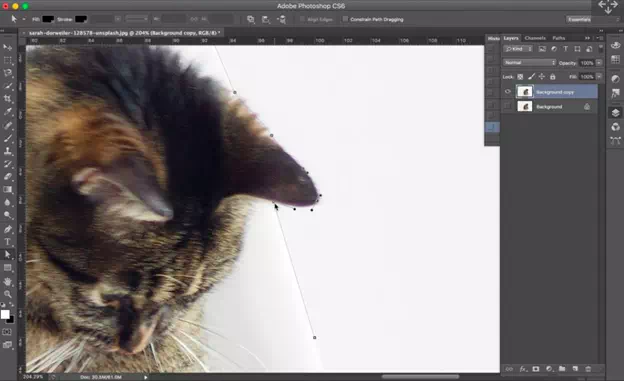
At this point, select the pen tool from the tools panel. You can use the Shortcut P for that as well. Now, you have to choose a point on the edge of the photo and start from here.
Now, you have to draw the path around the product or the people in the photo. If you are new, it will be difficult for you. So, choose a simple product for practice. When you find a curved area and find it difficult to create the path, you can add an anchor point using the mouse key.
When you have to move to a straight line from the curved one, you have to press alt+click directly on the anchor point. Thus, you can add a new anchor point for the next curved area and move the straight lines as well.
Step 2: Saving The Created Path
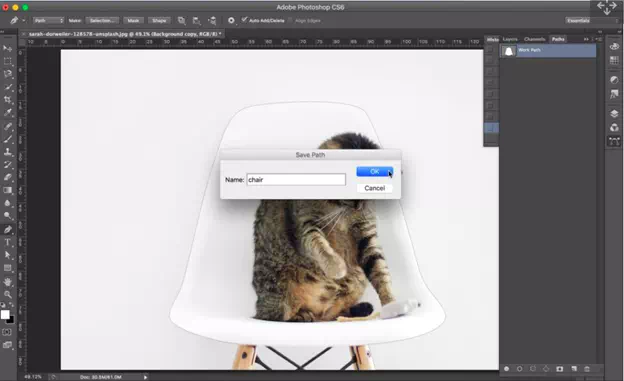
When you complete drawing the path around the object, you have to save it. For that, simply click on the first anchor point. Here, you will find a small circle that will show you the selected point. Click on it, and the path will be closed.
Don’t worry, the path does not vanish. Well, it will automatically appear in the path panel that you will find directly under the Window. At this point, you have to double-click on the work path. A small tab will appear where you have to type the name of the path. The path indeed gets saved on the same name.
Step 3: Further Edition
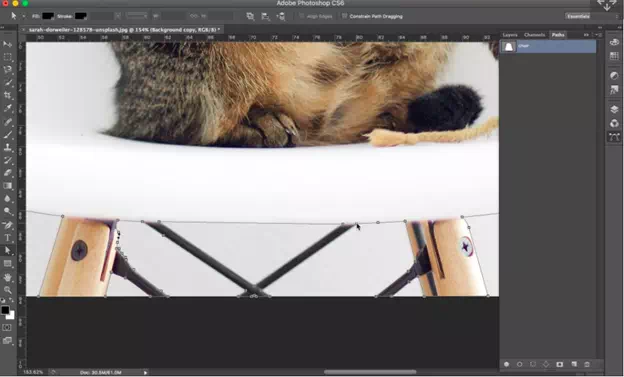
Once the path is saved you have done, and that’s not true actually. You may not get the path perfectly lined and a further editing project can be a requirement for the perfect background removing project. So, check the path again and make sure it is perfect.
If it is not, don’t forget to edit the path to get the perfect shape. For that, use the select anchor point using the Direct Select tool. After that, make necessary adjustments and save the changes.
You can easily add necessary anchor points using the pen tool to create new paths. Also, you can remove paths by removing the points as usual. Additionally, you can convert a curved point into a straight one and vice Versa.
Step 4: Create the Mask
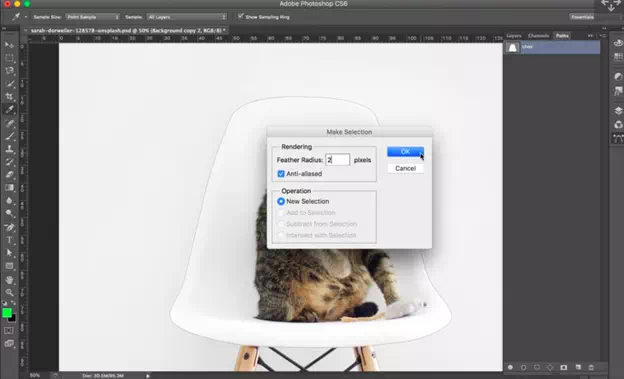
At this point, you have to convert the path so that you can create a mask of the entire background. You can do that simply by selecting the paths panel. First, you will need to highlight the panel. For that, hit the load path and click on the Selection button. You will find it in the lower part of the paths panel.
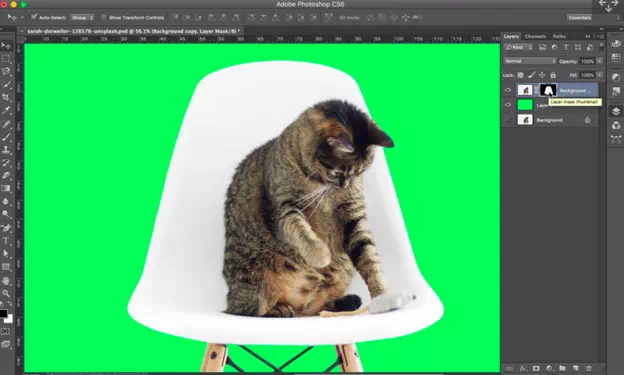
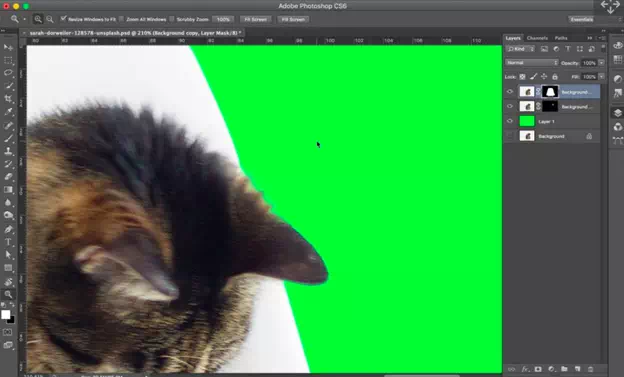
After that, you can open the layer panel. Now, you have to select the duplicate background layer. After that, you will find a layer mask button. Click on it. Here, you will get a new layer, and you have to add a bright contrast by filling the color from the color plate. After that, you can find the exact look of the cutout.
Step 5: Customize the Mask
Now, you have to customize the mask to get the appropriate image without the background. You have to soften the cutout edges that mostly have a harsh finish. Additionally, you have to make the layer visible for the appropriate aftermath. For that, you have to hit Ctrl+Right-click.
From the Flyout menu, you can make the selection and highlight it as well. Then, you can switch to the layer panel and then, add the layer mask too.
Step 6: Final Merging
You are in the final step, and here, you have to merge the entire technique. That means you have to create a better cutout in this phase. For that, you can simply use the Refine Edge tool. Then increase the Edge detection until you got the fur of the image visible.
Here, you have to be careful and make sure not to go too far. Otherwise, you can get an unusual outcome. Remember that, this area is very much soft to handle.
So, that’s how you can use the Pen tool to remove the background. Now, the question is where the outcome of these two procedures differs and which one is the best process. To learn about them, check the sections below.
Factors of Differences: Automatic vs. Manual Background Remover
Once you learn about the difference you can get from the outcomes of these two popular processes of background removal, you will understand which is the best option for you. Basically, the aftermath of the pen tool depends on how perfect you are in using the tool.
The automatic background removal process doesn’t have a lot of difference in its outcome. Still, most people, especially professionals, choose the manual process most of the time. Let’s check out the basic difference you can get in the result of the two systems.
Time
For sure, the automatic one is the quickest process as you don’t have to make the selection automatically. It doesn’t need more than a minute to make the selection in the automatic process. But the manual one takes more time for the selection process only.
Accuracy of Selecting the Path
This is the most important point for what people choose the manual one. The automatic background removal process cannot always create the perfect path, especially when the type is complicated.
But if you have enough time to use the pen tool, you can surely create the perfect path for the object in the image. Indeed, the automatic one needs further edition where you have to use the manual clipping path using the pen tool. So, ultimately, the pen tool is essential to get the perfect path selection.
Quality of the Image
Another special reason for choosing the manual one is the quality of the image. The automatic process cannot provide equal quality to the hand-drawn one. So, the image quality drops, and the outcome cannot be satisfactory as well.
So, as we see, the Automatic process is easy and quick. But if you prefer the image quality and perfect cutout, you have to go for the manual process for sure. That’s the reason most people choose the manual background removal process over the automatic one even if it is time-consuming and difficult in a sense.
To Sump Up
Being quick and following the easiest way can never get you the best aftermath. You should be consistent and patient. The manual background removal can provide you with the best quality with the perfect object selection. In contrast, the automatic background removal process can be quick and easy.
So, the choice is yours. You can choose the process according to your requirements. Thanks for being with us till now. Don’t hesitate to comment if you have any questions.


