Converting image to vector is like turning pictures into computer magic. They stay clear and sharp no matter how big or small you make them. Think of them as a set of instructions for the computer to create pictures.
image to vector conversion is a special trick. Vectors let you resize images without losing quality. It’s like magic for making logos, icons, and cool designs that always look great, no matter where you use them. So, converting is like making images superhero-strong!
Difference Between Regular Image and Vector Image
Learn the basic difference between a regular image and a vector image. Both show pictures, but their structures and uses make them different in digital graphics.
Regular Image:
- Made of tiny colored dots called pixels.
- Zooming in can make the picture look blurry or less sharp.
- Common in photographs and images found online.
- Resolution-dependent and resizing may result in loss of clarity.
- File formats include JPEG, PNG, and GIF.
Vector Image:
- Created using mathematical equations to define shapes.
- Can be resized without losing clarity or sharpness.
- Ideal for logos, illustrations, and designs.
- Resolution-independent, maintaining sharpness at any size.
- File formats include AI (Adobe Illustrator), EPS, SVG, and PDF.
How To Convert Image to Vector in Illustrator?
Converting image to vector in Illustrator makes your visuals look great no matter their size. Here, we’ll show you five popular methods or tools for ‘image to vector’ conversion.
Image Trace Method
Turn pictures into resizable drawings fast with Image Trace. It’s like magic for designers, keeping details and recognizing colors easily.
Step-1. Open Illustrator:
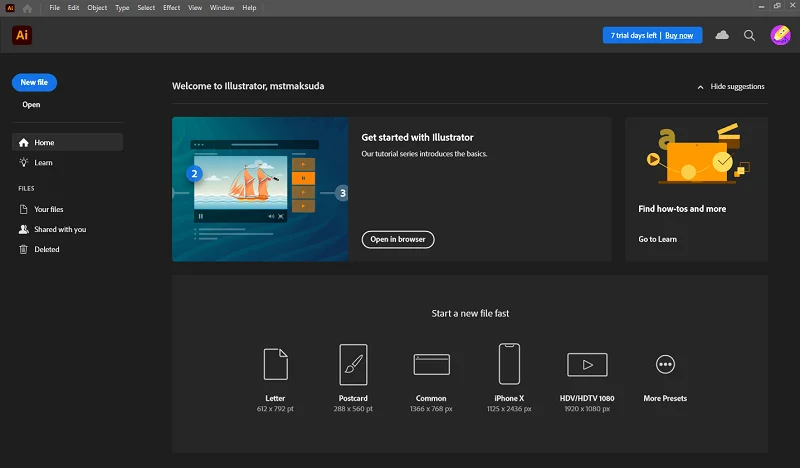
Launch Adobe Illustrator on your computer.
Step-2. Import Your Image:
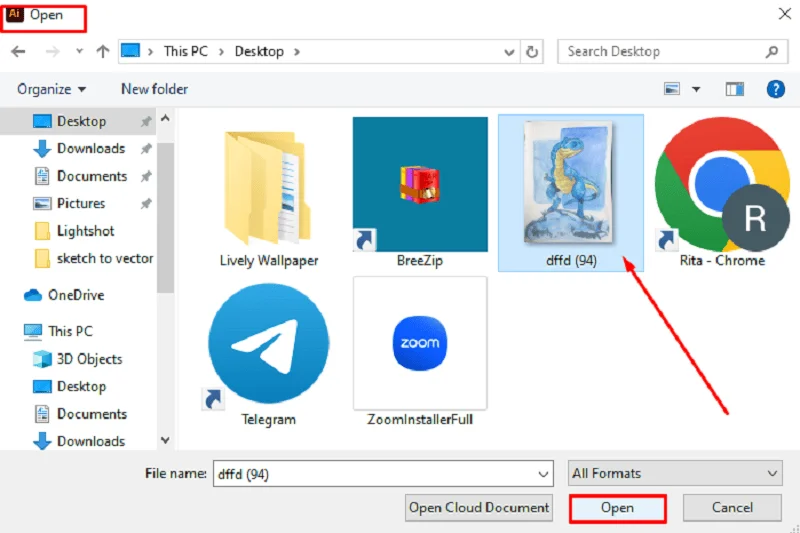
Import your image in Illustrator through “File” > “Open” or drag and drop directly.
Step-3. Select the Image:
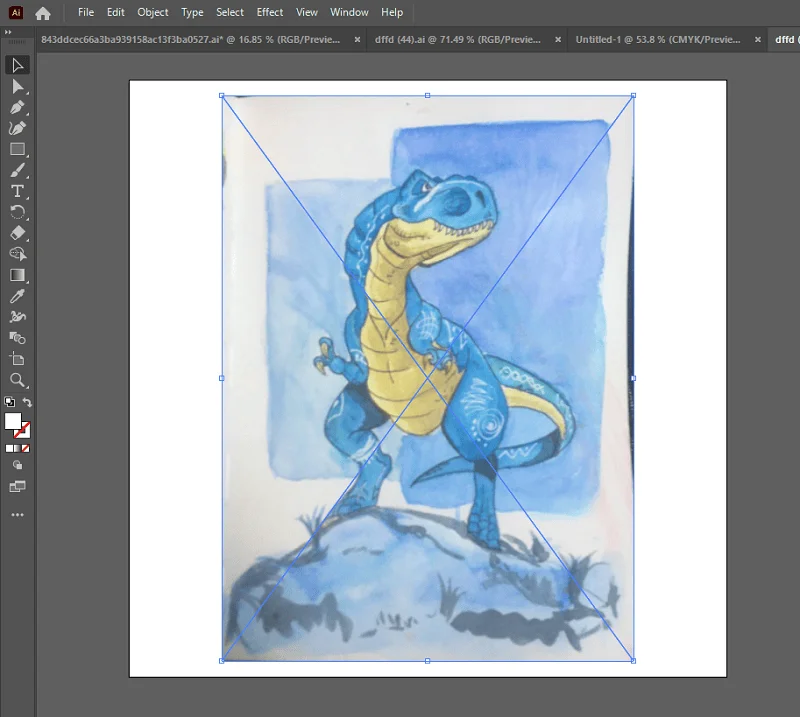
Click the imported image to select it; it’ll have a bounding box.
Step-4. Access the “Object” Menu:
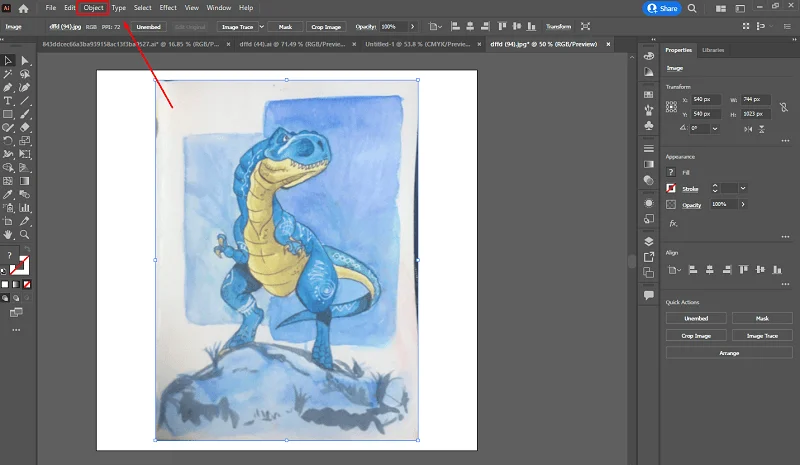
Navigate to the top menu and find the “Object” option.
Step-5. Choose “Image Trace”:
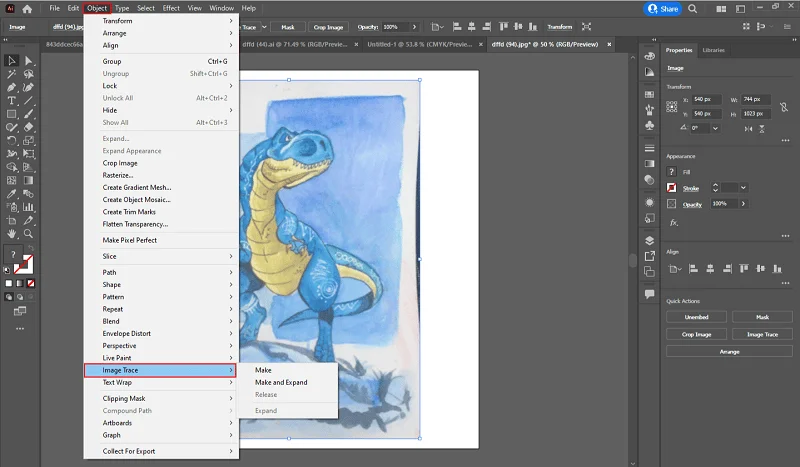
Under the “Object” menu, hover over “Image Trace.” A submenu will appear.
Step-6. Adjust Settings:
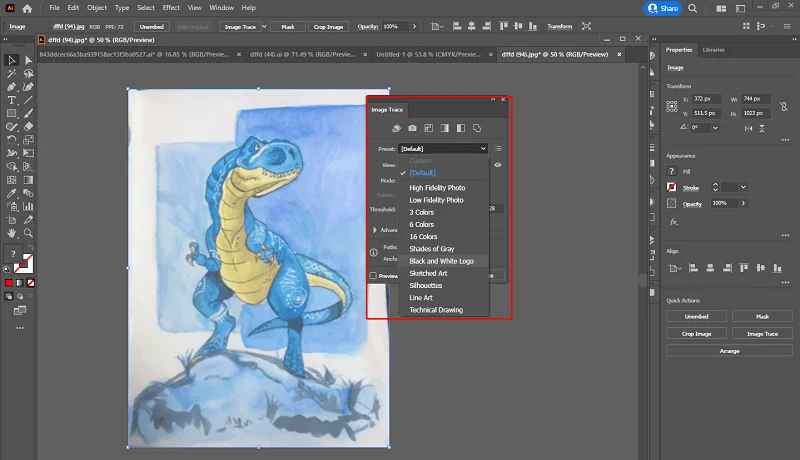
In the submenu, you can either choose one of the predefined tracing options (like “High Fidelity Photo” or “Black and White Logo”) or select “Custom” to manually adjust settings. The “Image Trace” panel will also open, allowing further adjustments.
Step-7. Use Presets or Customize:
If you choose a preset, Illustrator will automatically apply settings suitable for that type of image. If you go for “Custom,” you can fine-tune parameters like Threshold, Paths, and Corners based on the complexity and style of your image.
Step-8. Preview the Result:
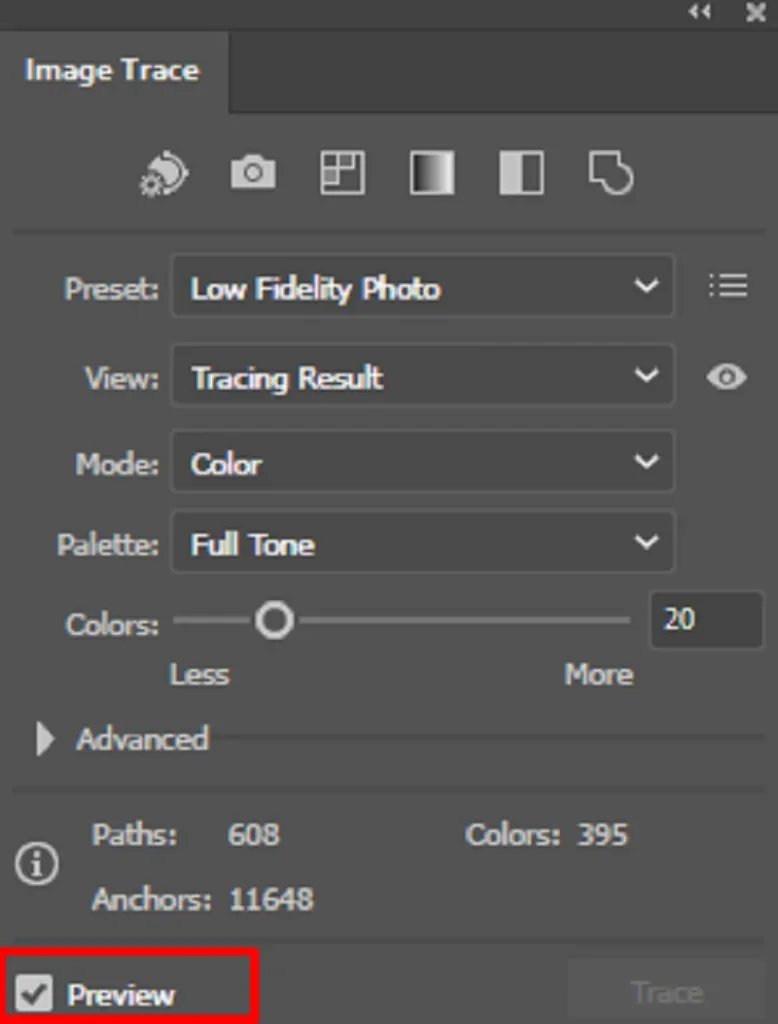
Before finalizing the trace, you can preview how the vectorization will look. Check the “Preview” box in the “Image Trace” panel to see the changes without committing.
Step-9. Click “Expand”:
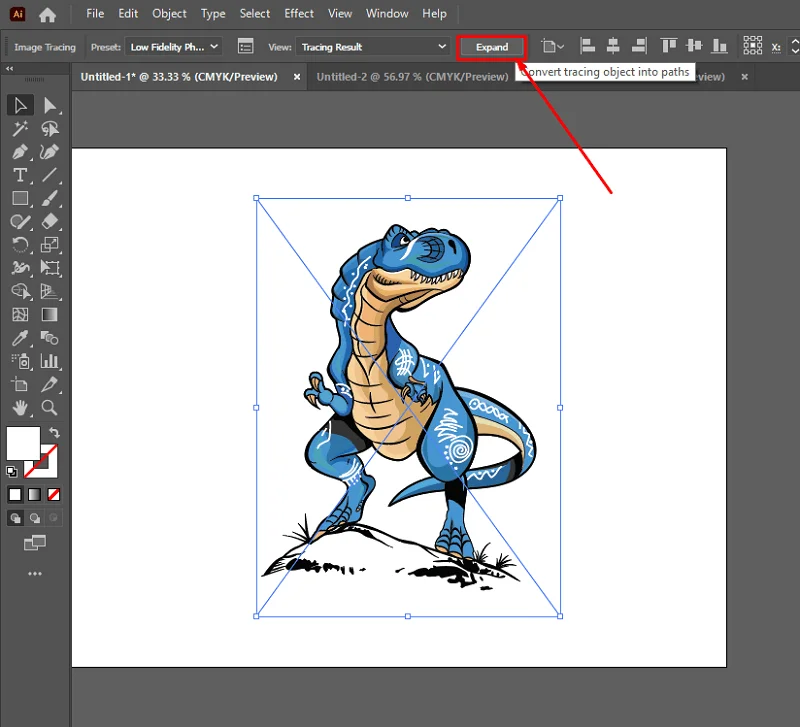
Once you’re satisfied with the preview, click the “Expand” button. This step converts the traced image into editable vector paths.
Step-10. Refine if Necessary:
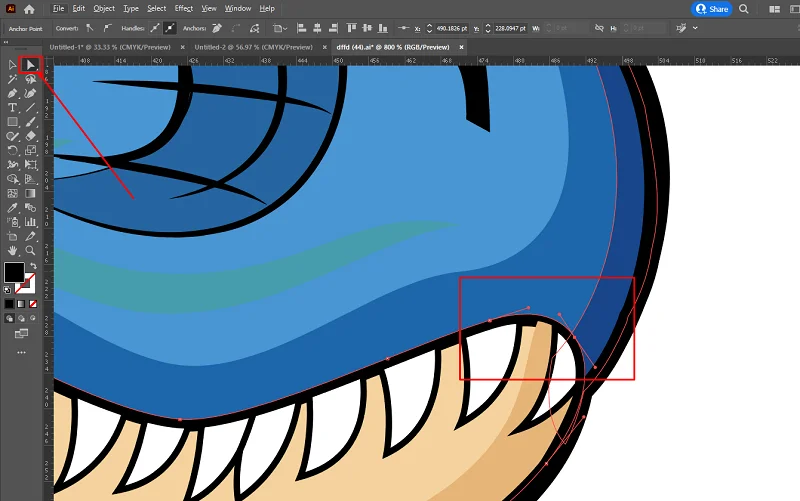
After expanding, you may need to further refine the vector paths. Use the Direct Selection Tool (white arrow) to adjust anchor points and handles as needed.
Step-11. Save Your Vector Image:
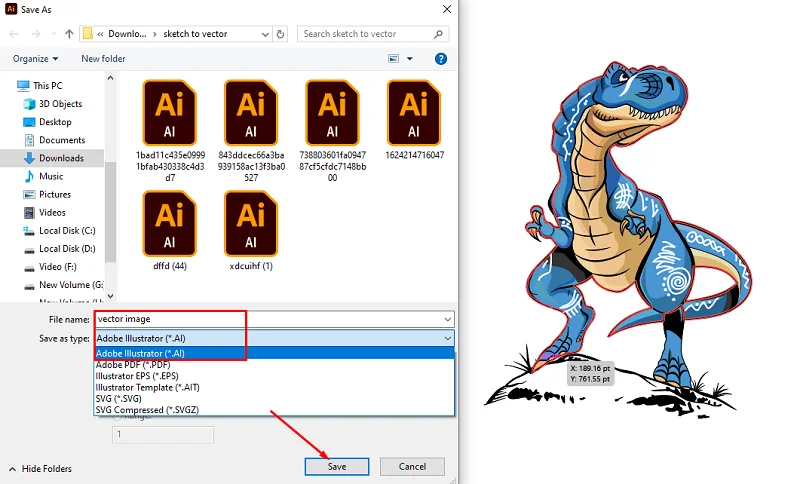
After refining, save your vectorized image as an Illustrator (.ai) file or export it to the desired format.
Best Use of Image Trace Method:
- Efficient Vectorization: Quickly convert photos into scalable vectors.
- Preserve Intricate Details: Capture fine details for intricate designs or logos.
- Color Recognition: Identify and maintain different colors within the image.
- Complex Shapes Compatibility: Perfect for handling images with intricate shapes and gradients.
Manual Tracing with Pen Tool
Manual tracing is like drawing by hand on a computer, perfect for creating unique and artistic vector illustrations. Follow these steps to create an image to vector line.
Step-1. Open Illustrator and Create a New Document:
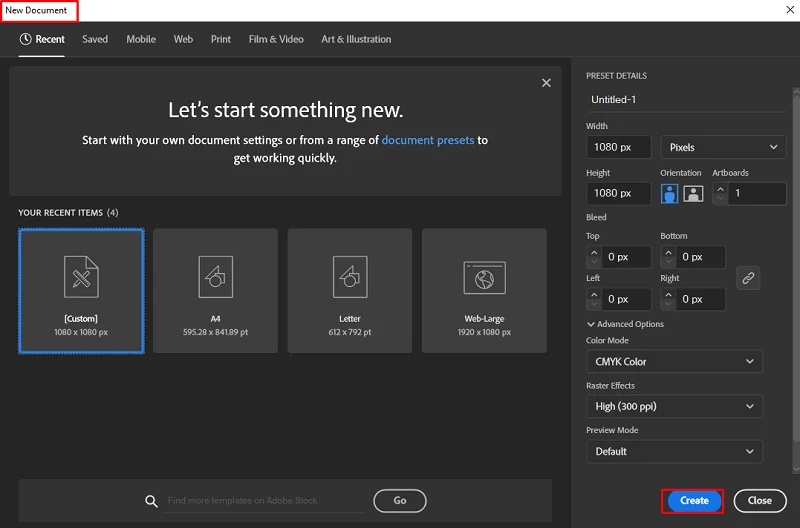
Launch Adobe Illustrator and create a new document by going to “File” > “New.” Set the document size and other parameters as needed.
Step-2. Place the Image:
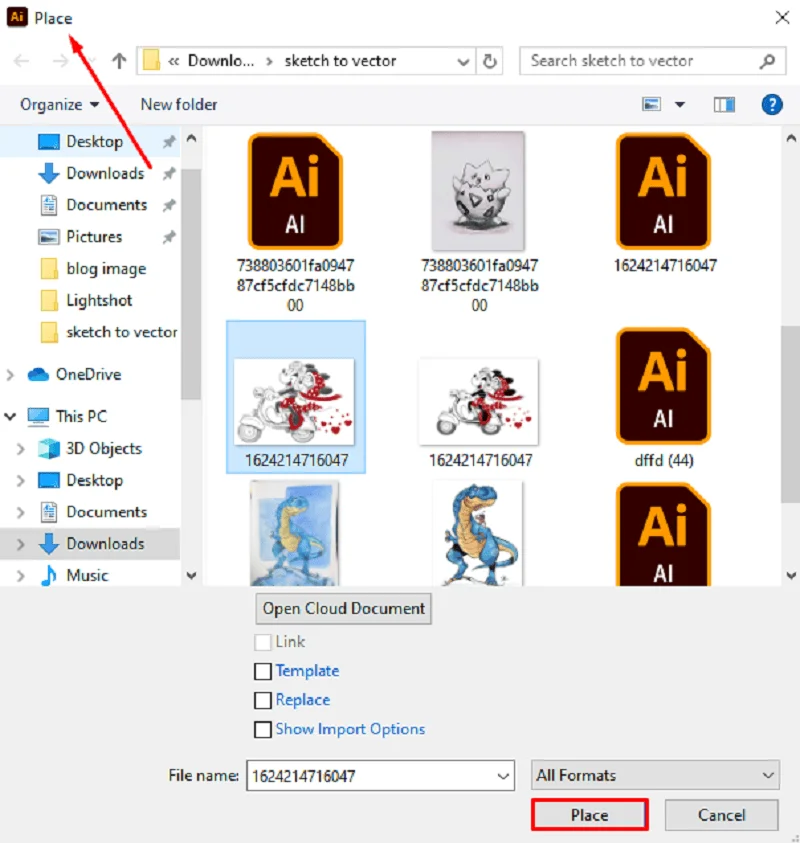
Import the image you want to convert into a vector by going to “File” > “Place.” Choose the image file and click “Place.”
Step-3. Lock Image Layer:
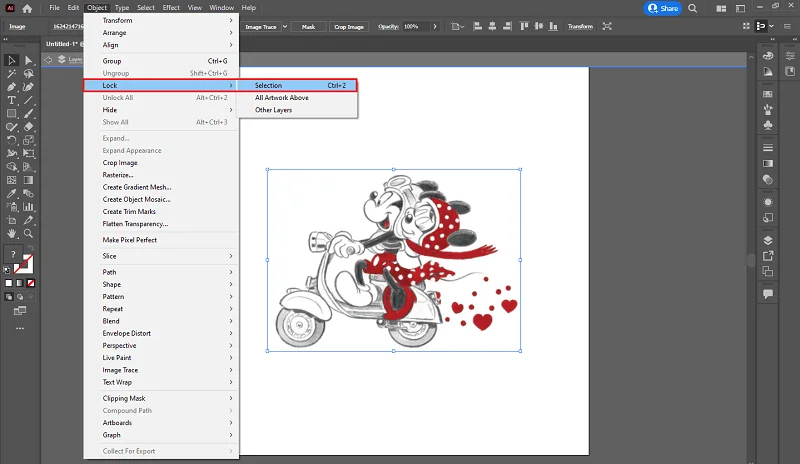
Right-click on the image, which is now on your artboard, and select “Lock Selection” from the context menu. This prevents accidental movement or changes to the image.
Step-4. Create a New Layer:
Find the “New Layer” icon at the bottom and click on it. This thing ensures that your vector paths are created on a separate layer.
Step-5. Select the Pen Tool (P):
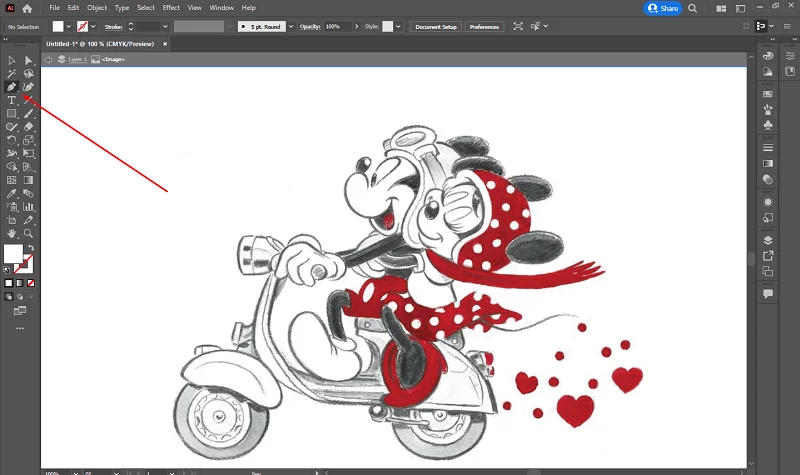
Pick the Pen Tool by pressing “P” or selecting it from the left-side toolbar.
Step-6. Start Tracing:
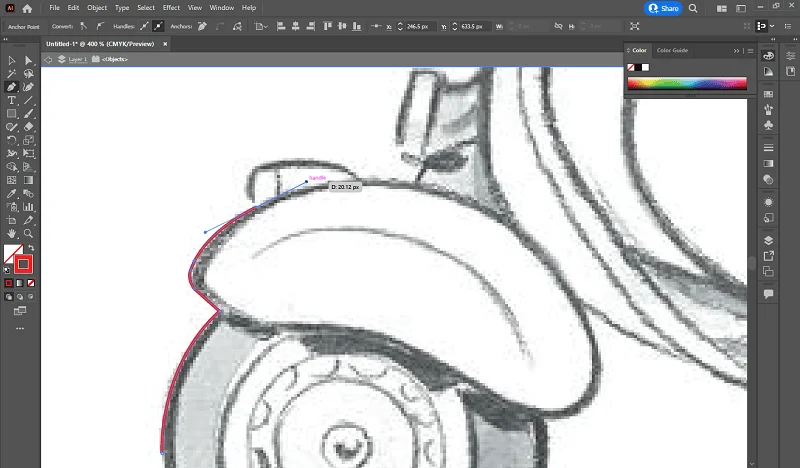
Zoom in on the image to see details clearly. Click on the edge of a shape you want to trace to create an anchor point. Continue clicking along the edges of the shape to create more anchor points.
Step-7. Close Paths and Fill:
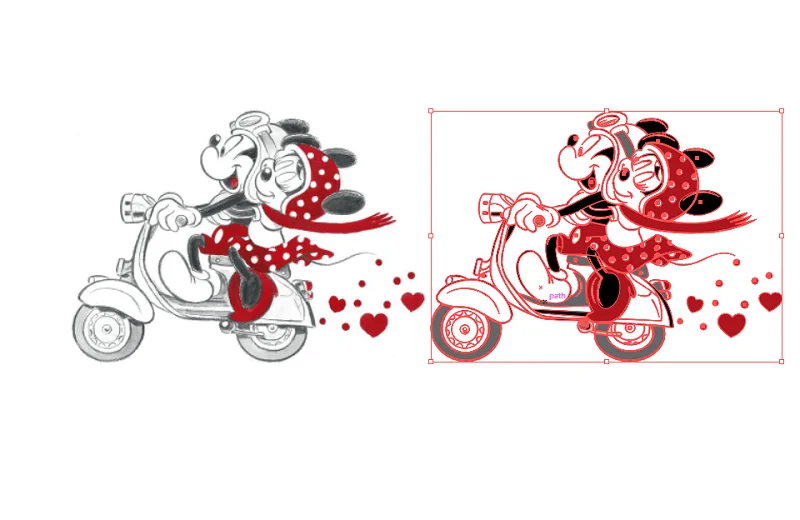
Close the path by connecting the last anchor to the first. Then, use the “Selection Tool” (V) to right-click and choose “Fill Color” for coloring.
Step-8. Refine and Save:
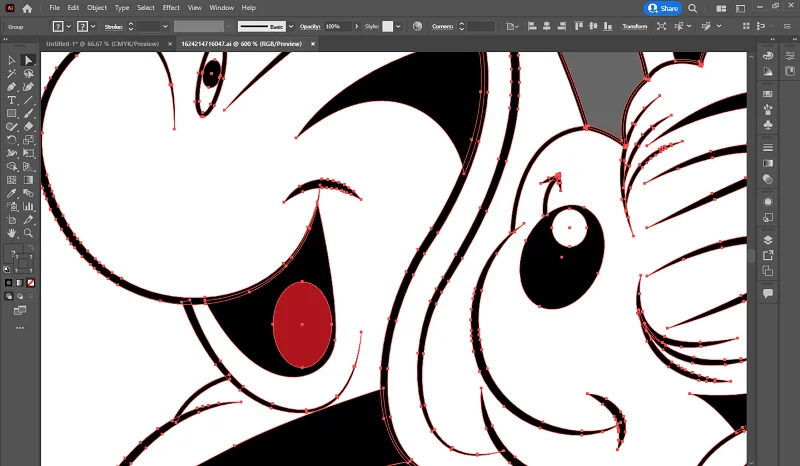
Use the Direct Selection Tool (A) to adjust anchor points and handles for precision. Add, delete, or move anchor points as needed. Save your Illustrator file frequently to avoid losing progress.
Best Use of Manual Tracing:
- Detailed Artwork: Perfect for intricate designs, logos, or illustrations requiring high precision.
- Customized Paths: Provides flexibility to create paths tailored to specific design requirements.
- Complex Shapes: Suited for images with complex shapes and varying line weights.
Live Paint Bucket
Easily add colors to turn your “image to vector” with the Live Paint Bucket. Beginners love it because you can paint many areas at once, making your designs vibrant.
Step-1. Open Adobe Illustrator: Launch Adobe Illustrator on your computer.
Step-2. Create a New Document: Go to “File” > “New” to create a new document.
Step-3. Place the Image:
Embed the image in Illustrator using “File” > “Place.”
Step-4. Image Trace:
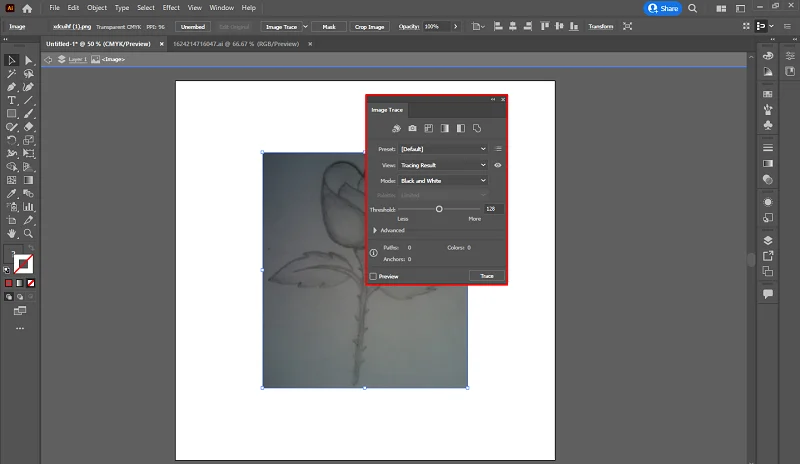
Choose the placed image, locate the “Image Trace” panel at the top or under “Window,” and click “Image Trace” for automatic tracing.
Step-5. Expand the Image Trace:
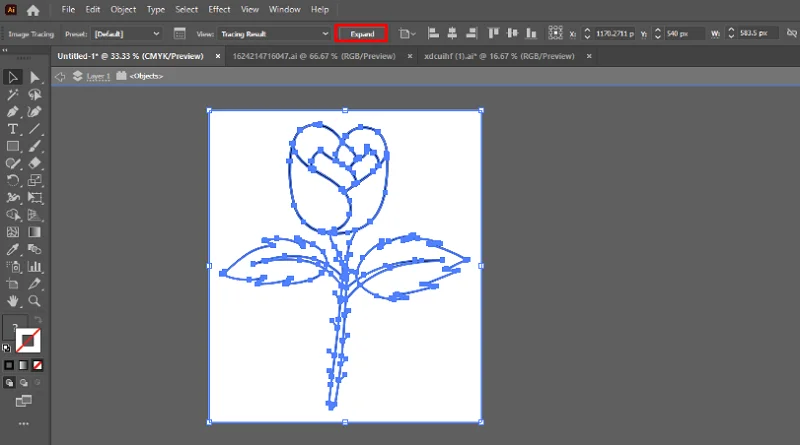
After tracing, click “Expand” at the top. This converts the traced image into editable vector paths.
Step-6. Create a Live Paint Group:
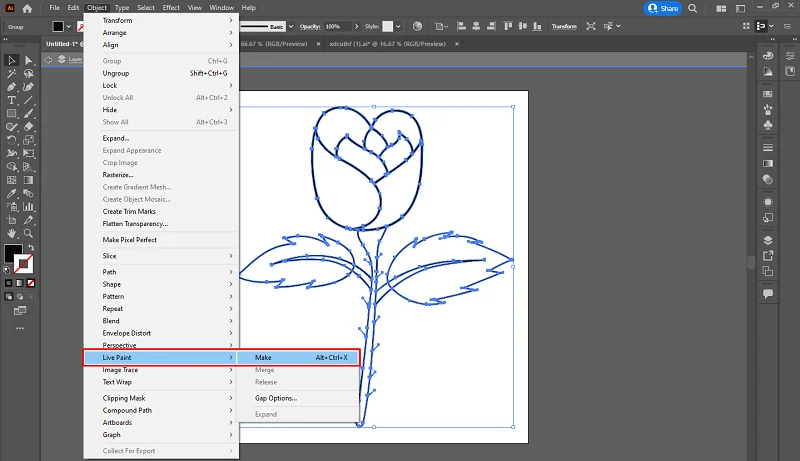
With the traced image selected, go to “Object” > “Live Paint” > “Make.” This will convert your paths into a Live Paint Group.
Step-7. Select the Live Paint Bucket (K):
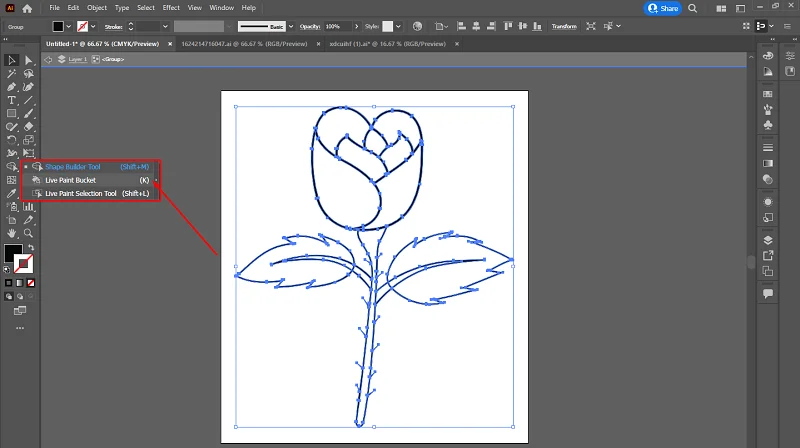
Choose the “Live Paint Bucket” tool from the toolbar (shortcut: K). Your cursor will turn into a small paint bucket.
Step-8. Fill with Color:

Click on any enclosed area within the Live Paint Group. The Live Paint Bucket will fill the area with color. Continue clicking to fill other areas with different colors.
Step-9. Save Your Work:
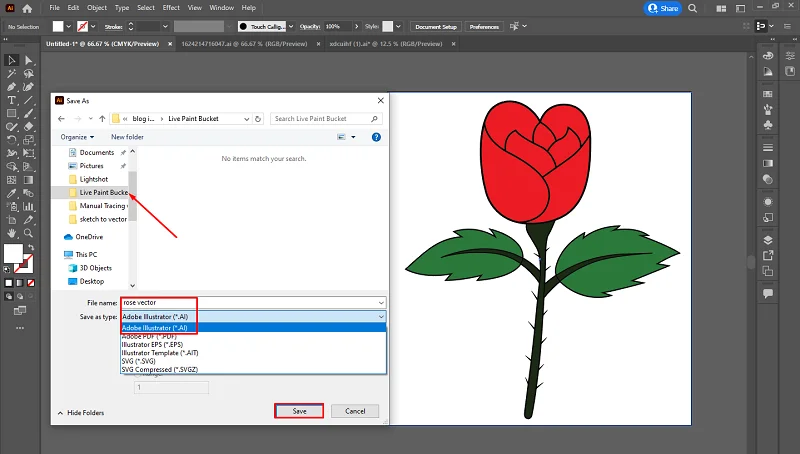
Go to “File” > “Save” to save your Illustrator file. Choose a location and enter a filename. Saving your work frequently ensures that you don’t lose your progress.
Best Use of Live Paint Bucket Method:
- Vector Illustrations: Live paint bucket is ideal for illustrations with well-defined shapes and distinct regions.
- Flat Colors: Particularly effective for designs with flat color elements.
- Quick Color Additions: Provides a faster and less precise approach compared to manual tracing, making it suitable for projects with a more fluid and artistic style.
Pathfinder Panel
Process of Using Pathfinder Panel for Vectorization in Illustrator:
Step-1. Image Import:
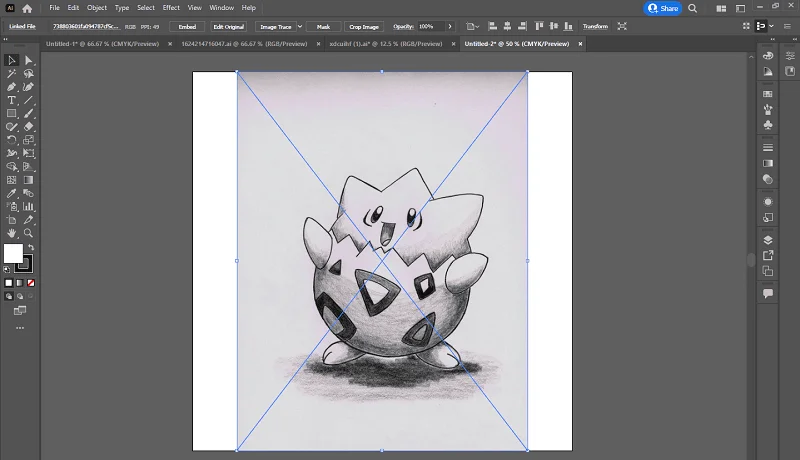
Begin by opening Adobe Illustrator and importing the image you want to vectorize.
Step-2. Create a New Layer:
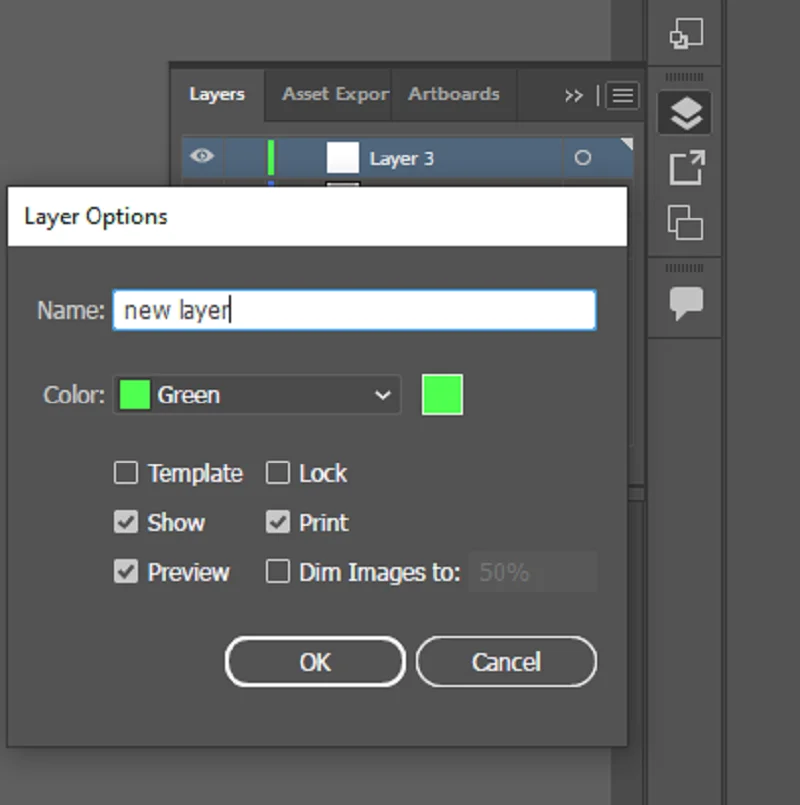
Access the Layers panel and locate the “New Layer” icon. Click on it to generate a dedicated layer for your vector paths.
Step-3. Tracing with the Pen Tool:
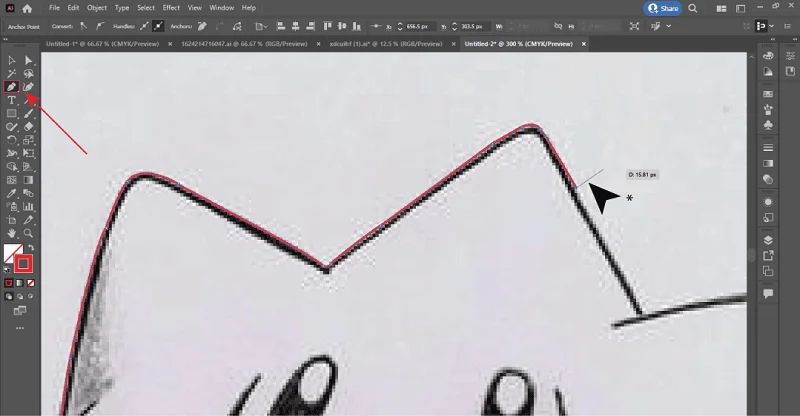
Use the Pen Tool to manually trace the key elements of the image on the new layer. Click to create anchor points and adjust handles to define curves.
Step-4. Open the Pathfinder Panel:
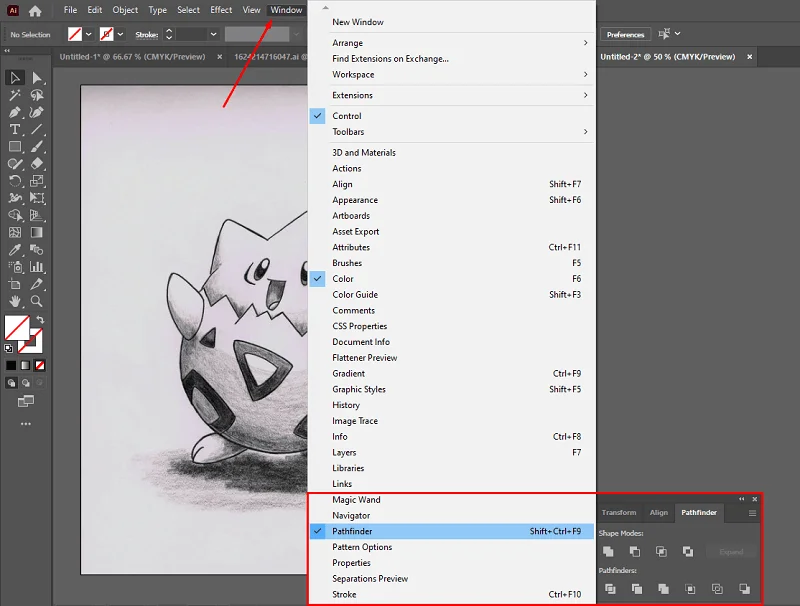
Access additional tools by going to the “Window” menu. Open the Pathfinder panel for various options in combining, dividing, and manipulating vector shapes.
Step-5. Select Traced Shapes:
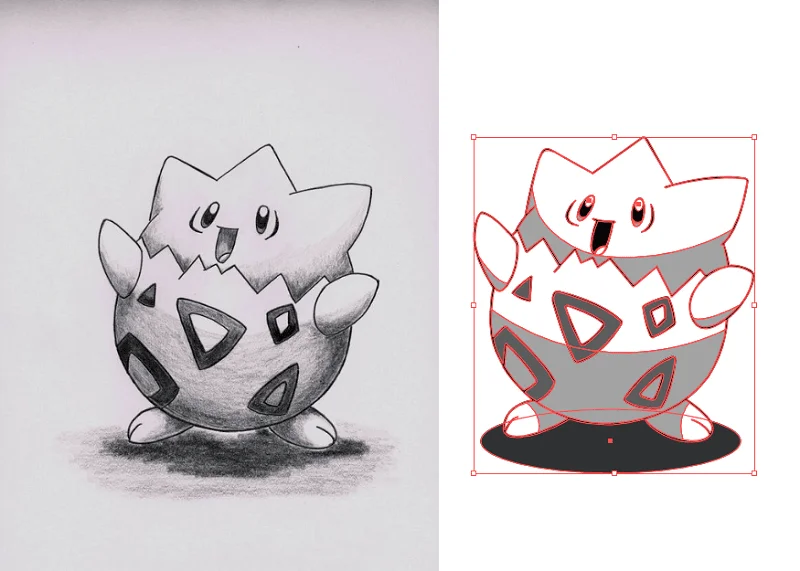
Select the shapes you’ve created with the Pen Tool. Ensure that they are closed paths, as the Pathfinder operations work best with closed shapes.
Step-6. Choose a Pathfinder Option:
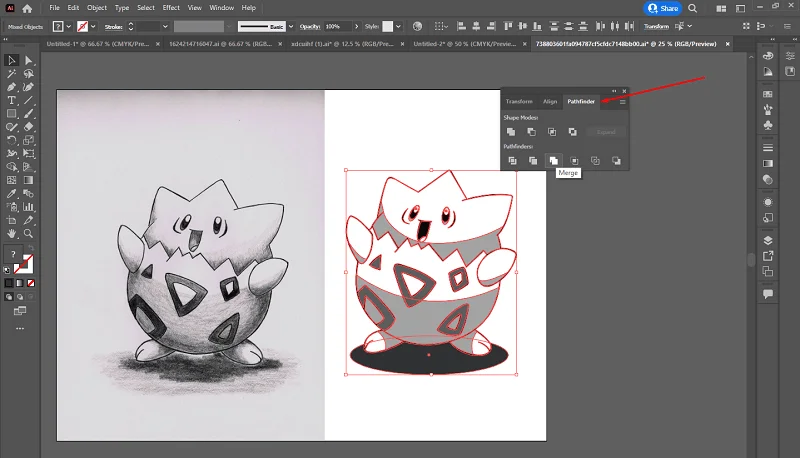
In the Pathfinder panel, you’ll find options such as “Unite,” “Intersect,” “Exclude,” and more. Choose the option that suits your vectorization goals.
- Unite: Combines selected shapes into a single, solid object.
- Intersect: Retains only the overlapping area of selected shapes.
- Exclude: Subtracts the front shape from the back shape.
Step-7. Apply the Chosen Operation:
After selecting the appropriate option, click on it in the Pathfinder panel. This action applies the chosen operation to the selected shapes, creating a new, modified shape based on the selected operation.
Step-8. Refine and Repeat:
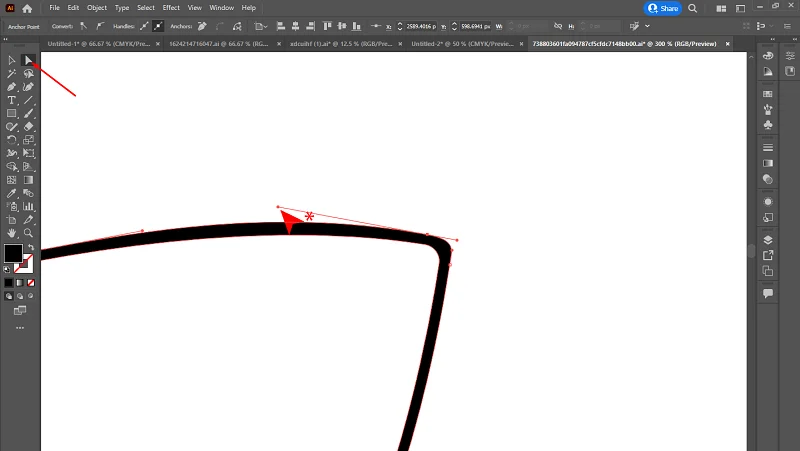
Fine-tune the resulting shape by adjusting anchor points and handles using the Direct Selection Tool (white arrow). Repeat the process as needed for other parts of the image, using different Pathfinder options for varied effects.
Step-9. Organize Layers:
Keep your vectorized shapes organized by using layers. Consider creating separate layers for different elements or sections of your vector illustration.
Step-10. Save Your Vector Image:
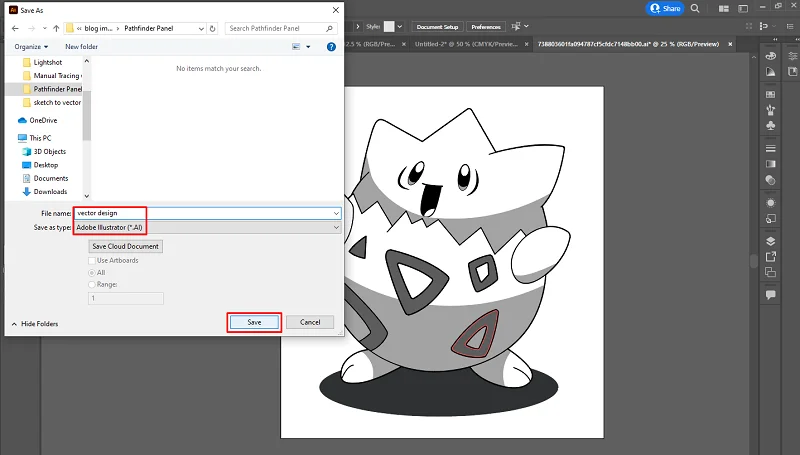
Once you’re satisfied with the vectorization, save your work as an Illustrator (.ai) file or export it in the desired format.
Best Use of Live Pathfinder Panel Method:
- Crafting Professional Logos: Makes logos look awesome by blending and refining shapes smoothly.
- Generating Unique Shapes: Creates cool and special shapes by mixing and matching basic ones.
- Designing Clear Icons: Helps in making easy-to-understand icons by merging and shaping elements neatly.”
- Styling Fancy Typography: Lets you play with shapes for unique and stylish text designs.
Gradient Mesh
Gradient Mesh tool helps you to convert a raster image to vector very easily. We have described the full process of using this tool in image to vector conversion.
Step-1. Open Illustrator:
Begin by opening Adobe Illustrator on your computer. It is essential to start the process of converting an image to vector.
Step-2. Import Your Image:
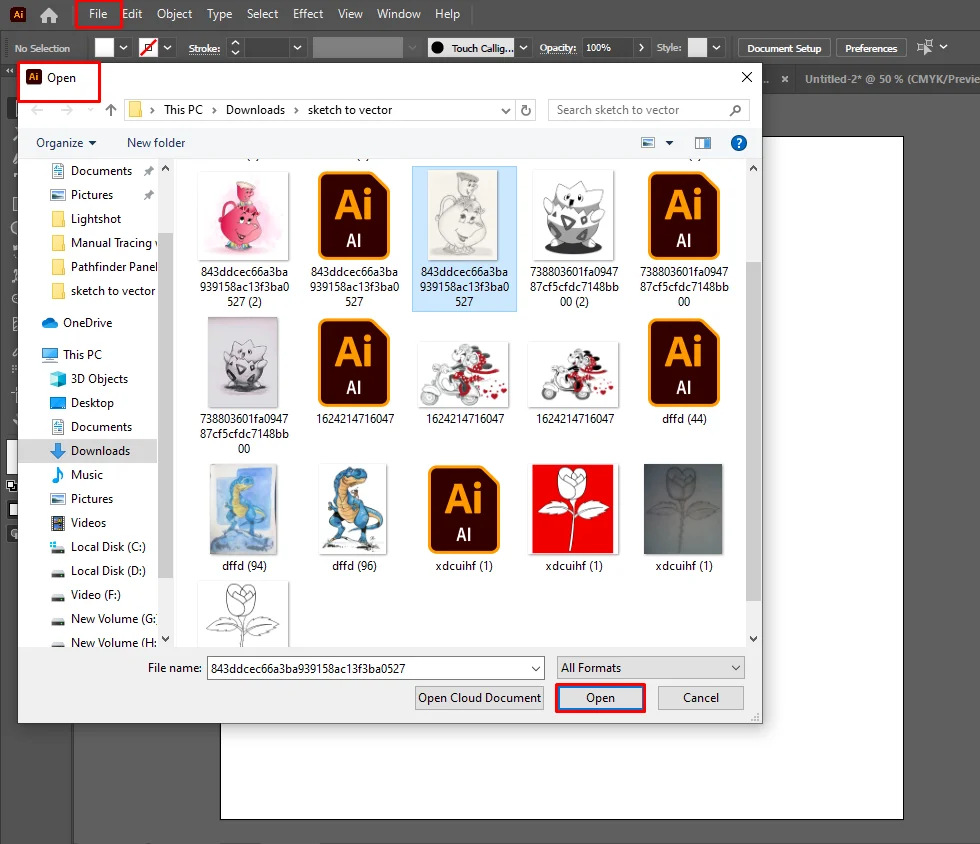
Go to “File” and select “Open” to open the image you want to convert.
Step-3. Create a New Layer:
Locate the “New Layer” icon at the bottom and click on it. This action will create a new layer to accommodate your design.
Step-4. Select the Gradient Mesh Tool:
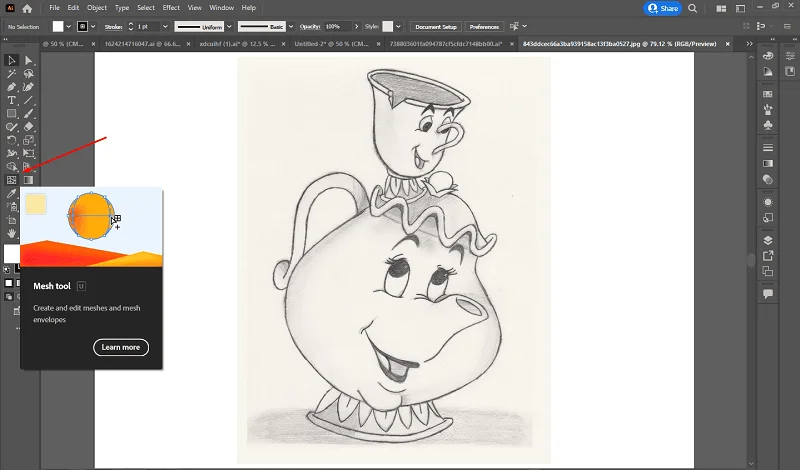
Choose the Gradient Mesh Tool by clicking its icon in the left-side toolbar.
Step-5. Add Mesh Points:
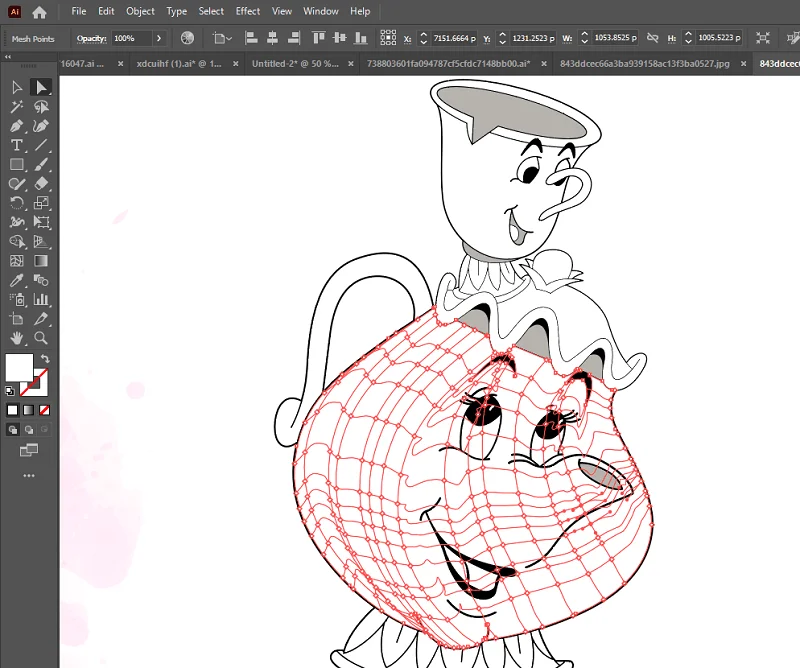
Click on the image where you want to add a mesh point. Illustrator will create a grid around the point, and colors will interpolate within the mesh.
Step-6. Adjust Mesh Points:
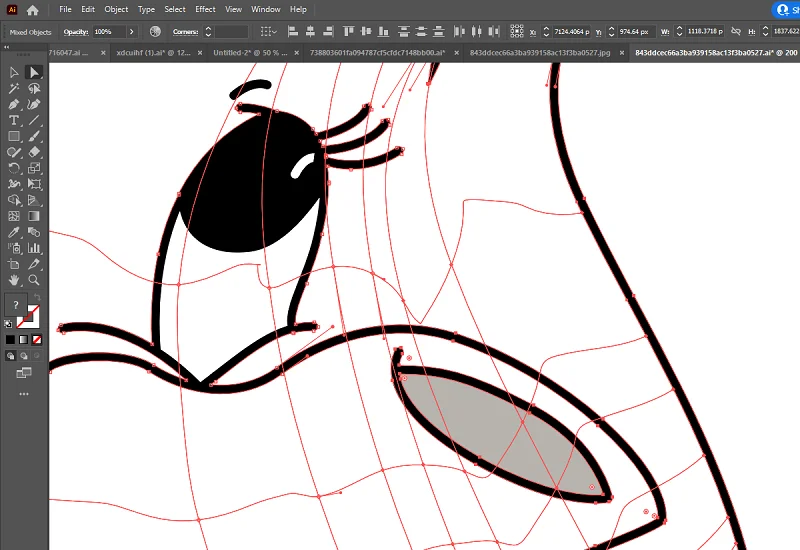
Use the Direct Selection Tool (white arrow) to select and move individual mesh points. You can add more points to refine the mesh structure.
Step-7. Assign Colors:
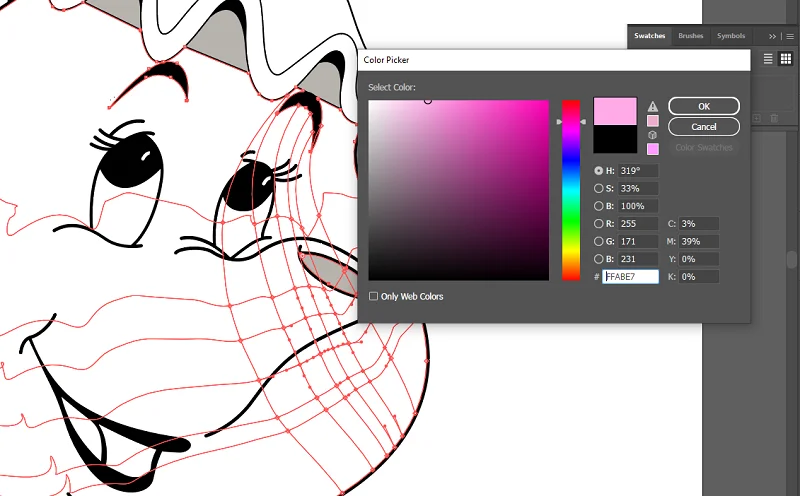
Click on a mesh point and select a color from the Swatches panel or Color Picker. Colors will blend smoothly within the mesh, creating gradients.
Step-8. Refine and Edit:
Continue adding mesh points, adjusting colors, and refining the mesh structure until you achieve the desired vectorized image with gradients.
Step-9. Organize Layers:
As you work, organize your layers to keep the mesh structure manageable.
Step-10. Save Your Vector Image:
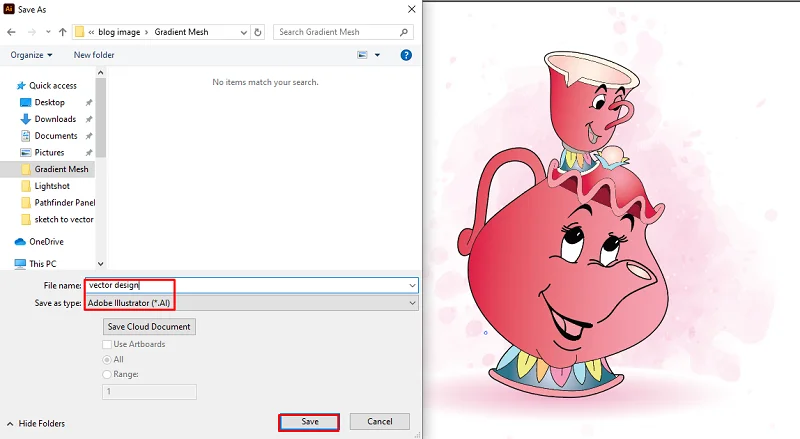
After creating the gradient mesh, save your vectorized image as an Illustrator (.ai) file or export it to the desired format
Best Use of Gradient Mesh Method:
Realistic Portraits: Gradient Mesh helps make faces look real with lots of tiny dots blending together.
Nature Scenes: Use it for smooth colors in nature pictures, like water or trees.
Product Designs: Perfect for making products look shiny and detailed in pictures. Cool and Unique Art: Create cool and special art with unique colors and shades
Conclusion
Illustrator has cool tools like Image Trace, Pen Tool, and Pathfinder Panel for turning images into sharp vectors. Each method has its own strengths and styles. So, don’t forget to practice and try out different methods. The more you play around, the better you’ll get at making awesome vector designs in Illustrator. Have fun experimenting!
FAQs
Q1: Why use Adobe Illustrator to convert an image to a vector?
A: Adobe Illustrator is great at turning images into vectors. You can easily do this using the Image Trace Tool, preserving quality and making your designs scalable.
Q2: What’s the difference between “image to vector” and “image to vector line”?
A: “Image to vector” means scalable vectors; “image to vector line” is editable lines and shapes, done with the Image Trace Tool.
Q3: Can I convert images to vectors if I’m a beginner?
A: Yes! Adobe Illustrator’s Image Trace Tool is super easy for beginners; just pick a preset, and Illustrator does the rest.
Q4: Are there specific settings for converting images to vectors?
A: Yes, when using the Image Trace Tool, you can choose different settings. Start with presets like “High Fidelity Photo” or “Sketched Art” and adjust them based on your image for better results.
Q5: Why would I use the Pen Tool instead of the Image Trace Tool?
A: The Pen Tool is great for precise tracing, giving you control. If you want to outline specific details or have a hand-drawn touch, the Pen Tool is your go-to.
Q6: Can I customize shapes after converting with Adobe Illustrator?
A: Absolutely! After converting, edit and refine your vector shapes as you like. Illustrator gives you the freedom to customize.


