
Short answer: To restore old photos, handle the print by its edges, scan it at 300 ppi or more (400 to 600 ppi for larger prints), and edit only a copy. Heal dust and scratches, clone across tears, correct fading with Levels or Curves, then colorize if you want. Missing detail can be rebuilt, not recovered.
Key takeaways
- Never edit the only copy. Scan first, keep the scan untouched, and work on a duplicate layer or file.
- The Library of Congress suggests 300 dpi for 4 × 6 and 5 × 7 prints, and 400 or 600 dpi for 8 × 10 prints and larger.
- Dust, scratches, small creases and fading are the easiest repairs. Large missing areas and damaged faces take the most skill.
- AI filters such as Photoshop’s Photo Restoration speed up the first pass, but faces and fine detail still need a careful manual check.
- Hire a restorer when the damage covers a face, a large area is missing, or the print is the only copy of an important family photo.
On this page
- What can and cannot be restored in an old photo?
- How should you handle the original before you start?
- How do you scan old photos for restoration?
- Which tools do you need to restore old photos?
- How do you restore an old photo in Photoshop, step by step?
- How do you restore old photos for free?
- What do AI restoration tools get wrong?
- When should you hire a professional restorer?
- How do you colorize an old photo so it looks natural?
- How do you restore a photo for a holiday gift in time?
- How do you keep the restored photo safe?
- Frequently asked questions
- Sources
What can and cannot be restored in an old photo?
Restoration can repair the appearance of a photo, but it cannot bring back information that was never captured or has been completely lost. FamilySearch puts it plainly: “Missing information in the photo cannot be restored.” What a restorer does is rebuild those areas convincingly from what is left, and make faint detail more visible.
That distinction sets expectations. A faded face with visible features can be brought back to life. A face torn away or eaten by water damage can only be reconstructed. The result depends on how much reference survives elsewhere in the photo or in other pictures of the same person.
| Damage | Can it be fixed? | Usual method | DIY difficulty |
|---|---|---|---|
| Dust specks and spots | Yes | Spot healing, Dust & Scratches filter on selected areas | Easy |
| Fine scratches | Yes | Healing brush, AI scratch reduction | Easy to moderate |
| Fading and low contrast | Yes, if detail is still there | Levels, Curves, Auto Color | Easy |
| Color casts (yellow, magenta, cyan) | Usually | Color balance, Auto Color, channel adjustments | Moderate |
| Creases and folds | Yes | Healing and cloning along the line | Moderate |
| Tears with all pieces present | Yes | Align pieces in the scan, then clone across the seam | Moderate |
| Stains, water marks, mold spots | Usually | Cloning, healing, local tone matching | Moderate to hard |
| Missing corners or background | Rebuilt, not recovered | Cloning, content-aware fill, painting | Moderate |
| Damage across a face | Rebuilt, with limits | Careful cloning and painting from reference | Hard |
| Large missing areas | Rebuilt only if reference exists | Reconstruction from other parts or photos | Hard |
| Very blurry originals | Improved, not made sharp | Contrast, careful sharpening, AI enhancement | Hard |
How should you handle the original before you start?
Handle the print as little as possible, and protect it before you think about software. The Library of Congress guidance on caring for photographs is practical and worth following at home.
- Use clean, dry hands or clean nitrile gloves, and hold prints by the edges or their sleeve, never the image area.
- Work on a clean, dry surface with no food or drinks nearby.
- Blow off loose dust with a bulb blower. The Library of Congress warns that even soft brushes can scratch photographs, and it suggests avoiding canned air.
- Do not use tape, glue, sticky notes or other adhesives on photographs, even to hold a tear together.
- Avoid paper clips and rubber bands, and albums with sticky “magnetic” pages.
Some originals need a specialist before they are scanned at all. Typical cases are prints stuck to glass, photos stuck together, flaking emulsion, or prints in “magnetic” albums that will not release. Forcing them apart can destroy the image. The Library of Congress points readers to a photograph conservator for problems like these, and the American Institute for Conservation keeps a directory of conservators.
How do you scan old photos for restoration?
Scan at a resolution that matches how you will use the result, save a lossless master, and clean the glass first. The Library of Congress personal archiving guide gives a simple starting point.
| Original print | Library of Congress suggestion | When to go higher |
|---|---|---|
| 4 × 6 or 5 × 7 print | 300 dpi | If you plan to print it larger than the original |
| 8 × 10 or larger | 400 or 600 dpi | Rarely needed beyond 600 dpi for prints |
| Small or wallet-size print | (not listed) | Use about 1,000 dpi or more if you want an 8 × 10 from it |
The enlargement math is simple. Printful, for example, recommends up to 300 DPI for paper prints and fine detail. If you want to print a 2 × 3 inch wallet photo at 8 × 12 inches, you need four times as many pixels per inch in the scan. That works out to about 1,200 ppi. Scanning higher than that only adds file size. Is the scan still too small for the print you want? Our guide to converting low to high resolution in Photoshop explains what upscaling can and cannot do.
Follow these steps for a clean scan:
- Clean the scanner glass, so it is free of dirt, smudges and particles.
- Remove loose dust from the print with a bulb blower.
- Choose color or grayscale. The Library of Congress lists grayscale as fine for black-and-white photos. For restoration work we still scan them in color, because it keeps the sepia tone and makes stains easier to separate.
- Turn off automatic “dust removal” and sharpening in the scanner software, if you can. We switch them off because they can soften detail you will want later.
- Save a master file in a lossless format such as TIFF, then do your editing on a copy. JPEG recompresses the image every time you save it.
- Name files consistently. The Library of Congress suggests starting file names with the date as yyyymmdd, for example 19620704-picnic-001.
- Keep at least two copies in different places.
No scanner? FamilySearch notes that a simple digital camera or a smartphone can capture a photograph. Shoot square-on in soft, even daylight, with no glare on the surface, and fill the frame with the print. A good scan is still better for small prints and fine detail.
Which tools do you need to restore old photos?
You need an editor with healing, cloning and tone controls, and a lot of patience. These are the common choices.
| Tool | Cost (checked October 18, 2026) | Strengths | Limits |
|---|---|---|---|
| Adobe Photoshop | US$22.99 per month (annual plan, billed monthly) | Spot Healing Brush, Clone Stamp, Neural Filters (Photo Restoration, Colorize) | Subscription; a learning curve |
| Adobe Photography plan | US$19.99 per month (annual plan, billed monthly) | Includes Photoshop and Lightroom | Same tools, subscription |
| GIMP | Free | Heal and Clone tools, Levels, Curves | No built-in AI restoration filter |
| Phone apps with AI restore | Varies | Fast for light damage | Little control; faces can change |
| Professional restorer | Per image, by damage level | Manual reconstruction, colorizing, print-ready output | You wait for delivery and pay per photo |
How do you restore an old photo in Photoshop, step by step?
Work non-destructively: keep the scan untouched and do every repair on separate layers. That way you can undo any mistake without starting over. This sequence follows the order we use in production, from global fixes to fine detail.
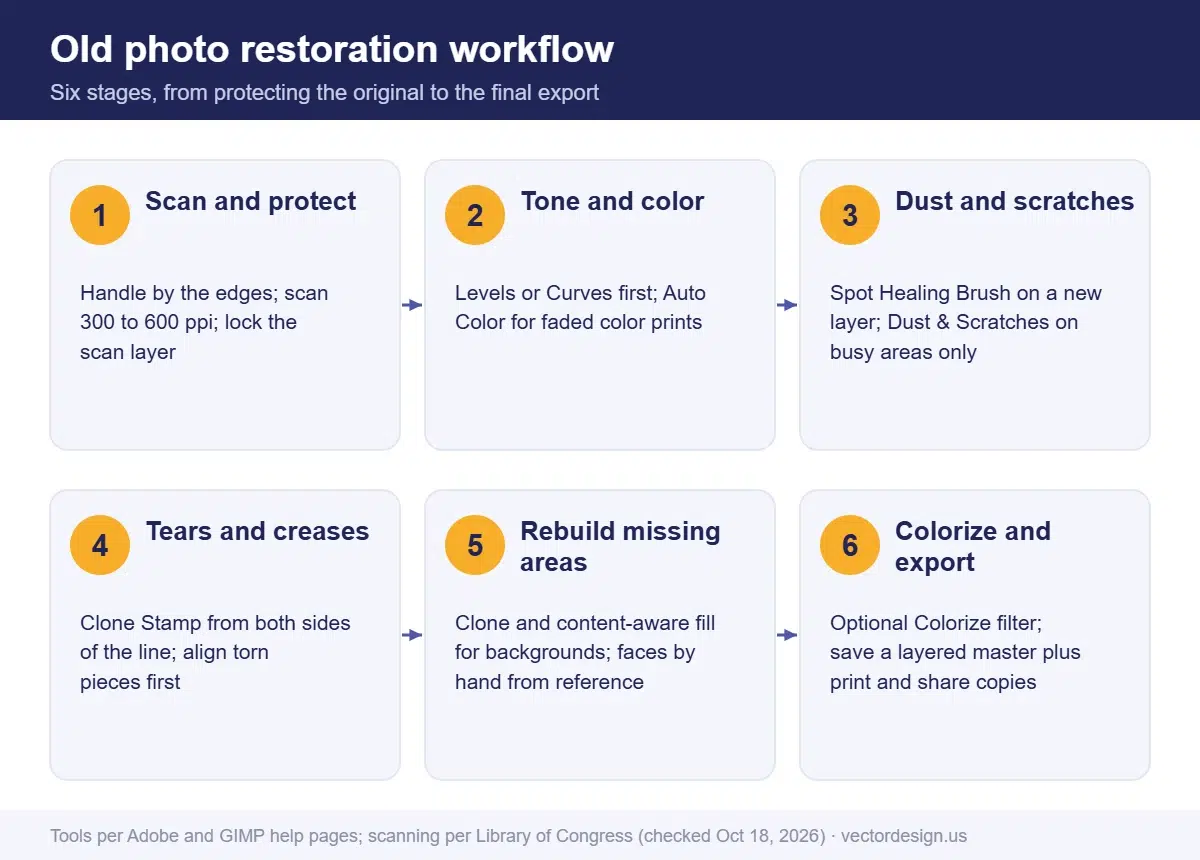
- Open the scan and protect it. Adobe’s restoration guide suggests keeping the scan as the background layer, locking it, and doing all adjustments on new layers.
- Straighten and crop. Rotate the image so horizons and door frames are level, and crop off the scanner bed.
- Run Photo Restoration as a first pass. Choose Filter > Neural Filters > Photo Restoration. Download the filter if asked. Then adjust the image enhancement, enhance face and scratch reduction sliders. Adobe lists this filter as a beta feature. Use low settings and check the result at 100%.
- Fix tone and fading. Add a Levels or Curves adjustment layer to restore blacks and whites. For faded color prints, Adobe suggests Auto Color, a Hue/Saturation layer and Levels.
- Remove dust and specks. On a new empty layer, use the Spot Healing Brush with the type set to Content-Aware and Sample All Layers turned on. It samples nearby pixels automatically, so you only dab over each spot.
- Treat areas full of fine specks. Select a busy background area and apply Filter > Noise > Dust & Scratches. Adobe advises trying different Radius and Threshold combinations to balance sharpness against hidden defects. Never apply it to the whole photo; it softens faces.
- Repair creases and tears. Use the Clone Stamp with “Current layers and below” selected, taking the source from undamaged areas next to the line. Change the source point often so no pattern repeats.
- Rebuild missing areas. For backgrounds and simple textures, select the area and use content-aware fill or cloning. For faces, hands and clothing edges, work slowly with small brushes and real reference from the same photo.
- Colorize, if wanted. Create a merged layer with Ctrl+Alt+Shift+E (Windows) or Command+Option+Shift+E (Mac). Choose Filter > Neural Filters > Colorize. Then set the layer blend mode to Color. Adobe notes that faded or badly exposed images give less accurate colors, so correct tone first.
- Sharpen lightly and export. Save a layered master (PSD or TIFF), then export a JPEG for sharing and a high-quality file for printing.
How do you fix dust, spots and scratches?
Use the Spot Healing Brush for isolated specks and the Healing Brush or Clone Stamp for scratches that cross detail. Work at 100% or 200% zoom with a brush slightly larger than the defect. Long scratches are easier in short strokes, following the scratch in segments, than in one long stroke.
How do you repair creases and tears?
Repair the line in sections, sampling from both sides. A crease often damages the surface without removing image detail, so a light healing pass may be enough. A tear needs the edges lined up first. If the pieces scanned slightly apart, move one piece into place on its own layer before you clone across the seam.
How do you fix fading and color casts?
Fix tone with Levels or Curves before color. Set a true black and white point, then judge color on a neutral area such as a white shirt, a gray wall or paper. Old color prints can take on a strong cast as their dyes fade. Channel-by-channel adjustments can pull it back, but very faded prints may need color painted back by hand.
How do you rebuild missing areas?
Rebuild from real reference wherever possible. Use symmetry carefully. A missing eye or ear copied from the other side often looks wrong, because faces are not perfectly symmetrical and the light falls differently. If the family has other photos of the same person, use them as a guide for shapes, not as a paste-in. If an old group photo includes someone who should not be in the final print, see how to remove someone from a photo.
How do you restore old photos for free?
GIMP, a free open-source editor, has the core tools. Its Heal tool (shortcut H, or Tools > Paint Tools > Heal) works like Photoshop’s healing brush. Hold Ctrl and click a clean area to set the source, then click over the defect. The GIMP manual explains that Heal takes the surrounding pixels into account, so it blends better than the Clone tool for small flaws such as wrinkles.
- Duplicate the scan layer and work on the copy.
- Fix tone with Colors > Levels or Colors > Curves.
- Use Heal for spots, small scratches and fine creases.
- Use Clone for larger repairs, changing the source often.
- Export a master in a lossless format and a JPEG copy.
Free tools can produce excellent results. What they lack is the AI first pass, so expect to spend more time on scratches and dust.
What do AI restoration tools get wrong?
AI filters are quick, and on light damage they can look impressive. In production we treat them as a first pass, never as the finish, because the same problems show up again and again:
- Faces that change. Enhanced faces can gain a different eye shape, smoother skin or a new expression. Families notice immediately.
- Plastic textures. Skin, hair and fabric can lose their grain and look painted.
- Invented detail. Text on signs, patterns on clothing and background objects can be replaced with plausible-looking nonsense.
- Guessed colors. Colorization guesses. A uniform, a car or a dress may come out in a color it never was.
- Uneven sharpness. The face becomes crisp while the shoulders stay soft, which looks unnatural.
Compare the result with the original scan side by side at 100%. If the person no longer looks like themselves, reduce the filter strength or repair that area by hand.
How do you choose a phone app with AI restore?
Judge an app by what it lets you control and what you get back, not by its sample images. Before you run a family photo through one, check these points:
- Export size. Some apps return a smaller file than you uploaded. Confirm you can export at full resolution if you plan to print.
- Strength control. A slider, or a way to apply the effect to part of the photo, lets you keep faces natural.
- Before-and-after view. You need to compare against the original at full size, not just a thumbnail.
- Where the photo goes. Read whether images are processed on the phone or uploaded, and how long the service keeps them.
- Pricing model. Check whether full-resolution exports need a subscription or a one-off purchase.
- Your original. Keep the untouched scan, whatever the app does to its copy.
For light dust and fading, a good app may be all you need. For torn faces and missing areas, the same limits listed above apply.
How our production team checks this
- We review the scan at 100% before quoting, and ask for a rescan if it is too small or blurred for the print size requested.
- The original scan stays untouched; every repair goes on its own layer.
- We compare faces against the original scan, and against any reference photos the family sends, before delivery.
- AI filter results are checked area by area, and anything that changed a feature or texture is repaired by hand.
- A second person reviews the finished file at print size before it goes back to the client.
Damage across a face, or pieces missing?
Our editors repair tears, stains and fading by hand in Photoshop and rebuild missing areas, so the photo still looks like the person in it.
From $20 per image for light damage. We email the firm price after looking at your scan.
When should you hire a professional restorer?
Hire a restorer when the photo matters and the damage is beyond quick fixes. Doing it yourself makes sense for dust, small scratches and fading. These situations usually justify paying someone with experience:
- Damage runs across a face, eyes or hands.
- Large areas are missing, torn away or eaten by mold or water.
- The print is the only copy of an important family photo.
- You need a print-ready file for a large print, a memorial or an event.
- You want an accurate, natural colorization rather than an automatic one.
- You have many photos and limited time before a deadline, such as a holiday gift.
What to send a restorer: the highest-resolution scan you can make and a note on what matters most, such as “grandmother’s face.” Add any other photos of the same people for reference, and say how you will use the result: screen, 5 × 7 print or large canvas.
Our restoration prices on the service page are set by damage level, checked October 18, 2026:
| Level | Damage | Starting price |
|---|---|---|
| Basic | Light damage: dust, small scratches, faded contrast | From $20 per image |
| Advanced | Visible tears and stains | From $30 per image |
| Professional | Heavy damage, larger missing areas rebuilt | From $40 per image |
| High-End | Severe damage, major reconstruction or full colorizing | From $50 per image |
How do you colorize an old photo so it looks natural?
Colorize from evidence, not imagination, and keep the colors quieter than modern photos. An automatic colorizer gives you a starting layer; the realism comes from correcting it area by area.
- Restore first, colorize last. Adobe’s Colorize filter notes that faded or badly exposed photos produce less accurate colors, so finish tone and repairs before adding color.
- Collect references. Ask relatives what they remember: eye color, hair color, a favorite coat, the color of the family car. Write the answers down before you start.
- Work in separate color layers. Paint skin, hair, clothing, background and sky on their own layers set to the Color blend mode, so each can be adjusted later.
- Vary skin tones. Real skin is warmer on cheeks, ears and hands and cooler in shadows. A single flat skin color looks like a mask.
- Keep saturation low. Strong, uniform colors make an old photo look fake. Pull saturation back until the color supports the image instead of covering it.
- Leave unknowns neutral. If nobody knows the color of a dress, choose a plausible muted tone and tell the family it is an interpretation.
Always deliver the restored black-and-white version alongside the colorized one. Many families prefer to keep both.
How do you restore a photo for a holiday gift in time?
Plan backwards from the day you want to give it, just as you would for any order. Restored family photos make a meaningful gift, and the slowest step is usually finding and scanning the original, not the editing.
| Step | Allow | Notes |
|---|---|---|
| Find the original and ask permission from the family member who owns it | One to two weeks | Older relatives may need time to locate albums |
| Scan or photograph the print | One day | Follow the scanning steps above; keep the original safe |
| Restore (DIY or professional) | Days for DIY; 24 hours standard with us | Complex reconstruction or colorizing takes longer if you do it yourself |
| Review with family and make revisions | Two to three days | Faces need a second opinion from someone who knew the person |
| Print and frame | Check your print lab’s turnaround | Order prints early in December; labs can get busy |
| Ship | Check carrier holiday cutoffs | USPS publishes recommended holiday send-by dates each year |
If you are reading this in November, you have time to do it well. Leave the rush for the frame, not for the person’s face.
How do you keep the restored photo safe?
Save a layered master, export copies for use, and store them in more than one place. The Library of Congress recommends keeping at least two copies in locations as far apart as practical. It also advises moving files to current storage media about every five to seven years.
- Master: layered PSD or TIFF at full resolution.
- Print copy: a flattened high-quality file sized for the print.
- Share copy: a smaller JPEG for email and social media.
- The original print: store it flat in photo-safe enclosures, away from attics, basements and outside walls. The Library of Congress suggests 30 to 50% relative humidity and 70°F or below.
Frequently asked questions
Will restoration change how my relative looks?
It should not. A careful restorer repairs damage around a face without reshaping it. We compare faces against the original scan, and against any reference photos the family sends, before delivery. AI filters are the main risk, so their results are checked area by area.
Can a badly damaged photo be fully restored?
The look can usually be restored, but lost detail cannot be recovered. A restorer rebuilds missing areas from what remains, so results depend on how much reference survives.
Is it safe to clean an old photo before scanning?
Remove loose dust with a bulb blower. Avoid brushes, liquids and adhesives. If prints are stuck together or to glass, ask a conservator before trying to separate them.
Can I send a phone photo of the print instead of a scan?
For a quote, yes. Shoot square-on in soft, even daylight with no glare, and fill the frame with the print. For the restoration itself, a flatbed scan at 300 ppi or more keeps more detail, especially for small prints you want to enlarge.
Should I scan black-and-white photos in color?
Grayscale is fine for archiving, as the Library of Congress notes. For restoration, a color scan keeps the sepia tone and makes stains easier to separate. You can convert later.
How long does a professional restoration take?
It varies by restorer and by damage. With us, standard delivery is 24 hours after payment, rush starts at 6 hours and may cost extra, and timing for batches is confirmed after review.
Restore a family photo the right way
Upload a scan, point out what matters most in it, and receive a firm price by email.
From $20 per image for photo restoration.
- Exact quote by email before any work starts
- Prepayment by PayPal, Visa or Mastercard
- 24-hour standard delivery, rush from 6 hours (extra charge may apply), bulk timing confirmed after file review
- 2 free revisions and a 100% money-back guarantee
Sources
- FamilySearch Blog, Restoring Damaged Photographs, Part 1 (quoted): https://www.familysearch.org/en/blog/restoring-damaged-photographs-part-1 (checked October 18, 2026)
- Library of Congress, Care, Handling and Storage of Photographs: https://loc.gov/preservation/care/photo.html (checked October 18, 2026)
- Library of Congress, Personal Digital Archiving: Scanning (PDF): https://www.digitalpreservation.gov/personalarchiving/documents/PA_scanning.pdf (checked October 18, 2026)
- American Institute for Conservation, Find a conservator: https://www.culturalheritage.org/about-conservation/find-a-conservator (checked October 18, 2026)
- Adobe, Old photo restoration in Photoshop: https://www.adobe.com/products/photoshop/old-photo-restoration.html (checked October 18, 2026)
- Adobe Help, Neural Filters list and FAQ: https://helpx.adobe.com/photoshop/using/neural-filters-list-and-faq.html (checked October 18, 2026)
- Adobe Help, Spot healing to retouch imperfections: https://www.adobe.com/learn/photoshop/web/spot-healing-retouch-imperfections (checked October 18, 2026)
- Adobe Help, Filter effects reference (Dust & Scratches): https://helpx.adobe.com/photoshop/using/filter-effects-reference.html (checked October 18, 2026)
- Adobe, Photoshop plans and pricing (US): https://www.adobe.com/products/photoshop/plans.html (checked October 18, 2026)
- Printful Help Center, How should I prepare my print file (150 to 300 DPI guidance): https://help.printful.com/hc/en-us/articles/28491464259740-How-should-I-prepare-my-print-file-for-the-best-results (checked October 18, 2026)
- GIMP User Manual, Heal tool: https://docs.gimp.org/en/gimp-tool-heal.html (checked October 18, 2026)
Drafted with AI assistance and checked by our team against the sources listed above on October 18, 2026.