

As you have ended up here, we assume that photography is your passion. Now, if you want to take your photography skill to the next level -meaning to the “Pro-level” you need a copious understating of two crucial aspects of photography- the Rule of Third and the Golden Ratio. You must have heard of these two terms somewhere because they are frequently used in photography to make the composition better, sophisticated, and visibly pleasant. Also, the Rule of Third and the Golden Ratio is very popular to crop an image perfectly in photo editing.
So what are these rules? And how do they help you to capture an object brilliantly through your lens? All of the answers you are going to get from our discussion.
What is the rule of thirds?
First and foremost- the Rule of Third is a compositional rule or guideline of photography. It divides the photo into three equal parts horizontally and vertically. As a result, the images will have nine small pieces of equal length and width along with four gridlines. It mainly places your photography subject either on the left-third or on the right third which makes the composition a lot more interesting.
Also, it makes the photo look more balanced. So in a word, this technique will make the composition of the photo way better than you expected. The good news is nowadays all the latest digital cameras even smartphones have this feature in-built into the camera.
How does it work?
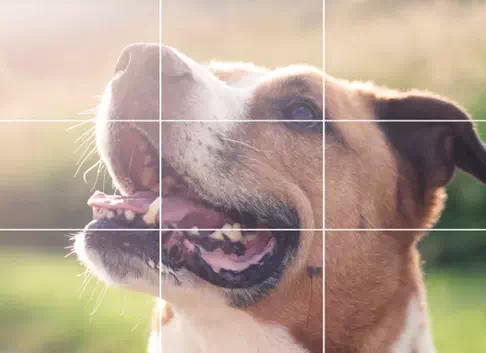
Here is the picture that may help you understand the feature better. As you can see the picture has been divided into nine equal sections with two horizontal and two vertical lines. Now when you see the lines, you can adjust your subject according to the lines. It will help you to make the photo balanced as you can clearly see what is going on.
The science behind it- is human eyes tend to look at the center and anything misplaced looks imbalanced and improper which eventually ruins the satisfaction of looking at a pleasant image. With the Rule of Third, you can avoid such problems and get professional-quality photos.
Where and how to apply this rule?
Well, the Rule of Third is pretty applicable for a large extent of subjects. From landscape photography to portrait, you can use it. For example, when you choose outdoor photography like wildlife or landscape or even the nearby street of your place, you can have plenty of subjects that attract your eyes.
To apply the rule in your beginner phase, shoot from a bit distance so that you can profoundly see and adjust your subject. Our advice is to start shooting subjects that are not going to vanish soon. For example- the mountain or a lake or anything like this.

For a picture like this, you see the water, mountain, and the sky all these elements are in a balanced position. Nothing is looking like slightly more or noticeably less. This is the advantage you get from gridlines or precisely from the rule of third.
For a picture like this, you see that the water, the mountain, and the sky all of these elements are in a balanced position. Nothing is looking like slightly more or noticeably less. This is the advantage you get from gridlines or precisely from the rule of third.
As you have already understood -the best part of this rule is it is super beginner-friendly. That means you, as a beginner can easily master the technique. It will make your photography stand out along with letting you understand the basic things of photography.
Not to forget, you can even apply the Rule of Third through editing. Photoshop, Luminar, and the Lightroom- each of them allows you to do so.
Some pro-tips:
- Firstly, rely on your eyes to check what is looking better. Of course, with the help of the gridlines.
- Choose a point of interest that you want to show specifically. Then adjust them along with the gridlines.
- If you mistakenly capture some unintentional objects, you can crop them out to make the rule of third work properly
- If you cannot immediately go outside to practice, you can take your previously taken photos for practice.
- Take help from editing software that will help you have a clear understanding of the technique.
What is the golden ratio?
When you are an already established photographer yet you want to take your skill to the next level, the golden ratio is the one technique you definitely need to master. It is tricky undoubtedly but let us encourage you- you will learn it quite easily. By the way, the golden ratio has many other terms that you may have heard here and there- the Fibonacci spiral, the Phi grid, the divine proportion, or the golden mean. Either way, it is a mathematical composition of photos that makes the photo naturally brilliant.
The Background:

Here we are going to give you a brief mathematics lesson that is utterly related to the golden ratio. First of all, the golden ratio has not come from the blue. It is found in nature, in the human body, and is frequently used by painters, designers, and even musicians. The golden ratio means a ratio of 1.618 to 1. From the Pyramids of Giza to the Vinci’s Mona Lisa and even in the famous logo of Pepsi or Twitter, it is everywhere.
The easiest way to understand is to look at your arm from the elbow to the tip of your fingers. You will find that your wrist has started from a point that is not the middle point. It is the proportion of the golden ratio.
The technique is based on the famous Fibonacci number invented by Leonardo Fibonacci. It is a sequence of numbers such as- 0,1, 1, 2, 3, 5,8, 13, 21, 34, and so on. Using this sequence, you will get a spiral known as the Golden Spiral that applies to different arts and music.
How does it work in Photography?
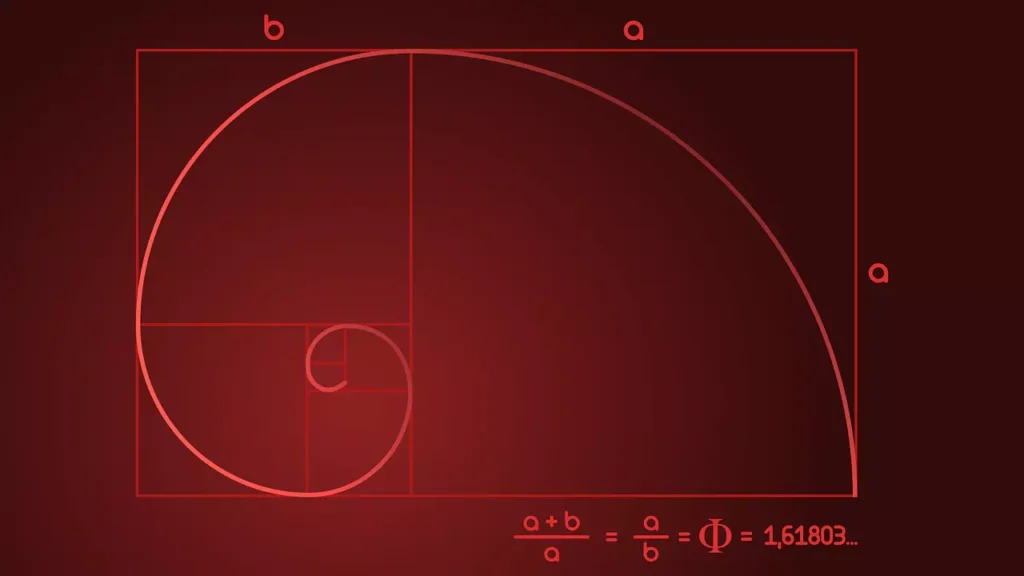
Imgae: Fibonacci spiral
In photography, the golden ratio helps you with the composition. The rule of third is in fact a simplified version of this technique. It gives your picture a balanced look that is way too brilliant and almost artistic with its precise ratio. Another advantage of it is that it makes the photo look live and natural. The reason is it is thoroughly connected with nature which is subconsciously common and familiar to human eyes.
Where and how to apply the rule:

As we have mentioned previously, the golden ratio is used to get a composition that looks natural, spontaneous, and eye-soothing. So, you can apply this rule to a large number of subjects. You can do it through the Fibonacci spiral or the phi-grid (the Rule of Third gridlines).
It is applicable for the landscape, wildlife, or even for capturing single subjects like a flower, or anything similar to that. The first thing you need to do is to find a natural curve line or leading line. Use the gridlines, if you have trouble.
The phi-grid works through the technique of the Rule of Third. You may already know how it works as we have discussed earlier. In the case of the golden ratio, you have to care for more naturalistic lines. That means the Rule of Third says you to keep a proper balance between the sky and the land. But in nature, there is not always this balance. So, in the golden ratio, you have to carefully handle that.
The golden spiral or the Fibonacci spiral is more applicable for things that have natural curves or gridlines. For example- the staircase or a flower or even a bird can be the subject for it. Sometimes you may find it in nature as well. Use your eyes to find them around you.
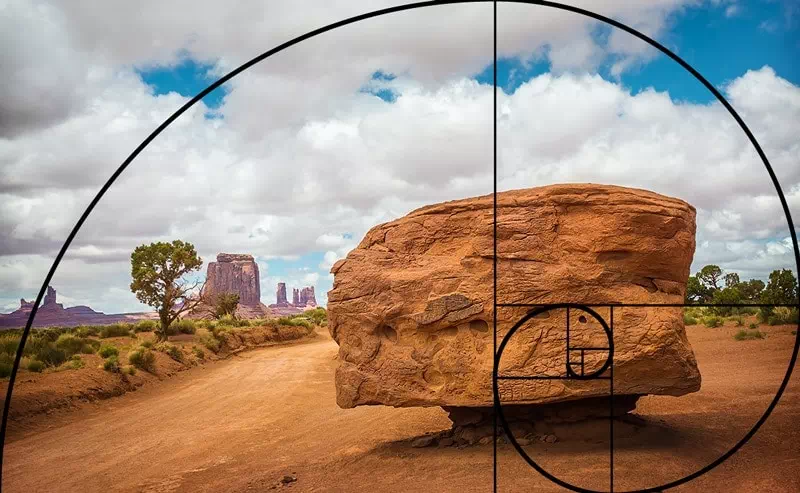
You can even apply the golden spiral to your images through post-production. Use either Photoshop or Lightroom to place the Spiral or the gridlines on your photos.
Tips:
- Try to understand the spiral line to find it much easier in the nature
- Start with simpler things or even DIY things for practicing
- Non-moving things are easily manageable
- Depend on the gridlines offered by the camera
- Put old photos into post-production to understand the technique better
To sum up, the golden ratio and the rule of third both help you get amazing photos that look professional and pleasing. While the Rule of Third is easy to understand and apply, the Golden Ratio takes time and effort. But that does not make it an impossible task. In fact, by mastering the Rule of Third, you are already one step forward to the Golden Ratio. So, have confidence and practice until you reach your goal.


