
Pretty sure being a photographer, photo editor, and vector artist, you have some questions desire to get answers about photography and vector faqs. So, here we have accumulated the questions and tried to answer from the professional view. Check out these if they can fulfill your desire.
Questions and Answers about Photography and Vector
We are going to present here a lot of Questions and Answers for the photography learners. By going through, you can learn a lot of new things. Hopefully, the formations will help you grow a successful business.
How much do photographers charge for product photography?

It depends on many factors as some of the photographers may charge per hour or product. Also, there are other things to consider such as prepping or styling them along with their weight, size, layout, set construction, photography post-production or photo editing, etc.
Different products require different preparation before getting photographed. Also, some products are reflective so they additionally cost you more. Another important thing is that professional photographers will certainly cost you a bit higher than others.
In a word, depending on your product type and preparation before shooting them, the cost is decided. On average, it will typically charge you $100-250 per hour. Note that photo retouching and editing services will be additionally charged which will increase the cost.
How much do product photographers charge?

Typically a photographer will charge you around $100 to $250 per hour and around $25 to $100 per image. But this cost is not always the same. It depends on many factors for instance some of the photographers may charge per hour or product.
Also, there are other things to consider such as prepping them or styling them along with their weight, size, layout, set construction, post-production, etc. Different products require different preparation before getting photographed.
Also, some products are reflective so they additionally cost you more. Another important thing is that professional photographers will certainly cost you a bit higher than others. In a word, depending on your product type and preparation before shooting them, the cost is decided.
How much does a product photographer make?

A product photographer or more specifically a well-established product photographer makes quite a handsome figure. In the USA the salary is around $39,975 per year or around $20.50 per hour. It varies depending on his experience level. If you are a beginner, your salary will start at $31,200 per year.
But an experienced photographer certainly makes a bit much which is around $57,550 per year. In California, it is around $43,875 per year and in Florida and Texas, you can make around $40,000 per year.
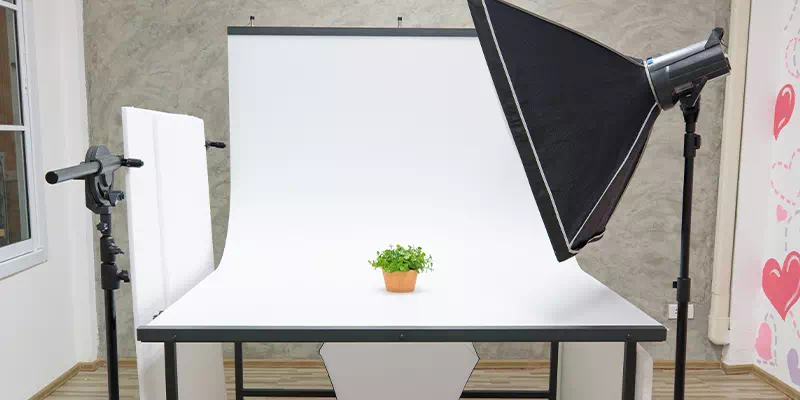
How to photograph products on a white background?
The white background is one of the most frequently used backgrounds for product photography because it creates less distraction and keeps the focus on the product. Also, it reduces your expense on photography as white background is not expensive at all.
To photograph a product on white background, you will need a plain white background that has no fold or spot. A white backdrop, white wall, or poster board will work great. If you don’t want to spend on it, pick up a white poster board. And for the wall, choose the one that has a smooth surface with no rough texture.
Anyway, for professional quality photos, use a lightbox which you can either buy or get DIY which will cost around $50. Then you need to choose your lighting whether you want to use natural light or artificial light. Then get your other equipment like a camera, tripod, and table ready. Now capture the product picture against the white background.
How to photograph products for the online store?

The photo of a product plays the most important role for an online store. After all, it is the first thing your customers will notice. That is why you need to focus more on the photography of the product. Firstly take a product with good packaging meaning no fold or flaw.
For clothes, iron them properly. For jewelry focus on the background, for mobile phones or cameras focus on its detailing. After that, choose a background that will complement the product. Make sure the background does not draw attention or make a distraction. For small products, you can use a lightbox.
You can either make it a product-only photo or an in-context photo. You can even use a model to show the product with versatility. Use a good-quality camera that will perfectly capture your product with its real color and texture. Lastly, don’t forget to do post-production for perfection.
How to photograph reflective products?
Getting a good quality photo of a watch or a sunglass or anything with gems or rhinestones or metals becomes extremely challenging due to their reflective nature. But there are some tricks that you can follow to avoid reflection and get your desired image.
For watch and sunglass keep an umbrella left of the product. Then take two foam boards behind your product like a V-shape. Make sure it is on the opposite side of the umbrella. Adjust the white balance of your camera and keep the ISO low. For metal objects like a knife or other kitchen utensils, put two studio lights on each side of the product.
Diffuse the light with a big size umbrella. Also, keep a white background long enough to pass beneath the product and get attached to the lens to avoid any kind of reflection. Take the photo from a slightly low position to get it right.
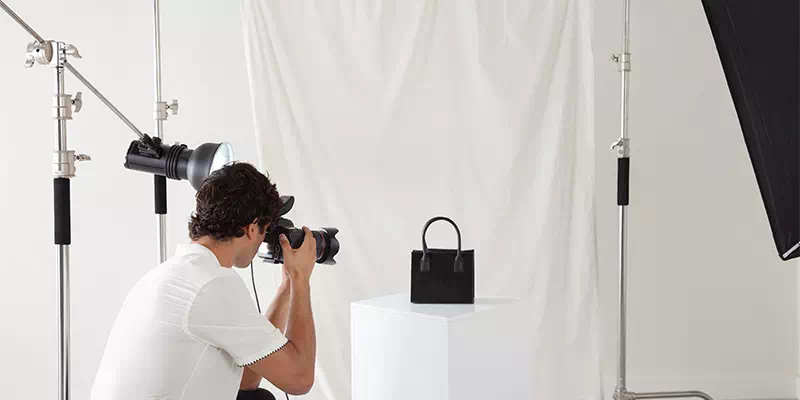
How to photograph products?
Product photography requires more attention as it is the only way to reach your product to the customer before selling it. That is why you need to focus more on the photography of the product. Different products depending on their color, size, texture, reflective nature requires a different type of camera setting, set the setting, and post-production.
To get a good quality photo, you must take a flawless product at first. For example in the case of clothes, iron them properly. For jewelry focus on the background, for mobile phones or cameras focus on its detailing. After that, choose a background that will complement the product. Make sure the background does not draw attention or make a distraction.
For small products, you can use a lightbox. You can either make it a product-only photo or an in-context photo. You can even use a model to show the product with versatility. Use a good-quality camera that will perfectly capture your product with its real color and texture. Lastly, don’t forget to do post-production for more perfection.
How to photograph stationery products?

Stationery products or flat lays are a bit tricky to shoot. First of all, you need to style them with other props to make them versatile and attention-grabbing. Also, consider having a great white or transparent backdrop or styling board. The best option is to use the floor which will not require getting a ladder to go high enough to capture them.
Do not stock up all your items in a straight line which looks boring and uninteresting. Instead have some angles and keep enough space between items so that it does not look cluttered or messy. For papers or cards, you can experiment with layering as well. for items like scissors, pens, pencils, rulers, tapes and other things like them the set design will be the same and layering will also work great here.
How to photograph white background products?
White background makes your product pop up more and keeps the focus right. Shooting with white background is not that challenging it is simple and quite easy. For shooting products with white background, you can use natural daylight which will help you to bring its texture and color correctly.
Instead, you can rely on artificial lights according to the product type. For the camera setting, keep the white balance automatic if you do not want to mess it up. Never use a wide-angle lens to shoot the product while capturing it solo and if you want to avoid distraction. Maintain moderate distance from the product and keep it angular for a better look.
Do you tip photographers?
The simple answer is – of course! Why not? If you truly like his work and are 100% satisfied with the service, you can think of tipping them along with their actual charge. It can be 20% or 25% according to your preference. As it is an additional charge, there is no fixed rule. It is more like a token of appreciation that will encourage them more. For a wedding or birthday party, though it is not expected to tip them, really shows a nice gesture if you do so.
How to design a cleaning business logo?
To design a cleaning business logo you can either go some types such as wordmark, lettermark, emblem, or combination logos. As it is related to cleaning, you can use symbols like water, waterdrop, broomstick, etc. To have a fresh and clean look in the logo, choose colors like blue, aquamarine, light sky blue, white.
They will enhance the beauty of your logo. Keep the font a bit straightforward so that it is easy to connect and does not look messy. You can use different sizes in the font to emphasize the company name. It will help in engaging the clients with the logo.
How to vectorize an image in illustrator?
To vectorize a raster image in illustrator, firstly, you need to choose the photo in the format as JPF, JIF, or PNG. A large file will take a long time to get vectorized. Also, a single subject will work better than a landscape. One more thing- choose an image with a bit less resolution.
Now it is to the illustrator. It has a feature called Image Trace which is filled with preset settings that work automatically. Here you can either go for a high fidelity photo or a low fidelity photo. You will get all these options once you click Image Trace.
Then your image will go through some automatic processes which will bring several changes into your image. The changes are very slight though, they can only be identified when you zoom in on them. Open the Image trace panel from the Window menu.
Now select mode to change its color, grayscale, or black and white adjustment. In the next step, go to the Expand option to see the composite shapes. You will find them in blue color. Right-click on the image and select Ungroup to separate the colors into individual parts. Now edit the image and save it.
How to vectorize an image in Photoshop?
First of all, select the image that you want to vectorize. Press Ctrl + Alt + l and select its resolution to 300. Now separate the image from its background and copy it on a new layer. After separating it from the background, click on the layer icon on the layer panel holding down the control key.
Thus you will get a selection of the image. Select the Marquee tool, move the cursor over the selection and rick click the mouse. Now click on Make Work Path from the menu. Then press A and right-click on the image again. Select Vector mask which will create a mask over the layer. Now save your vectorized image.
How to vectorize an image in Inkscape?
Firstly open your PNG image in Inkscape. Now go to path and select Trace Bitmap. Then, you will find the Multiple Scan button, select colors from the menu which will maintain the color of the vector image. Increase the number accordingly to cover all the colors. Now click OK in the Trace Bitmap and Inkscape will start to vectorize your image. After getting your vector image, click on Edit Path. Then click on the image and you will find some dots which will help in adjusting the shape of the new vector. So now you have your vectorized image using Inkscape.
How to vectorize an image illustrator 2020?
To vectorize an image in illustrator 2020, choose the photo in the format as JPF, JIF, or PNG. It has a feature called Image Trace which is filled with preset settings that work automatically. Here you can either go for a high fidelity photo or a low fidelity photo. You will get all these options once you click Image Trace.
Then your image will go through some automatic processes which will bring several changes into your image. The changes are very slight though, they can only be identified when you zoom in on them. Open the Image tracing panel from the Window menu.
Now select mode to change its color, grayscale, or black and white adjustment. In the next step, go to the Expand option to see the composite shapes. You will find them in blue color. Right-click on the image and select Ungroup to separate the colors into individual parts. Now edit the image and save it.
How to convert an image to a vector in illustrator?
To convert an image to a vector in Illustrator you need to choose the photo in the format as JPF, JIF, or PNG. Then you will find it has a feature called Image Trace filled with preset settings that work automatically. Here you can either go for a high fidelity photo or a low fidelity photo.
You will get all these options once you click Image Trace. Then your image will go through some automatic processes which will bring several changes into your image. The changes are very slight though, they can only be identified when you zoom in on them. Open the Image trace panel from the Window menu.
Now select mode to change its color, grayscale, or black and white adjustment. In the next step, go to the Expand option to see the composite shapes. You will find them in blue color. Right-click on the image and select Ungroup to separate the colors into individual parts. Now edit the image and save it.
What are the best programs to vectorize an image?
There are several programs that you can use to vectorize an image. The best among them are Illustrator, CorelDRAW, Sketch, A tiny Designer, Adobe Illustrator Draw, Inkscape, Adobe Capture, Designevo, Lunacy, and DrawPad. Adobe Illustrator definitely triumphs over all of the other programs for its capacity to vectorize an image into high quality.
You can use Adobe Capture on your phone which is its best feature. CorelDRAW, Sketch, A tiny Designer along with other mentioned programs also work great for vectorizing an image. If you want some more options- you can try Vecteezy Editor, Gravit Designer, Snappa, Artboard, Vector Magic, Amadine, Vector stock, etc.
With the build-in feature Live Trace, you can vectorize any image. It is an automatic process and not even lengthy. All you need to do is to select the image and open it in CS3. Click on the Live Trace in the toolbar. Then click on the Object menu and select the Live Trace folder.
Now click on Make which will start converting your image into a vector using the Live Trace feature. You will see vector lines over the original image in the final result. This is how you will get a vector from a raster image using Photoshop CS3
How to make an image vector in Photoshop?

To make an image vector in photoshop, firstly press ctrl+Alt+l and select its resolution to 300. Now separate the image from its background and copy it on a new layer. After separating it from the background, click on the layer icon on the layer panel holding down the control key.
Thus you will get a selection of the image. Select the Marquee tool, move the cursor over the selection and rick click the mouse. Now click on Make Work Path from the menu. Then press A and right-click on the image again. Select Vector mask which will create a mask over the layer. Now save the image vector.
How to save an image as a vector in photoshop?
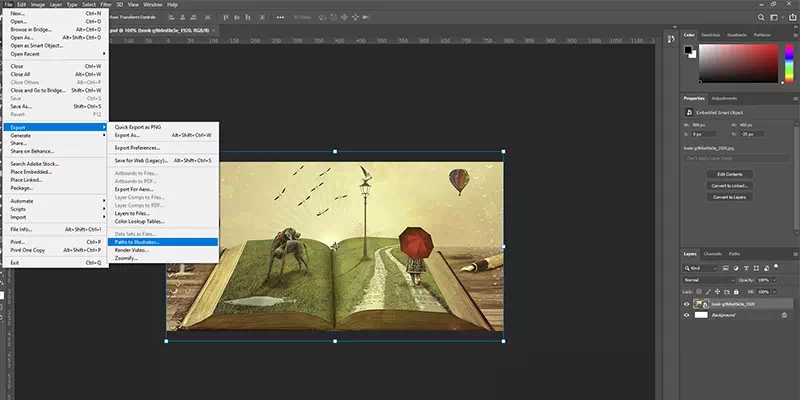
To save an image as a vector in photoshop, in the first step get done with the conversion. Then click on ‘File’ and select ‘Export’. From there choose “Paths to Illustrator”. Now name your file with the extension .ai. It will export the file Abode’s standard file format. Now to save the original file, click “File” and select “save”.
How to tell if an image is a vector?
If an image is a vector, it will be free of any pixelation. Also, it will not look distorted when you zoom in on it. It is essential to know that raster images are made with pixels but a vector image is made with mathematical formulas. So no matter how much you stretch it, the quality will be the same. It will not lose its resolution.
Also, you can recognize it through the file type. .ai, .eps, .svg, etc are used to mark the file. So, in a word, you can tell an image a vector if it can be scaled up or down without losing its quality. Besides, it is smaller in size compared to a raster image and completely editable.
How to turn an image into a vector in photoshop?
To turn an image into a vector, select the image first. Press ctrl+Alt+l and select its resolution to 300. Now separate the image from its background and copy it on a new layer. After separating it from the background, click on the layer icon on the layer panel holding down the control key. Thus you will get a selection of the image.
Select the Marquee tool, move the cursor over the selection and rick click the mouse. Now click on Make Work Path from the menu. Then press A and right-click on the image again. Select Vector mask which will create a mask over the layer. Here you have the vector from an image.
How to vectorize an image in adobe illustrator?
To vectorize an image in Adobe Illustrator, first choose the photo in the format as JPF, JIF, or PNG. Then you will find it has a feature called Image Trace filled with preset settings that work automatically. Here you can either go for a high fidelity photo or a low fidelity photo. You will get all these options once you click Image Trace. Then your image will go through some automatic processes which will bring several changes into your image.
The changes are very slight though, they can only be identified when you zoom in on them. Open the Image trace panel from the Window menu. Now select mode to change its color, grayscale, or black and white adjustment. In the next step, go to the Expand option to see the composite shapes. You will find them in blue color. Right-click on the image and select Ungroup to separate the colors into individual parts. Now edit the image and save it.
How to vectorize an image in InDesign?
Indesign is not an option for vectorizing an image. You can use their built-in option to make a vector image. But if you want to convert a raster image into a vector, that is not possible through InDesign. You can either use Adobe Illustrator or Adobe Photoshop for conversion.
How to make an image a vector in illustrator?
To make an image a vector Illustrator, first of all, choose the photo in the format as JPF, JIF, or PNG. Then you will find it has a feature called Image Trace filled with preset settings that work automatically. Here you can either go for a high fidelity photo or a low fidelity photo. You will get all these options once you click Image Trace. Then your image will go through some automatic processes which will bring several changes into your image.
The changes are very slight though, they can only be identified when you zoom in on them. Open the Image trace panel from the Window menu. Now select mode to change its color, grayscale, or black and white adjustment. In the next step, go to the Expand option to see the composite shapes. You will find them in blue color. Right-click on the image and select Ungroup to separate the colors into individual parts. Now edit the image and save it.
However, we read the end of our list of photography and vector faqs. We have that the answers that we shared here will help you to know more. All the answers are from professionals.


