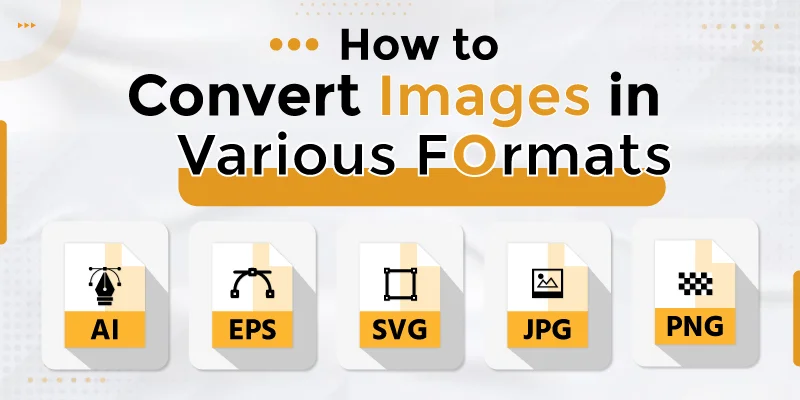
Pictures aren’t all the same. Some are like JPEG, some like PNG and there are others too. Each type has its own style and job. Like JPEG is great for photos, PNG is awesome if you want a clear background, and GIF is like a mini-movie. Understanding these picture types is crucial when you want to convert images. Because each format has its purpose and way of looking.
Converting pictures is like making sure our photos work well everywhere on the computer. When we share pictures on the internet, some places like them small, while others like them big. Changing them helps us make the pictures the right size, so they look good and load quickly on websites or when we send them to friends.
Here you can get knowledge of How to Convert Images in Various Formats . If you really want to get the idea of converting images, go through the content. It can guide you.
Understanding Different Image Formats
Pictures come in different types. Each type has its own way of looking and doing things. Here we have discussed some popular image formats.
- JPEG (Joint Photographic Experts Group): JPEG loves colorful photos. It makes them small for easy sharing but loses a bit of quality. Perfect for family pics and landscapes.
- PNG (Portable Network Graphics): PNG is a magic trick for pictures. It keeps them clear and can make the background disappear. Great for logos and pictures that need to stand alone.
- SVG (Scalable Vector Graphics): SVG is like an artist that can make pictures any size without getting blurry. It’s good for logos and icons, making them look nice both on big and small screens.
- GIF (Graphics Interchange Format): GIFs are like short, fun videos that repeat. They’re good for funny moments or adding life to a webpage.
- TIFF (Tagged Image File Format): TIFF is a pro at keeping all the details in a picture. It’s used for serious photography and printing where every bit of quality matters.
- BMP (Bitmap): BMP keeps things simple. It’s like having a basic version of a picture without much fancy stuff. Good for simple images where you want things plain and straightforward.
How to Convert Images in Various Formats
Converting images is like magic for your pictures. It helps you make them look different and cool. Let’s learn how to convert images with some easy ways:
Convert Images with Desktop Software?
Desktop software for changing pictures is like magic. It helps you make your photos look different. Some popular desktop tools for this are Adobe Photoshop, GIMP, and IrfanView. These cool tools enable you do PNG conversion (for clear backgrounds), file conversion (to switch things up), and JPEG conversion (for easy sharing). Let’s check out how it’s done using Adobe Photoshop as an example.
Steps Using Adobe Photoshop:
Step 1. Opening an Image in Adobe Photoshop:
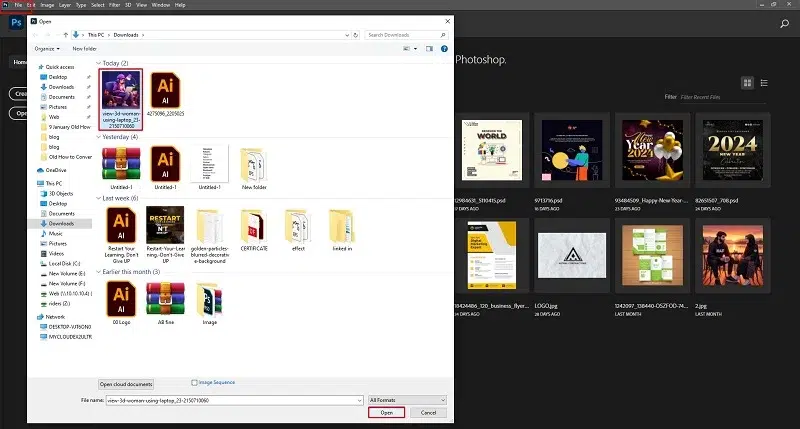
- Launch Adobe Photoshop on your computer.
- Click on “File” in the top menu and select “Open.”
- Find your image and click “Open” – it’s like unlocking the door to your picture.
Step 2. Selecting the Export or Save As Option:
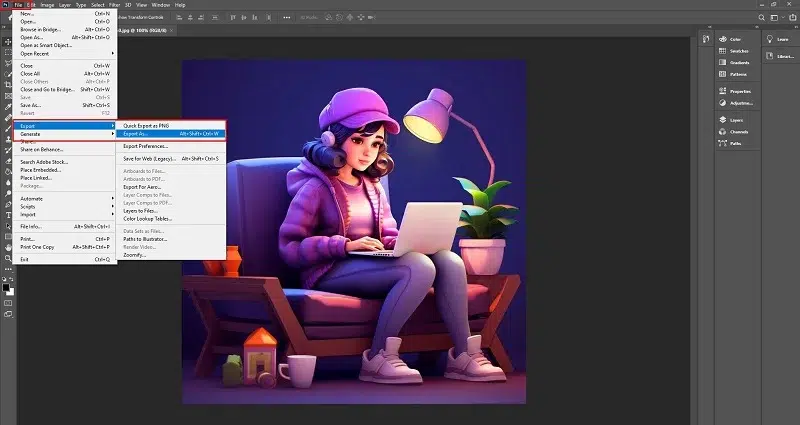
- In Photoshop, go to “File” again.
- This time, choose “Export” or “Save As” to let Photoshop know you’re creating a new version of your image.
Step 3. Choosing the Desired Output Format:
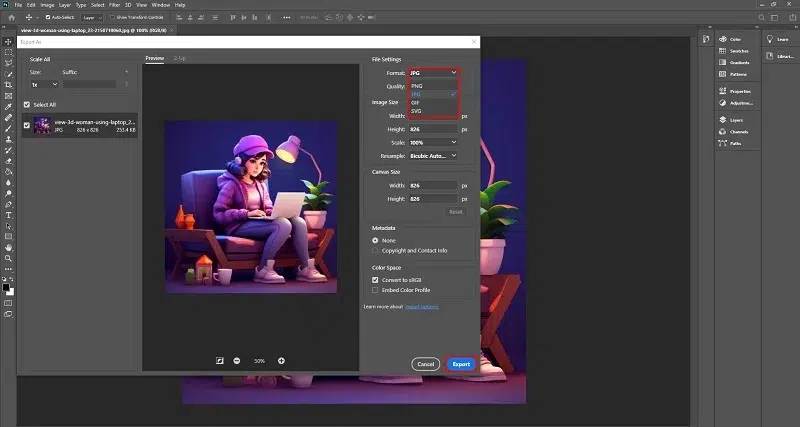
- A window appears – this is where you choose your image’s new ‘costume.’
- Select the format you want, such as JPEG or PNG, based on where you’ll use your picture.
Step 4. Adjusting Compression and Quality Settings:
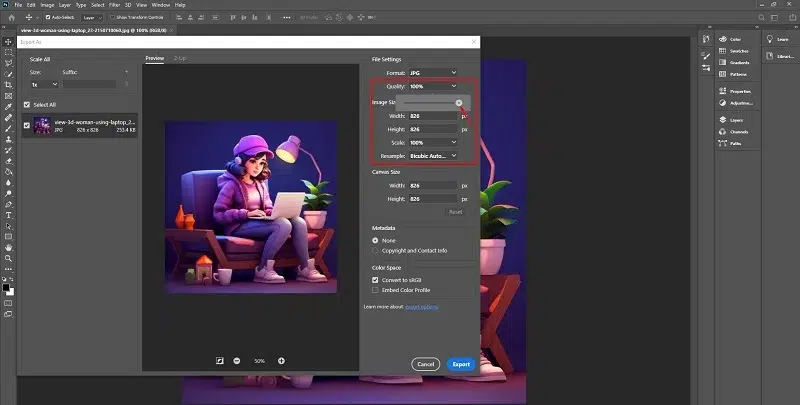
- Some formats let you fine-tune your picture’s appearance.
- If you see options like compression or quality, tweak them until your picture looks perfect – it’s like adjusting the superhero’s cape.
Step 5. Saving the Converted Image:
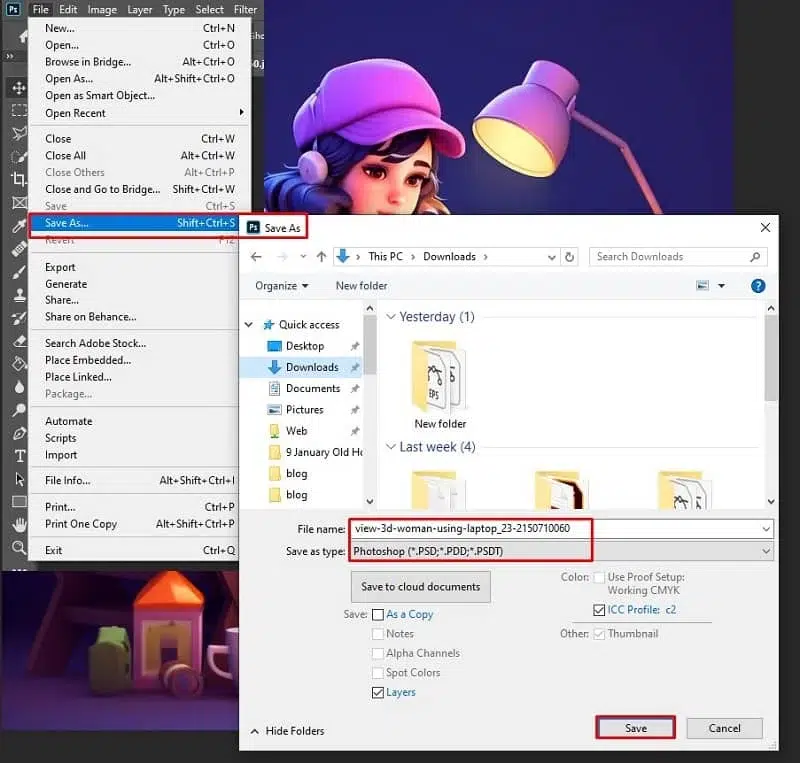
- After making all your choices, find the “Save” button.
- Click it, and Adobe Photoshop works its magic, turning your image into the chosen format.
- Your converted image is saved – it’s like your superhero putting on a new costume.
Convert Images in Online?
Online is a great image converter source. Online conversion is like having a helpful friend on the internet who can change your pictures into different styles. It’s quick and easy – just like sending a message. Some popular online conversion tools include Convertio, Online Convert, and Small PDF. Let’s see how it works using Online Convert as an example.
Steps Using Online Convert:
Step 1. Choosing the Right Online Tool:
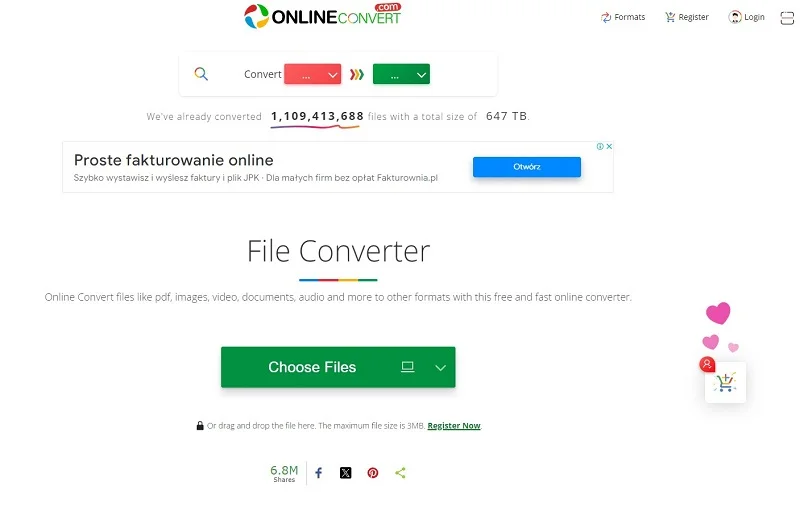
- Navigate to the Online Convert website – it’s like entering a virtual workshop.
- Confirm that Online Convert supports the format you desire for your pictures.
Step 2. Uploading and Selecting Input Images:
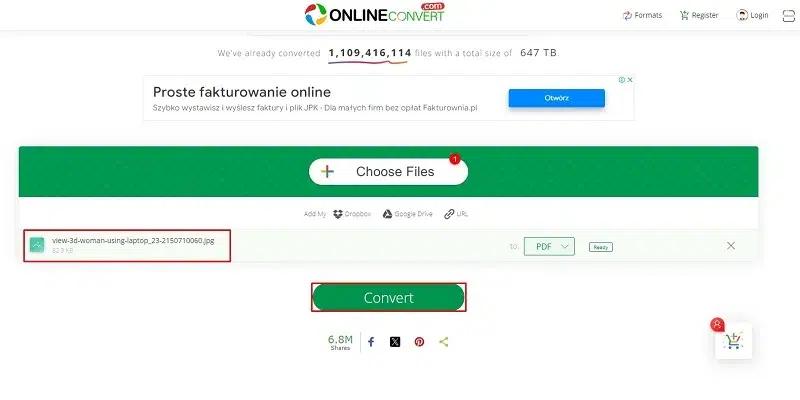
- Look for a button that says “Upload” or “Choose File.”
- Click it, and a window will appear – pick the images you want to convert and click “Open.” This is like handing your pictures to the online tool.
Step 3. Choosing the Output Format and Settings:
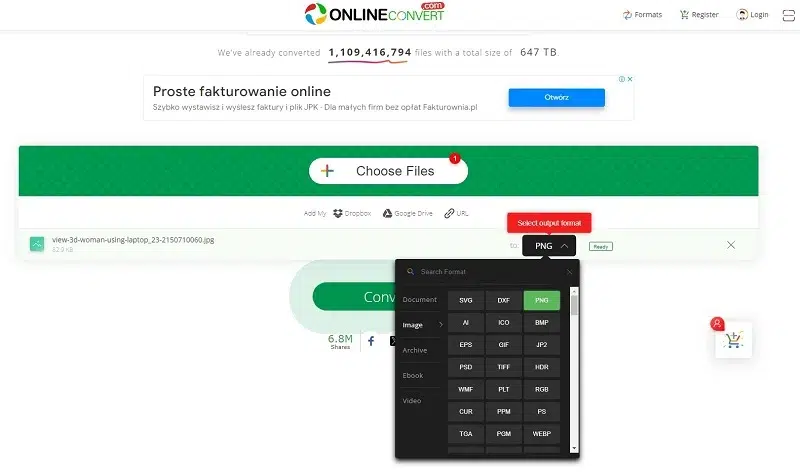
- On Online Convert, you’ll find options to pick the new style for your pictures.
- Choose the format you prefer, such as JPEG or PNG. Adjust any settings if needed – it’s like customizing your picture’s new look.
Step 4. Executing the Conversion:
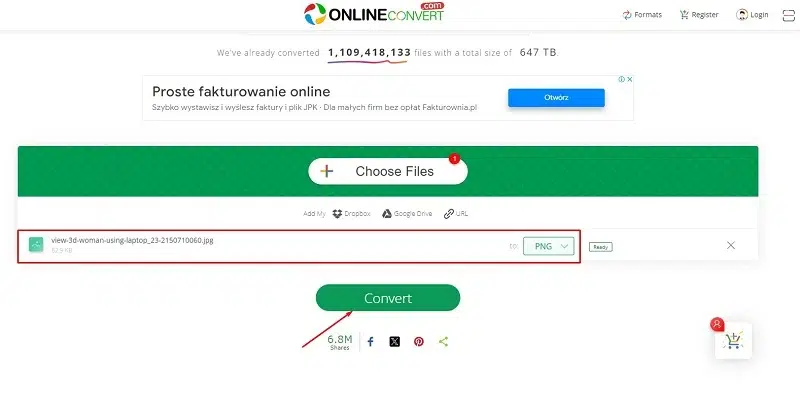
- After setting everything up, locate a button that says “Convert.”
- Click it, and Online Convert starts the conversion process – transforming your pictures into the chosen style. It’s like watching the tool perform its digital magic trick.
Step 5. Downloading the Converted Images:
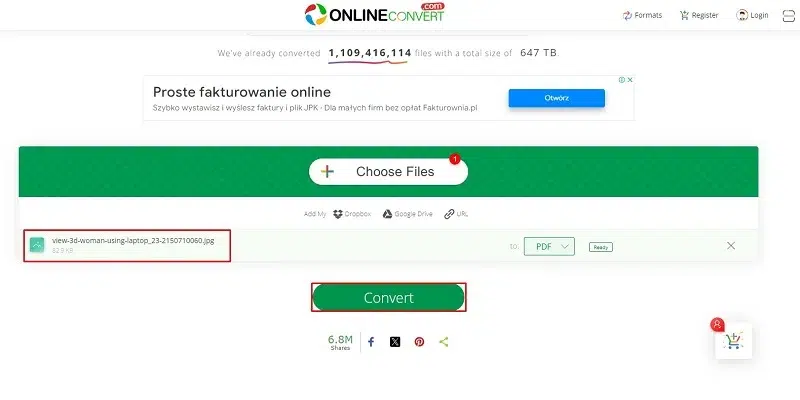
- Once the conversion is complete, you’ll see a button to download your transformed pictures.
- Click it, and the converted images are saved to your device. It’s like receiving a digital gift – your pictures now in a fresh style, ready to be used!
Convert Images in Windows?
Windows, the operating system for many computers, provides users with diverse options for image conversion. It’s like having a toolbox full of tools to transform your pictures. One popular Windows conversion process, especially for web optimization, involves using Paint. This simple yet effective application allows you to easily change the format of your images, ensuring they are optimized for the web.
Steps Using Paint on Windows:
Step 1. Find Your Image:
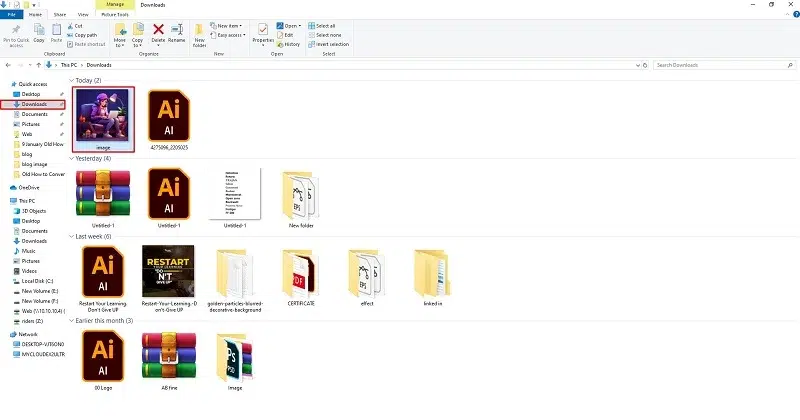
Locate the picture you want to convert. It could be on your desktop or in a folder – wherever you’ve saved it.
Step 2. Open with Paint:
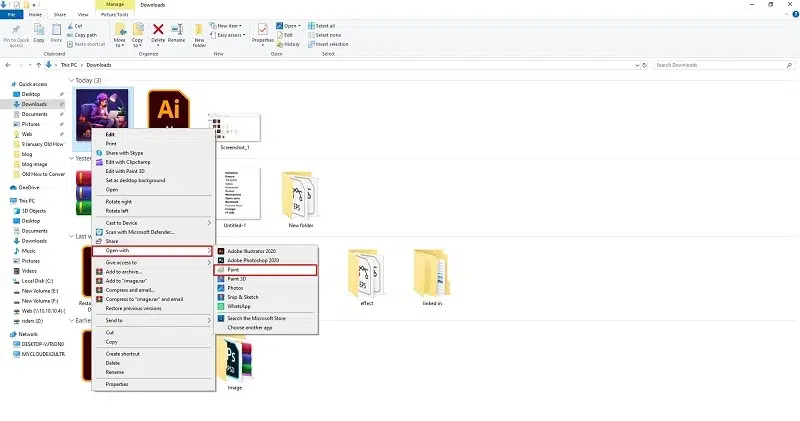
Click right on your picture, move over “Open with,” and pick “Paint.” It’s like opening the door to your picture.
Step 3. Access Save As Option:
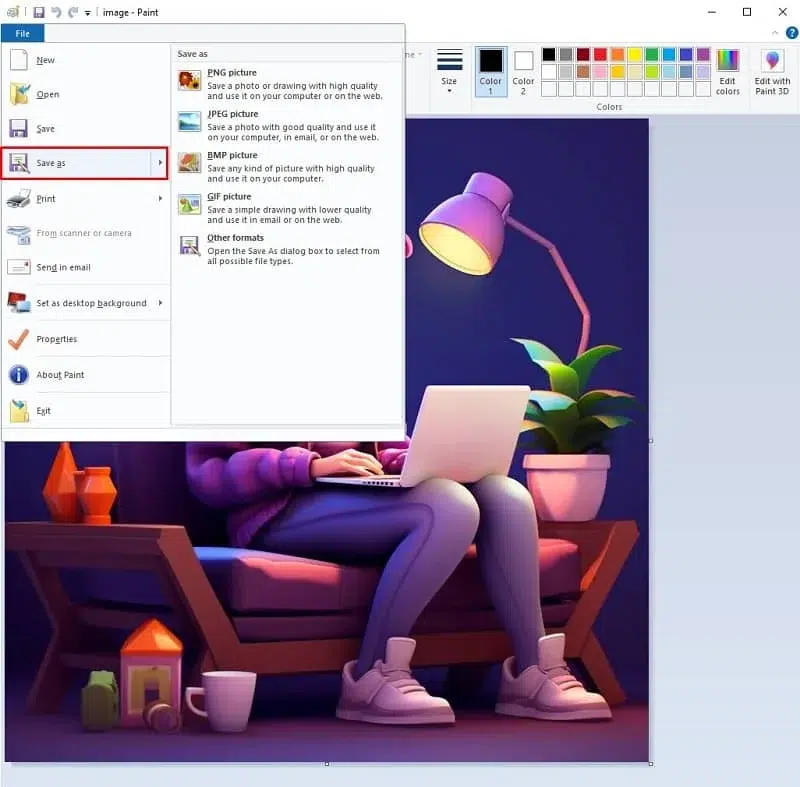
In Paint, click on the “File” menu at the top. Choose “Save As” – this is where the conversion journey begins.
Step 4. Choose a New Format:
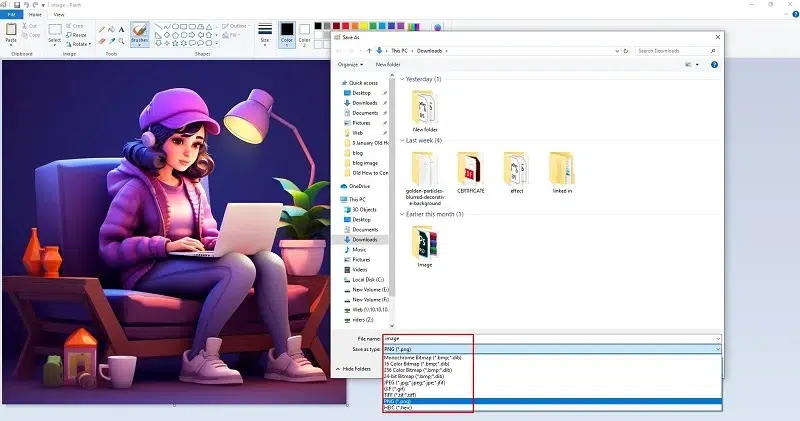
A window shows up. Choose a new style for your picture, like JPEG or PNG. It’s like picking a fresh look for your image.
Step 5. Save Your Transformed Image:
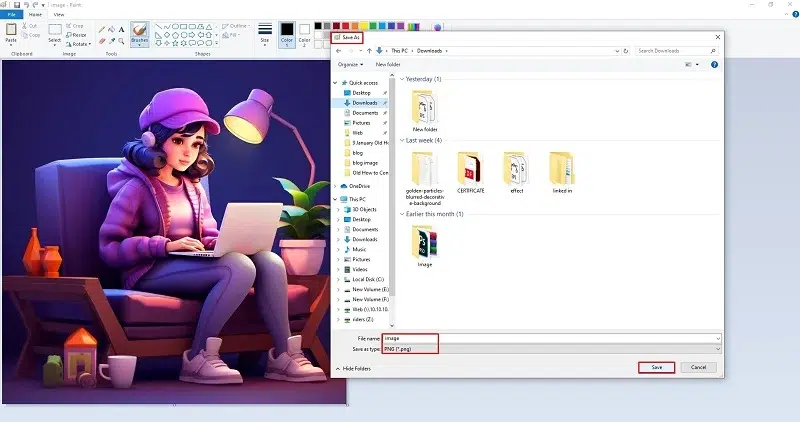
Once you’ve made your selection, click “Save.” Paint works its magic, and your image is now in a new format. It’s like giving your picture a fresh look.
Convert Images in MacOS?
MacOS is like the boss of Apple computers. It helps your computer do cool things. Inside, it has tools to change how your pictures look. It’s a bit like having a helpful friend right there with you. Among the popular MacOS image conversion processes Preview is a versatile application that lets you transform your images effortlessly.
Steps Using Preview on MacOS:
Step 1. Locate Your Image:
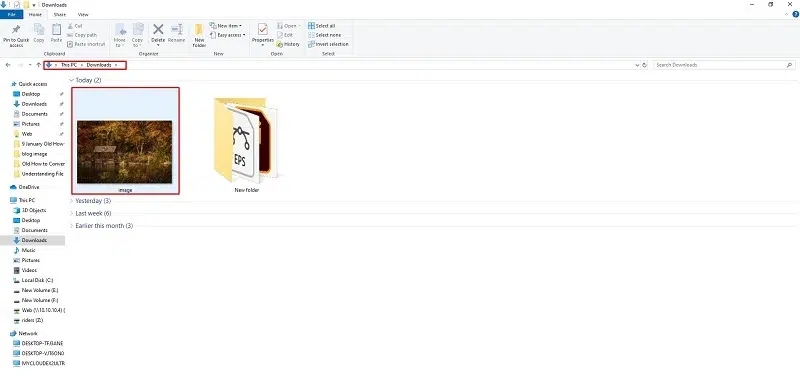
Find the picture you want to change. It could be on your desktop or in a folder – wherever you’ve stored it.
Step 2. Open with Preview:
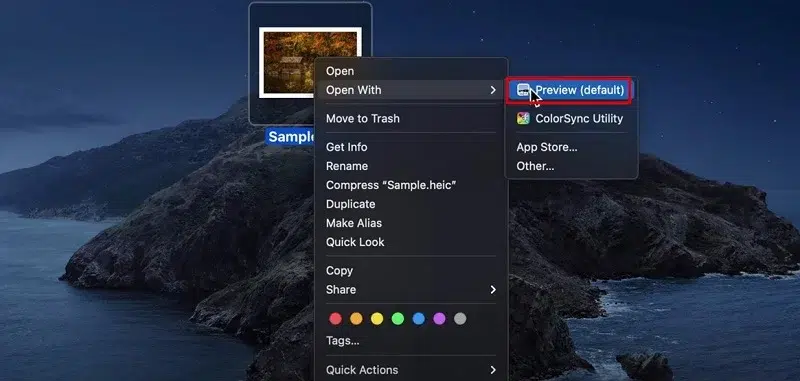
Click right on your picture, go to “Open With,” and pick “Preview.” It’s like telling your computer, “Let’s fix up this picture together.”
Step 3. Access Export Options:
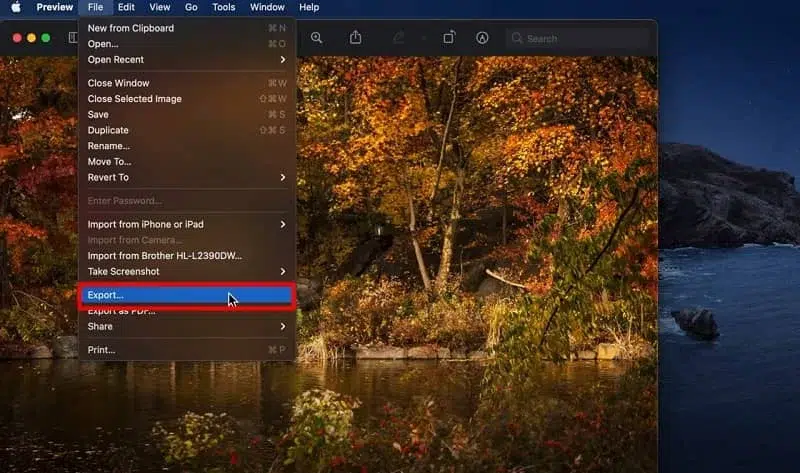
Inside Preview, click on “File” at the top. Select “Export” – this is where the magic starts.
Step 4. Choose a New Format:
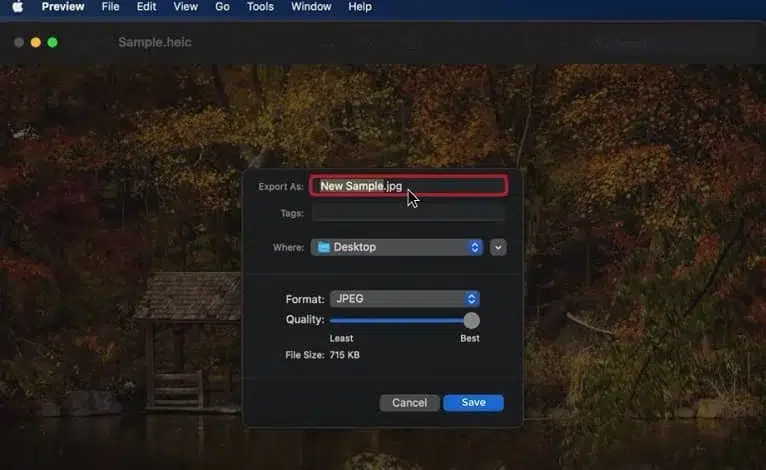
A window appears. Choose a new format for your image, such as JPEG or PNG. It’s like picking a fresh style for your picture.
Step 5. Save Your Transformed Image:
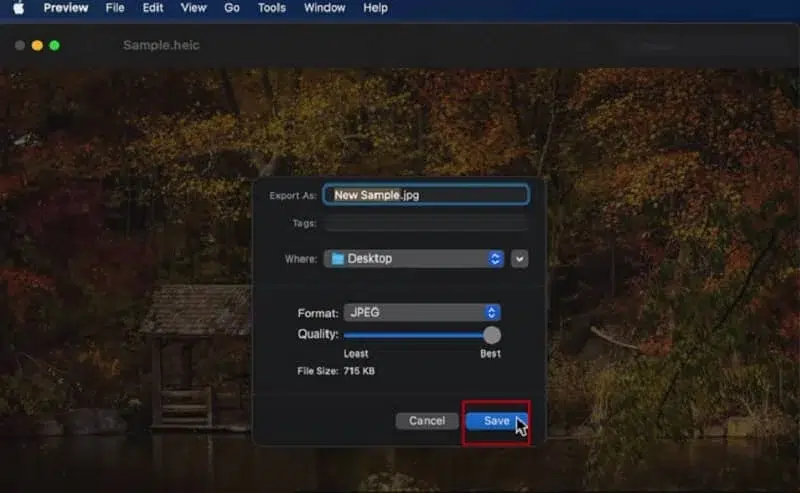
Once you’ve made your choice, hit “Save.” Preview works its magic, and your image is now in a new format. It’s like giving your picture a makeover.
Common Issues in Image Conversion
Converting images can sometimes run into hiccups, but fret not. Here are solutions to common issues you might encounter:
Image Quality Loss
Problem: After conversion, your image looks blurry or pixelated.
Solution: When saving, ensure you choose a high-quality setting (low compression) to maintain image clarity. Experiment with different settings to find the balance between file size and quality.
Incorrect Color Representation
Problem: Colors in the converted image don’t match the original.
Solution: Ensure you’re choosing a format that supports the color depth of your original image. Formats like JPEG might compress colors, impacting accuracy. Consider using lossless formats like PNG for better color preservation.
File Size Too Large
Problem: The converted image has an unexpectedly large file size.
Solution: Adjust compression settings when saving. For formats like JPEG, lowering the quality or increasing compression can significantly reduce file size. Be mindful of the balance between size and quality.
Unsupported Format
Problem: The application or platform doesn’t support the format you’ve chosen.
Solution: Check the requirements of the platform where you intend to use the image. Stick to widely supported formats like JPEG and PNG for general purposes. Consider converting to specific formats if needed for a particular platform.
Suggested Article-Vector File Formats
Software Compatibility Issues
Problem: Your image editing software or converter isn’t handling the conversion properly.
Solution: Update your software to the latest version. If the problem persists, try using alternative conversion tools or online platforms. Some tools might have limitations with certain formats or functionalities.
Transparency Issues
Problem: Images with transparent backgrounds lose transparency after conversion.
Solution: Ensure you are using a format that supports transparency, such as PNG. Check the settings during conversion to preserve alpha channels or transparency layers.
Slow Processing
Problem: Converting images takes too long.
Solution: Optimize your original images before conversion. Reduce the resolution or dimensions if applicable. Consider using more efficient conversion tools or platforms.
Conclusion
We’ve covered crucial tips for image conversion. Choose the right format for your picture, like JPEG for photos, PNG for transparency, GIF for simple animations. Think about image quality – how good it looks – and also how big the file is. Check what the platform where you’ll use the picture likes. Keep things clear if you’re doing lots of pictures together. And don’t forget to update your tools so they work well. Try different methods to Convert Images in different formats. The more you play around, the better you’ll get at making your pictures just right!
FAQs
Q1: What does it mean to convert images?
A: Changing images means making them look different. It’s like giving them a new outfit or style.
Q2: Why would I need to convert images?
A: Different places on the internet or projects like different picture styles. Converting helps make your pictures look good everywhere.
Q3: Which image format is the best for general use?
A: JPEG is great for everyday pictures. It looks good and doesn’t take up too much space.
Q4: How can I convert images online?
A: Online tools like OnlineConvert or Zamzar make it easy. You just upload your picture, pick the style you want, and it changes it for you.
Q5: Does converting images affect their quality?
A: Yeah, a bit. When you change images, especially to smaller sizes, they might not look as good.


